Products
A Product is a single item or service your business sells. Products can be physical or digital items, and you can sell one Product using Product Links or multiple products at a time using Products on Payment Pages or Storefront.
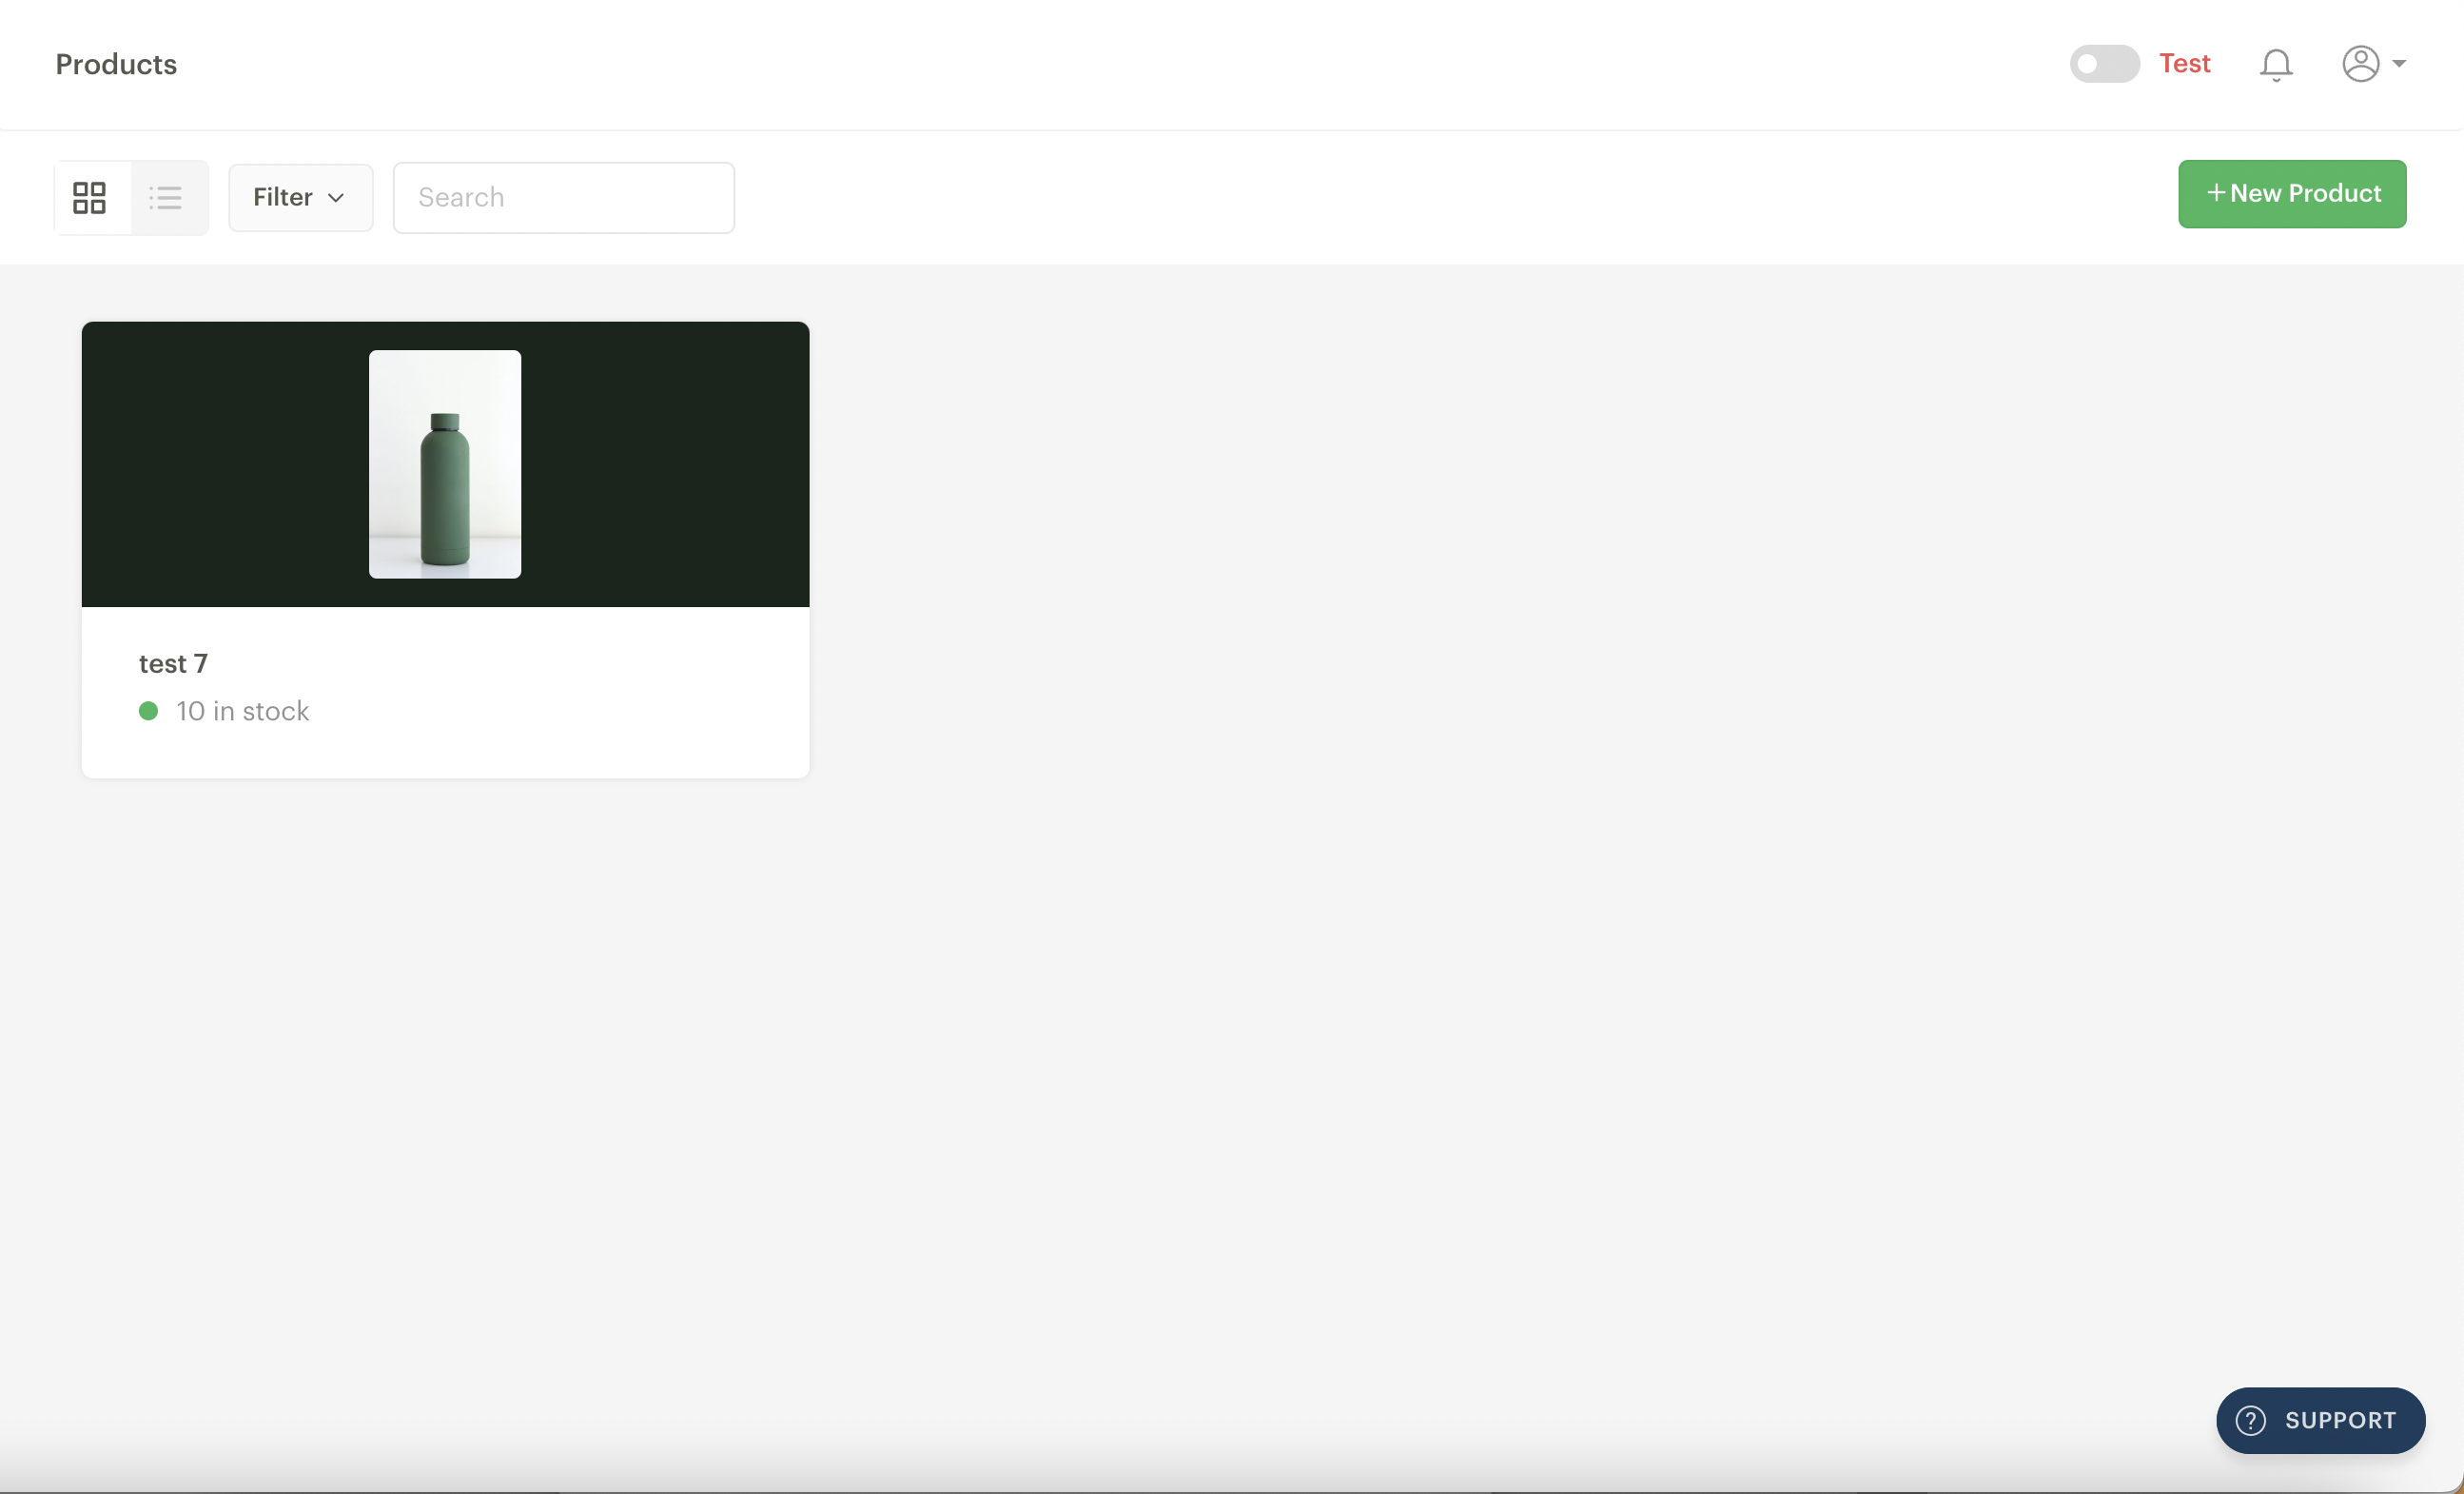
On the Products Page of your Dashboard, you can see a list of all the Products you wish to sell from your Paystack Dashboard. You can get here by clicking Products on the left sidebar of your dashboard.
You can choose a grid or list view for your Products, filter your Products by status, quantity, stock levels and creation date, search for a Product and add a new Product using the button at the top-left corner of the page.
Creating a Product
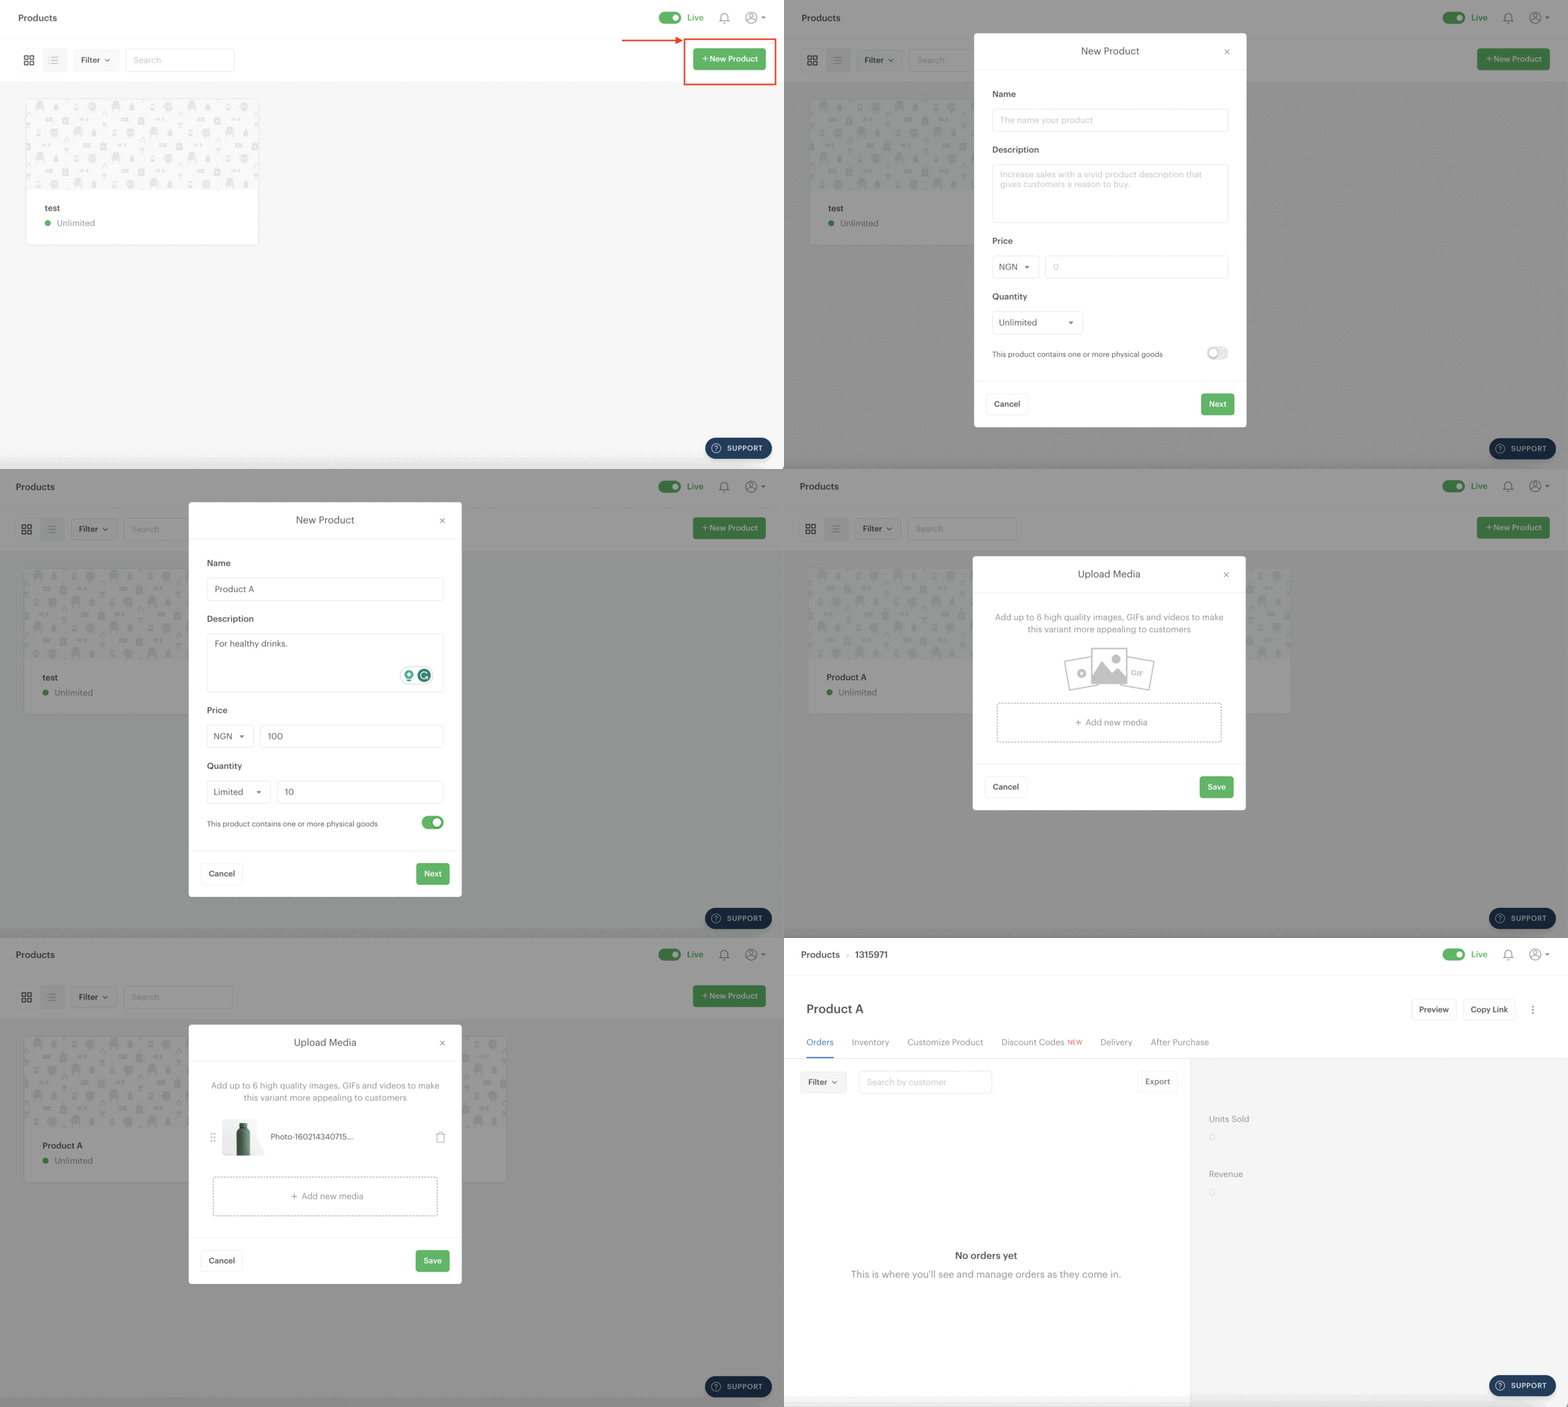
To create a product, simply visit the Products page on your Dashboard and follow the steps below:
On the Product Page, click 'New Product.'
A pop-up box will appear where you have to fill in the name, description (optional), price and quantity of that product. You can choose the unlimited stock option if the Product is always in stock or the limited option to indicate the quantity of the Product you have available. You can also indicate if the Product is a physical good by using the toggle on the form.
After completing the fields with information on your product, simply click 'Create.'
You have successfully created a product. You can now edit your Product to add more details such as pictures, videos, GIFs, background colour, description, shipping, etc.
Selling your Product
You can sell your products in three ways:
You can share the link to any of your products with your customers so they can buy it as soon as you create it as a Product Link. A Product Link offers a simple and beautiful way to sell single products online. With Product Links, you can easily manage your stock inventory, upload media, collect delivery fees, and customise your link in your brand's colours. It's a simple page that's optimised to help you increase your sales conversion.
You can create a Product Payment Page to sell multiple products at once. Please note that media, digital downloads and shipping are currently unavailable on the Product Payment Pages feature. What this means is that at the moment, when you add multiple Products to one Payment Page, your customers won’t be able to see the pictures and/or videos or downloaded digital products, and they won’t be able to pay for shipping.
You can create a Storefront to sell your physical and digital Products from one place.
Managing your Product
If you click on Product, you’ll see different tabs that show you more information about the product and the different ways to track specific metrics.
Orders tab
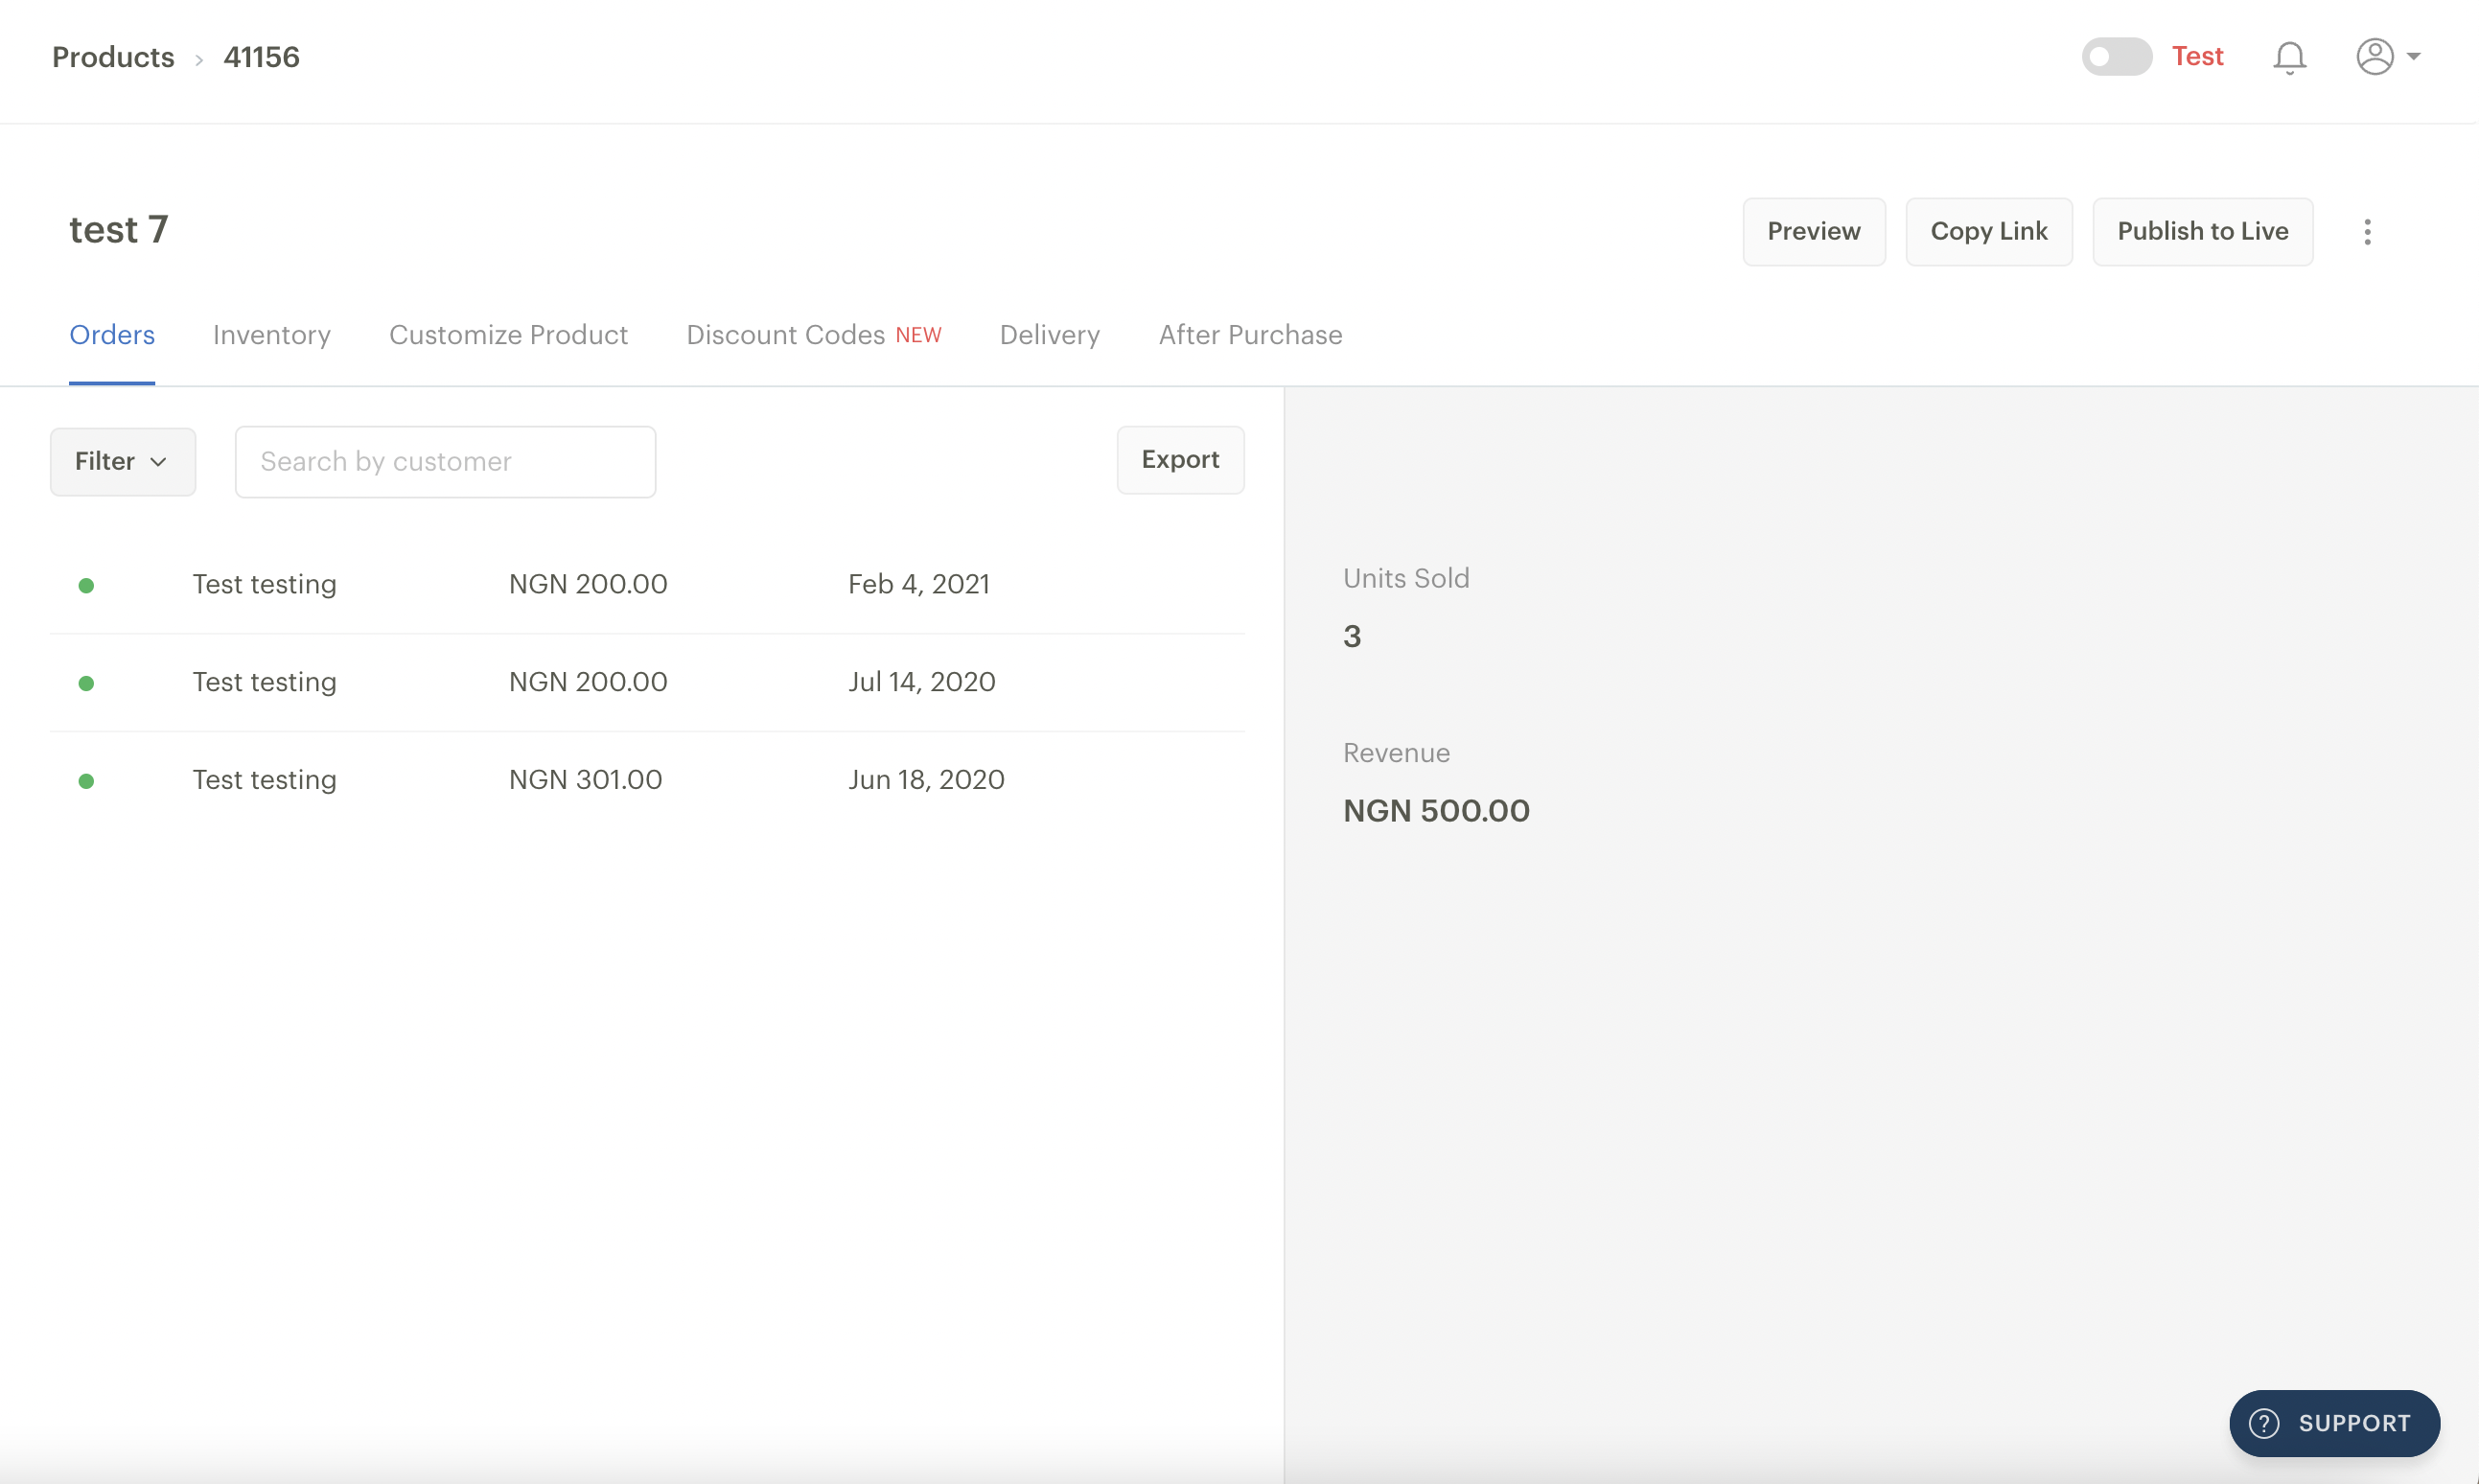
Filter: Here, you can filter your orders for that Product by order date, delivery date and delivery status.
Customer details: This is right below the Filter button and shows details of customers who have made payments for the Product you're viewing.
Search by customer: You can search for customers by name.
Export: You can export your Product's order and customer details here.
Units sold: This is the total number of this Product that has been sold.
Revenue: This is the total revenue you've generated for this Product.
Preview: You can preview your Product to see how it’ll appear to your customers. This is especially helpful if you want to sell it as a Product Link (single product).
Copy link: This is where you copy a direct link to your product, which can be shared with a customer to make a purchase.
Publish to Live: This lets you move Products/Products Links created in Test Mode to Live Mode.
Inventory tab
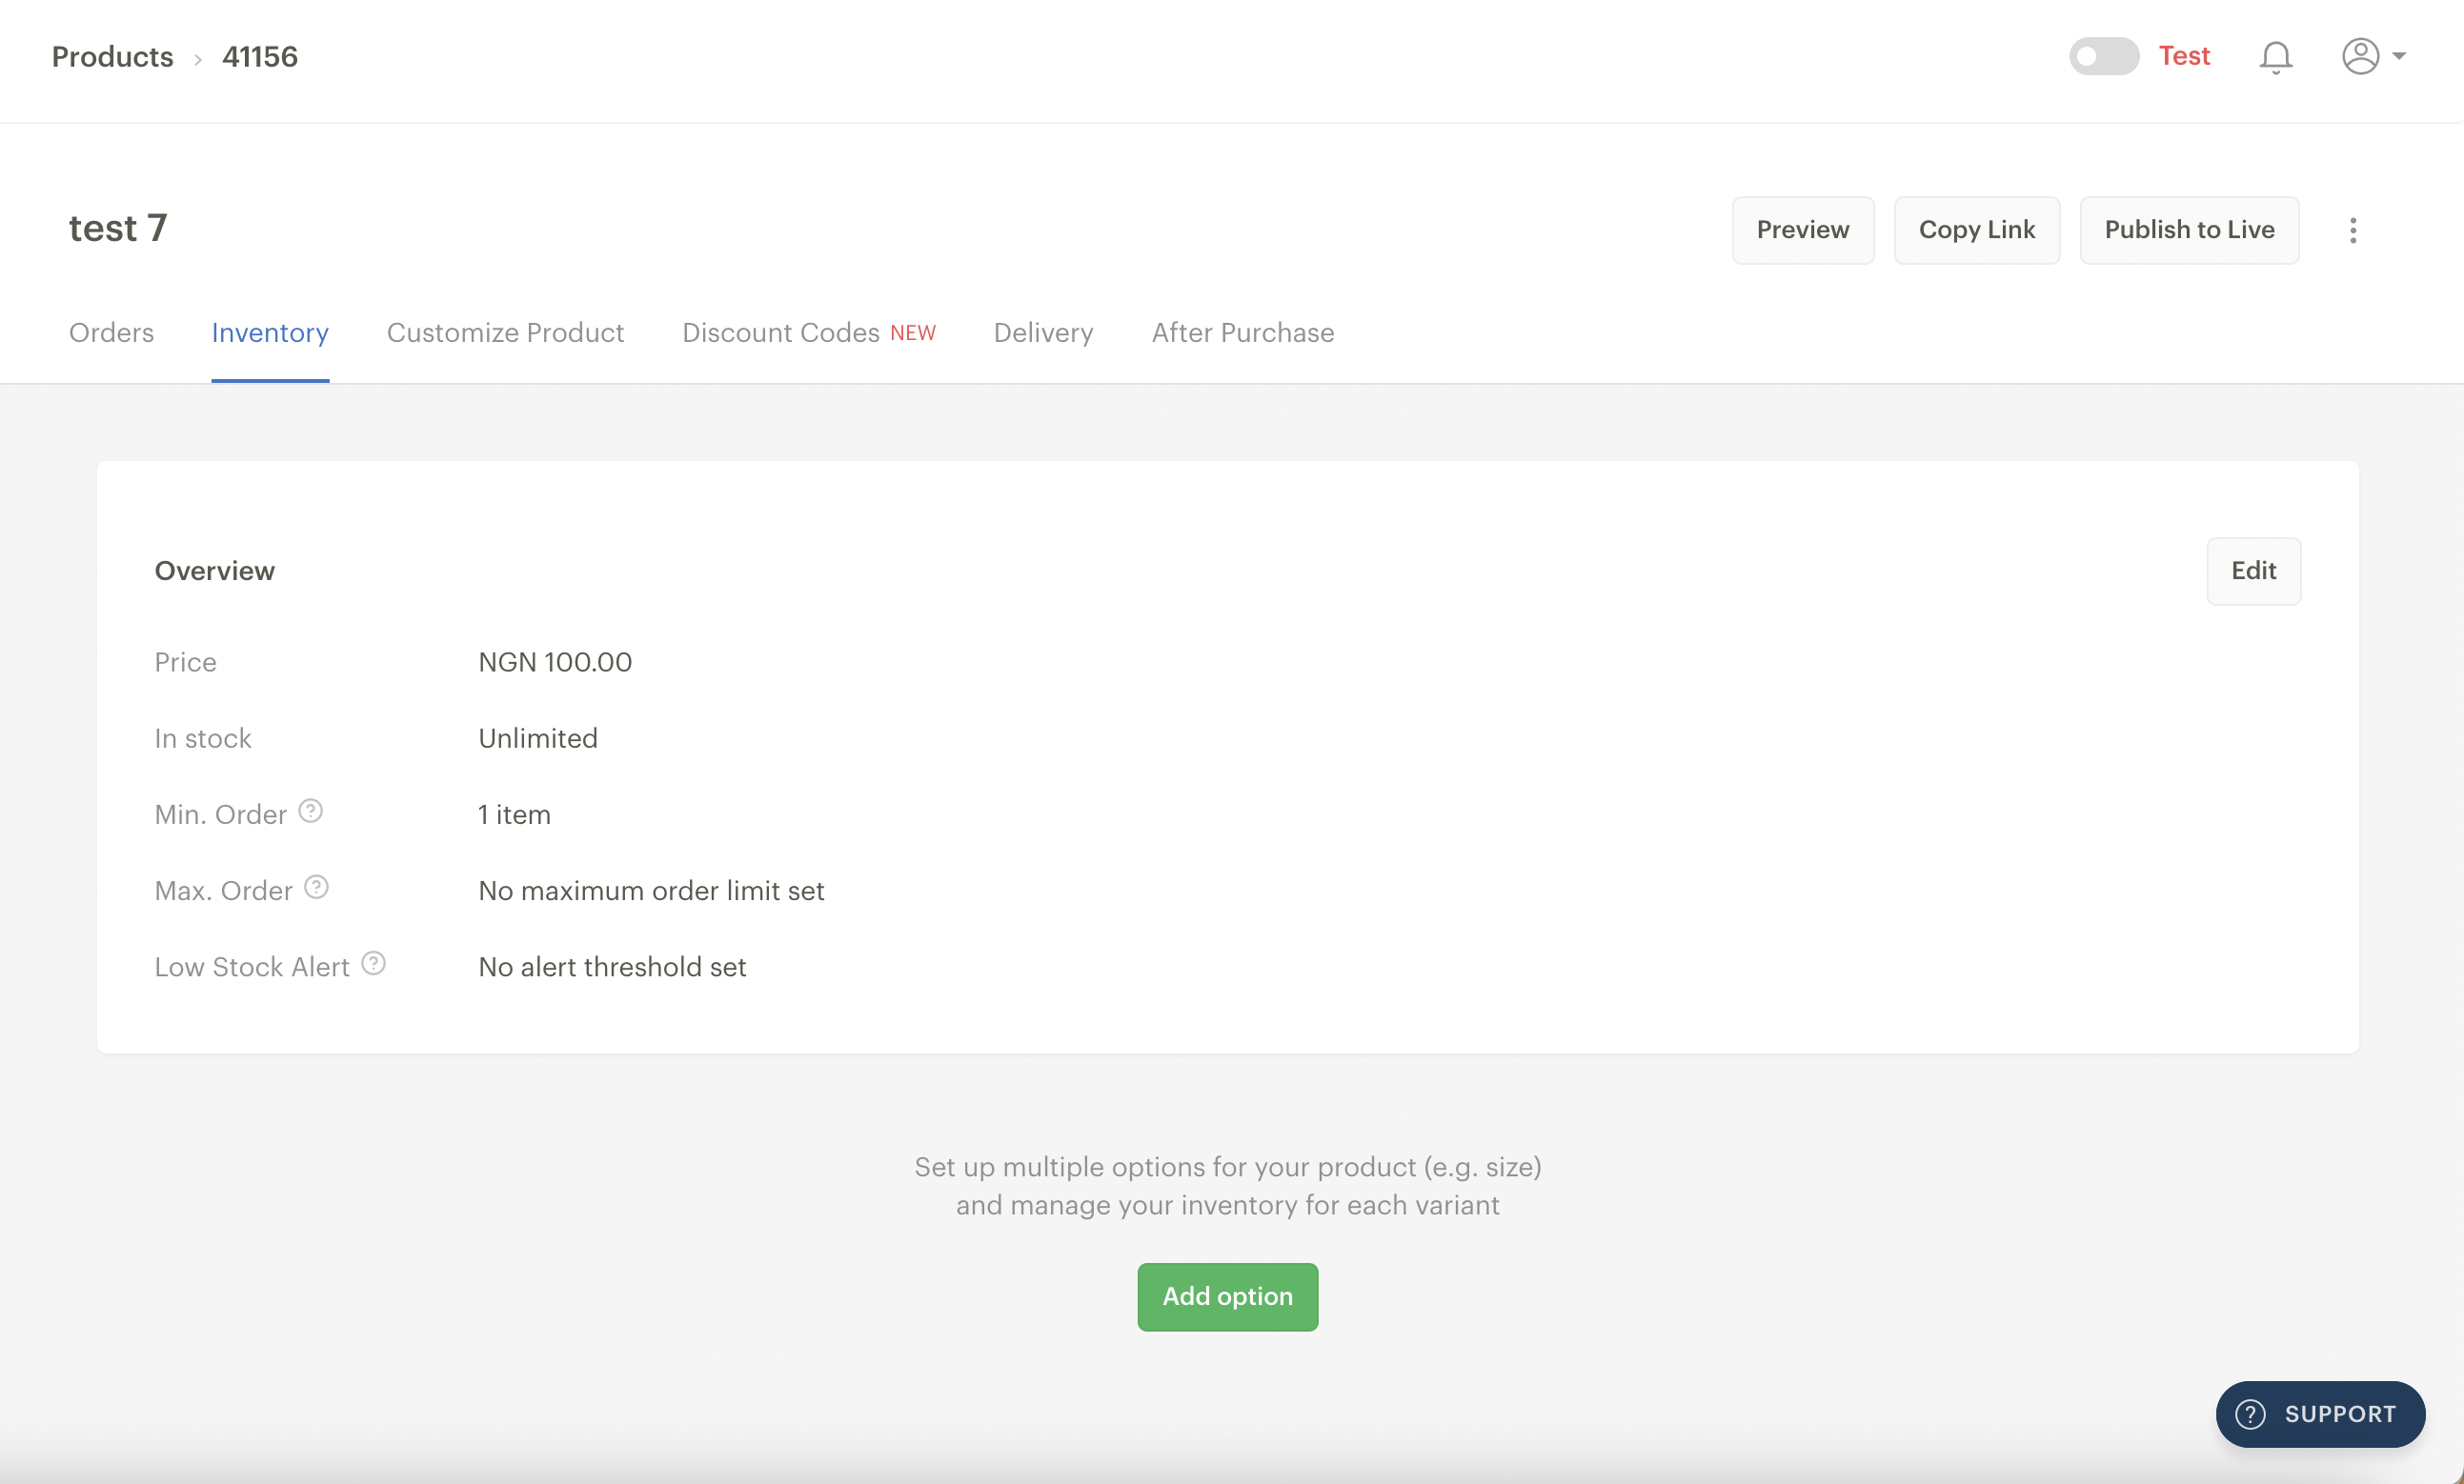
Price: This shows the price of the Product.
In stock: This shows how much of your Product is still in stock. You can choose a specific number or choose the unlimited option if the Product is always in stock. If you set a stock quantity when creating a Product, kindly remember to update the number of available products regularly.
This is important because as you make sales, the stock unit will keep reducing until it gets to zero. At zero stock, your product will be unavailable for your customers to buy. You can always edit the available quantity of your product at any time or not set a quantity to begin with. Not setting a quantity means you have unlimited stock.
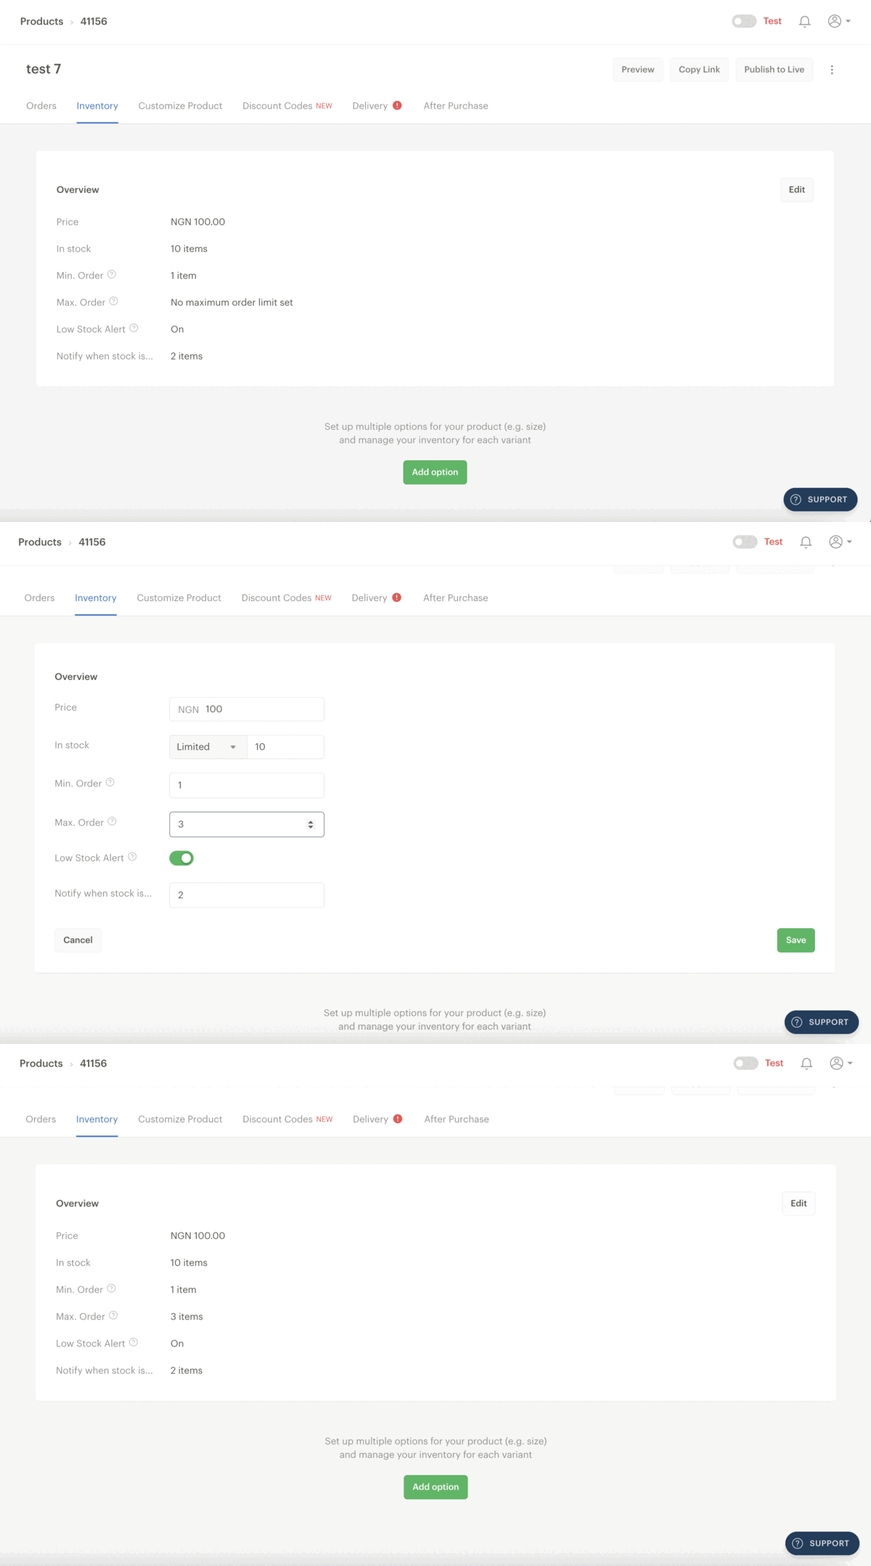
Edit: You can edit the Product price, quantity, order, variant (using the ‘Add option’ button) and low stock alert by clicking this button.
Minimum and Maximum order
The Min/Max Order Limit feature lets you control how many units of a Product a customer can buy at a time. To set a minimum/maximum order limit for a product without variants, kindly follow these steps:
Click on Products on the left side menu.
Create a ‘new product’ or click on an existing Product.
Click on the Inventory tab.
Click on Edit.
Enter your preferred minimum order limit in the ’Min. Order’ field.
Enter your preferred maximum order limit in the ’Max. Order’ field.
Click Save to confirm the updates you’ve made.
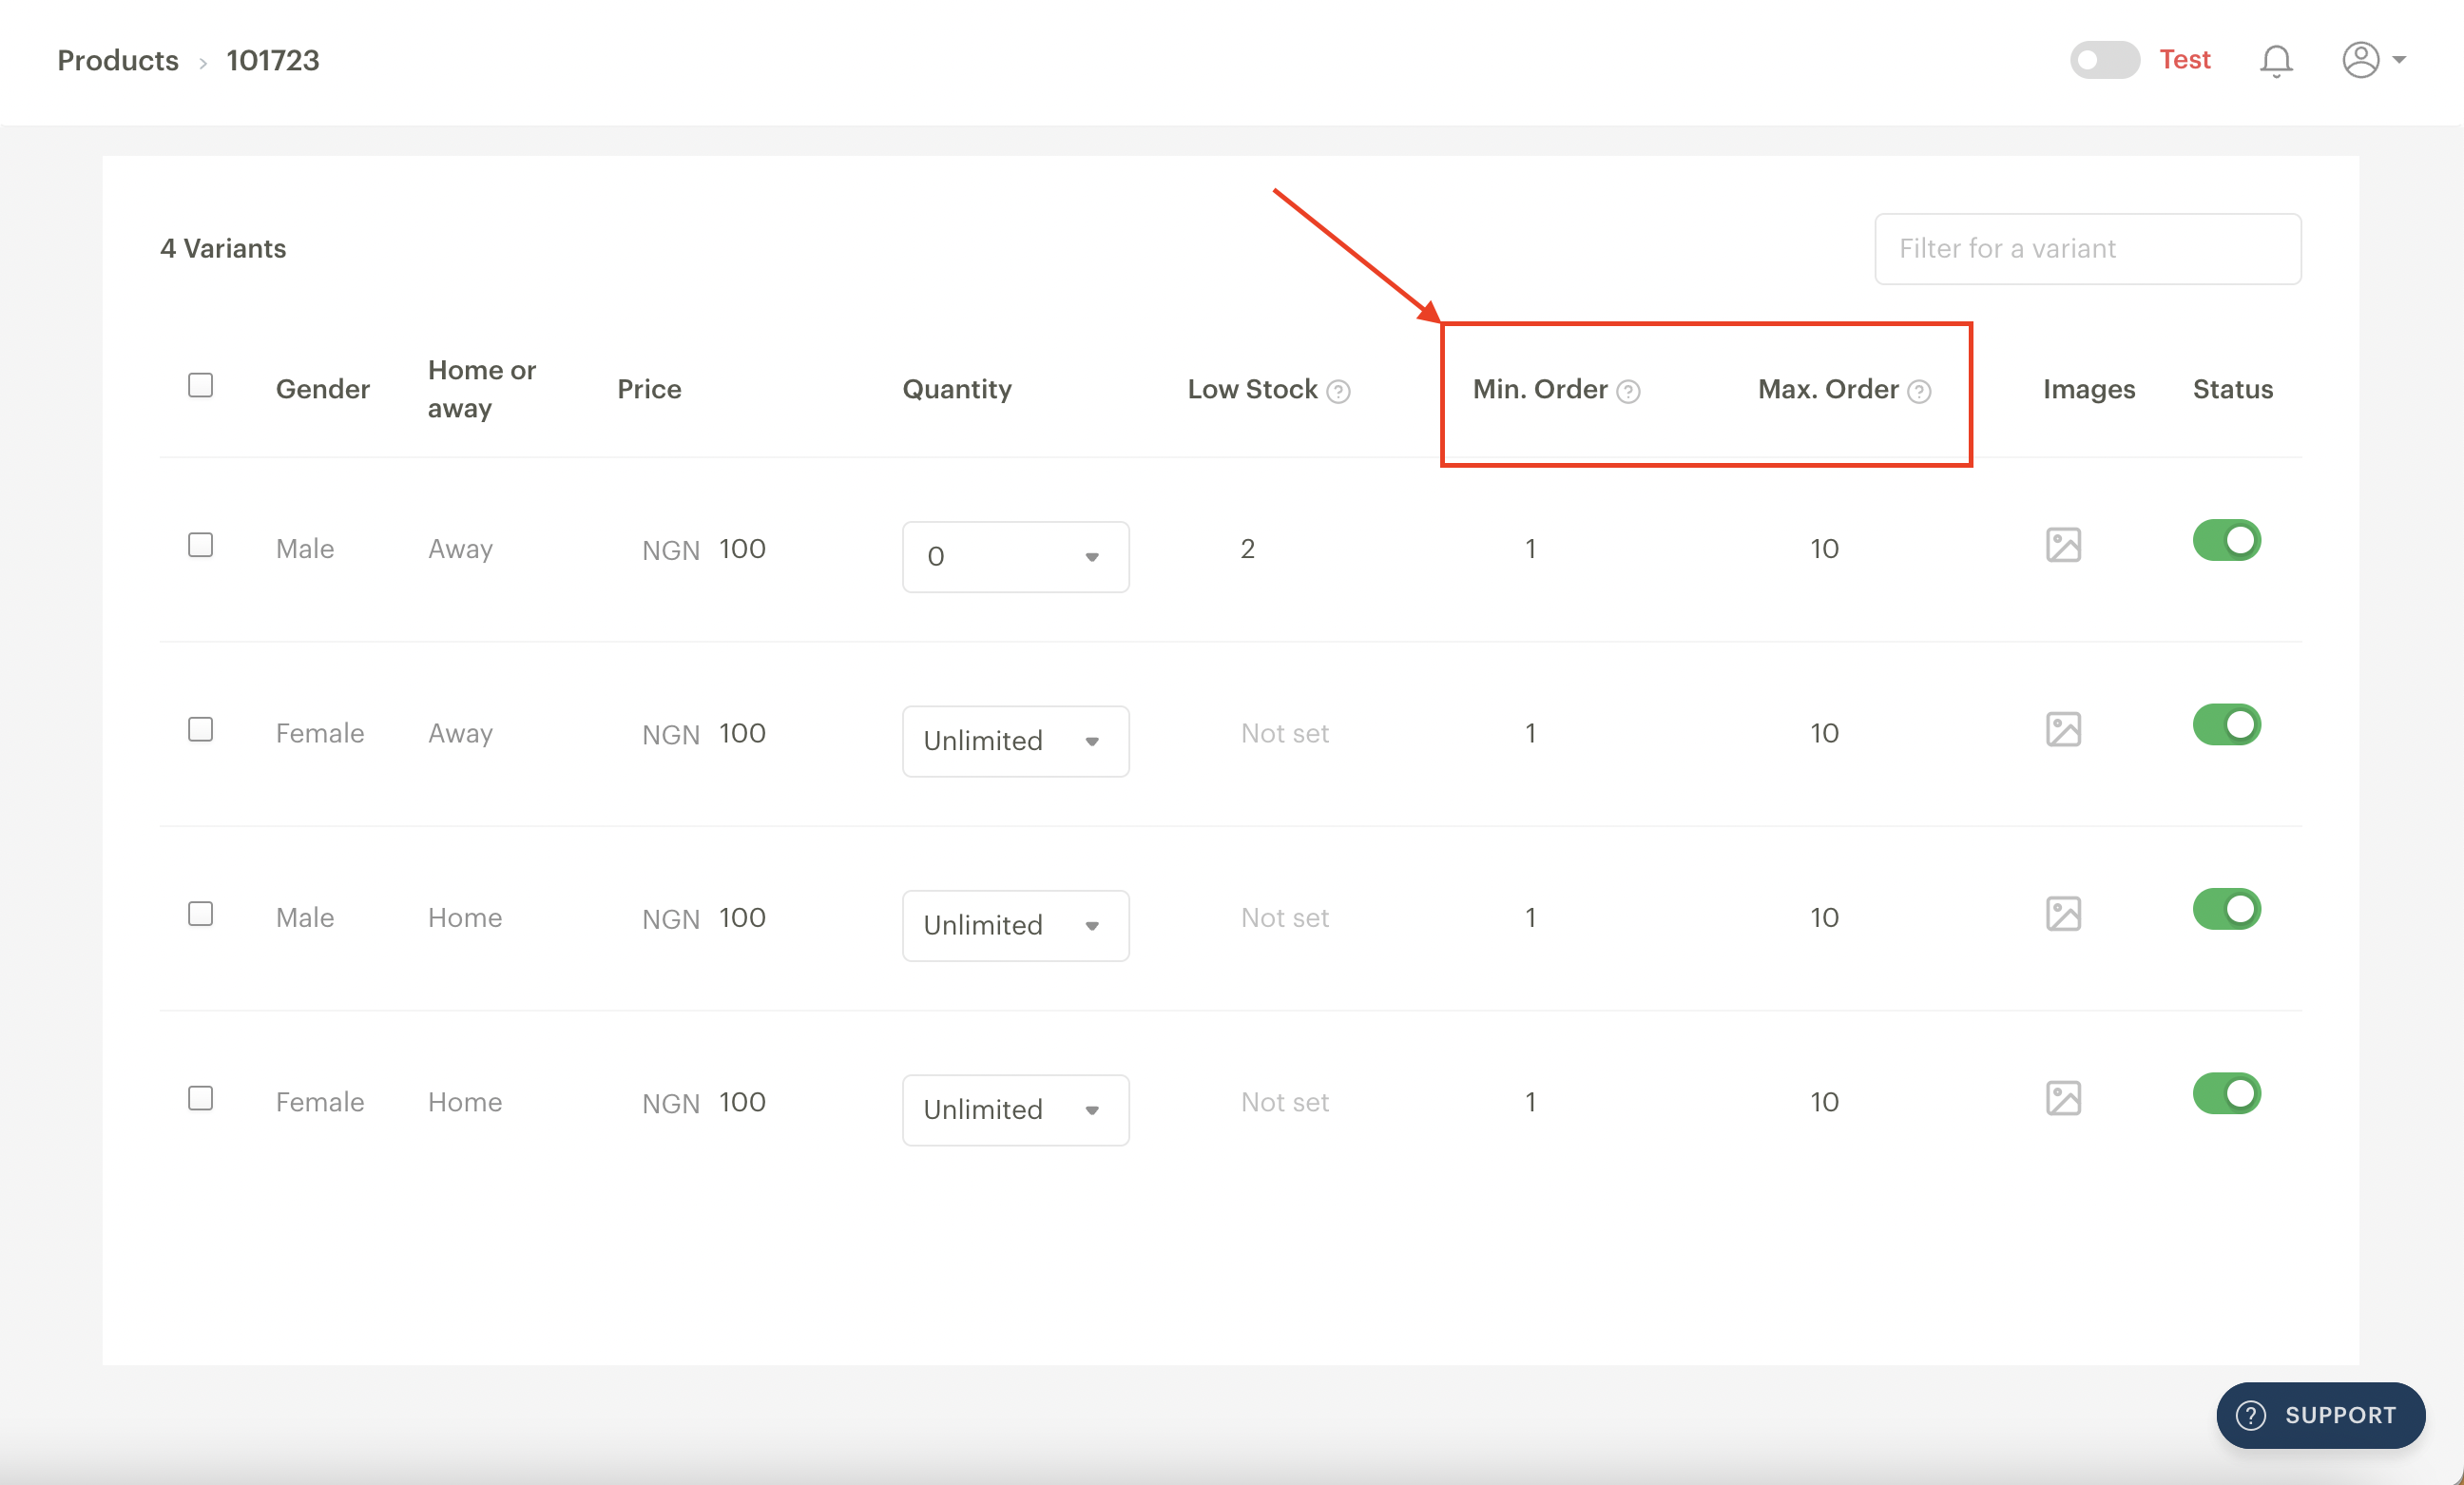
To set a min/max order limit for a Product with **variants, kindly follow these steps:
Click on the Inventory tab.
Scroll to the Inventory section, where the variants are listed.
Enter your preferred minimum and maximum order limits under the Min. Order and Max. Order columns, respectively. Your entries are automatically saved.
Low stock alert
You can specify the quantity level at which you want to receive an alert. Once the number of units you have in stock meets or falls below that amount, we'll send an email alert to everyone on your team who has permission to create and manage products.
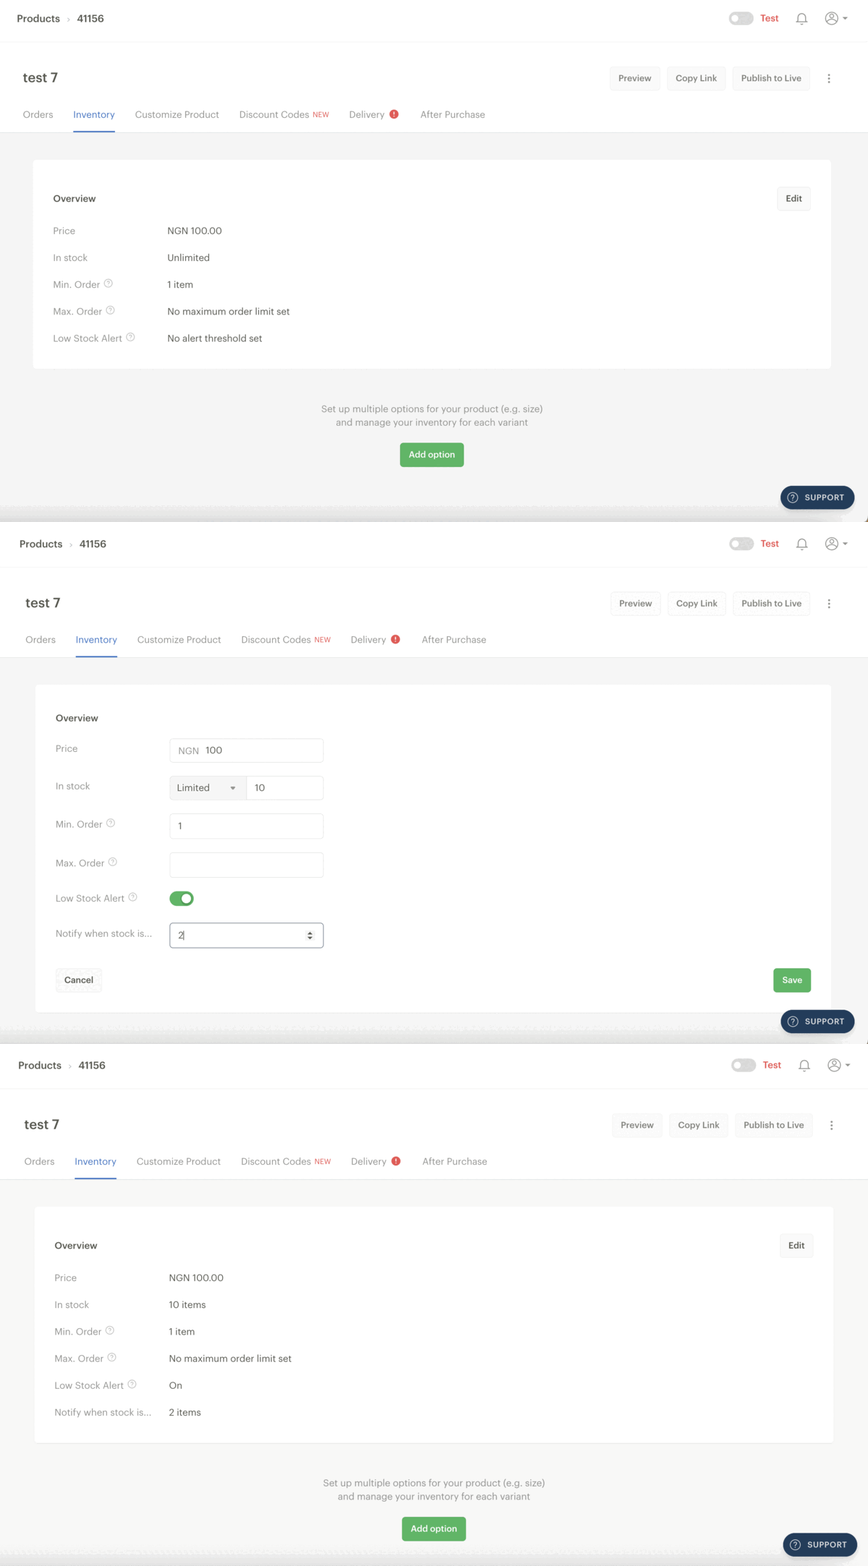
If you want to create a low stock alert for a Product that doesn't have variants, kindly follow these steps:
Create a new Product or click on an existing Product.
Click on the Inventory tab.
Click on Edit.
Toggle the ‘Low Stock Alert’ button.
Enter the number of stock at which you’d like Paystack to alert you in the ’Notify when stock is...’ field.
Click ’Save’ to confirm your updates.
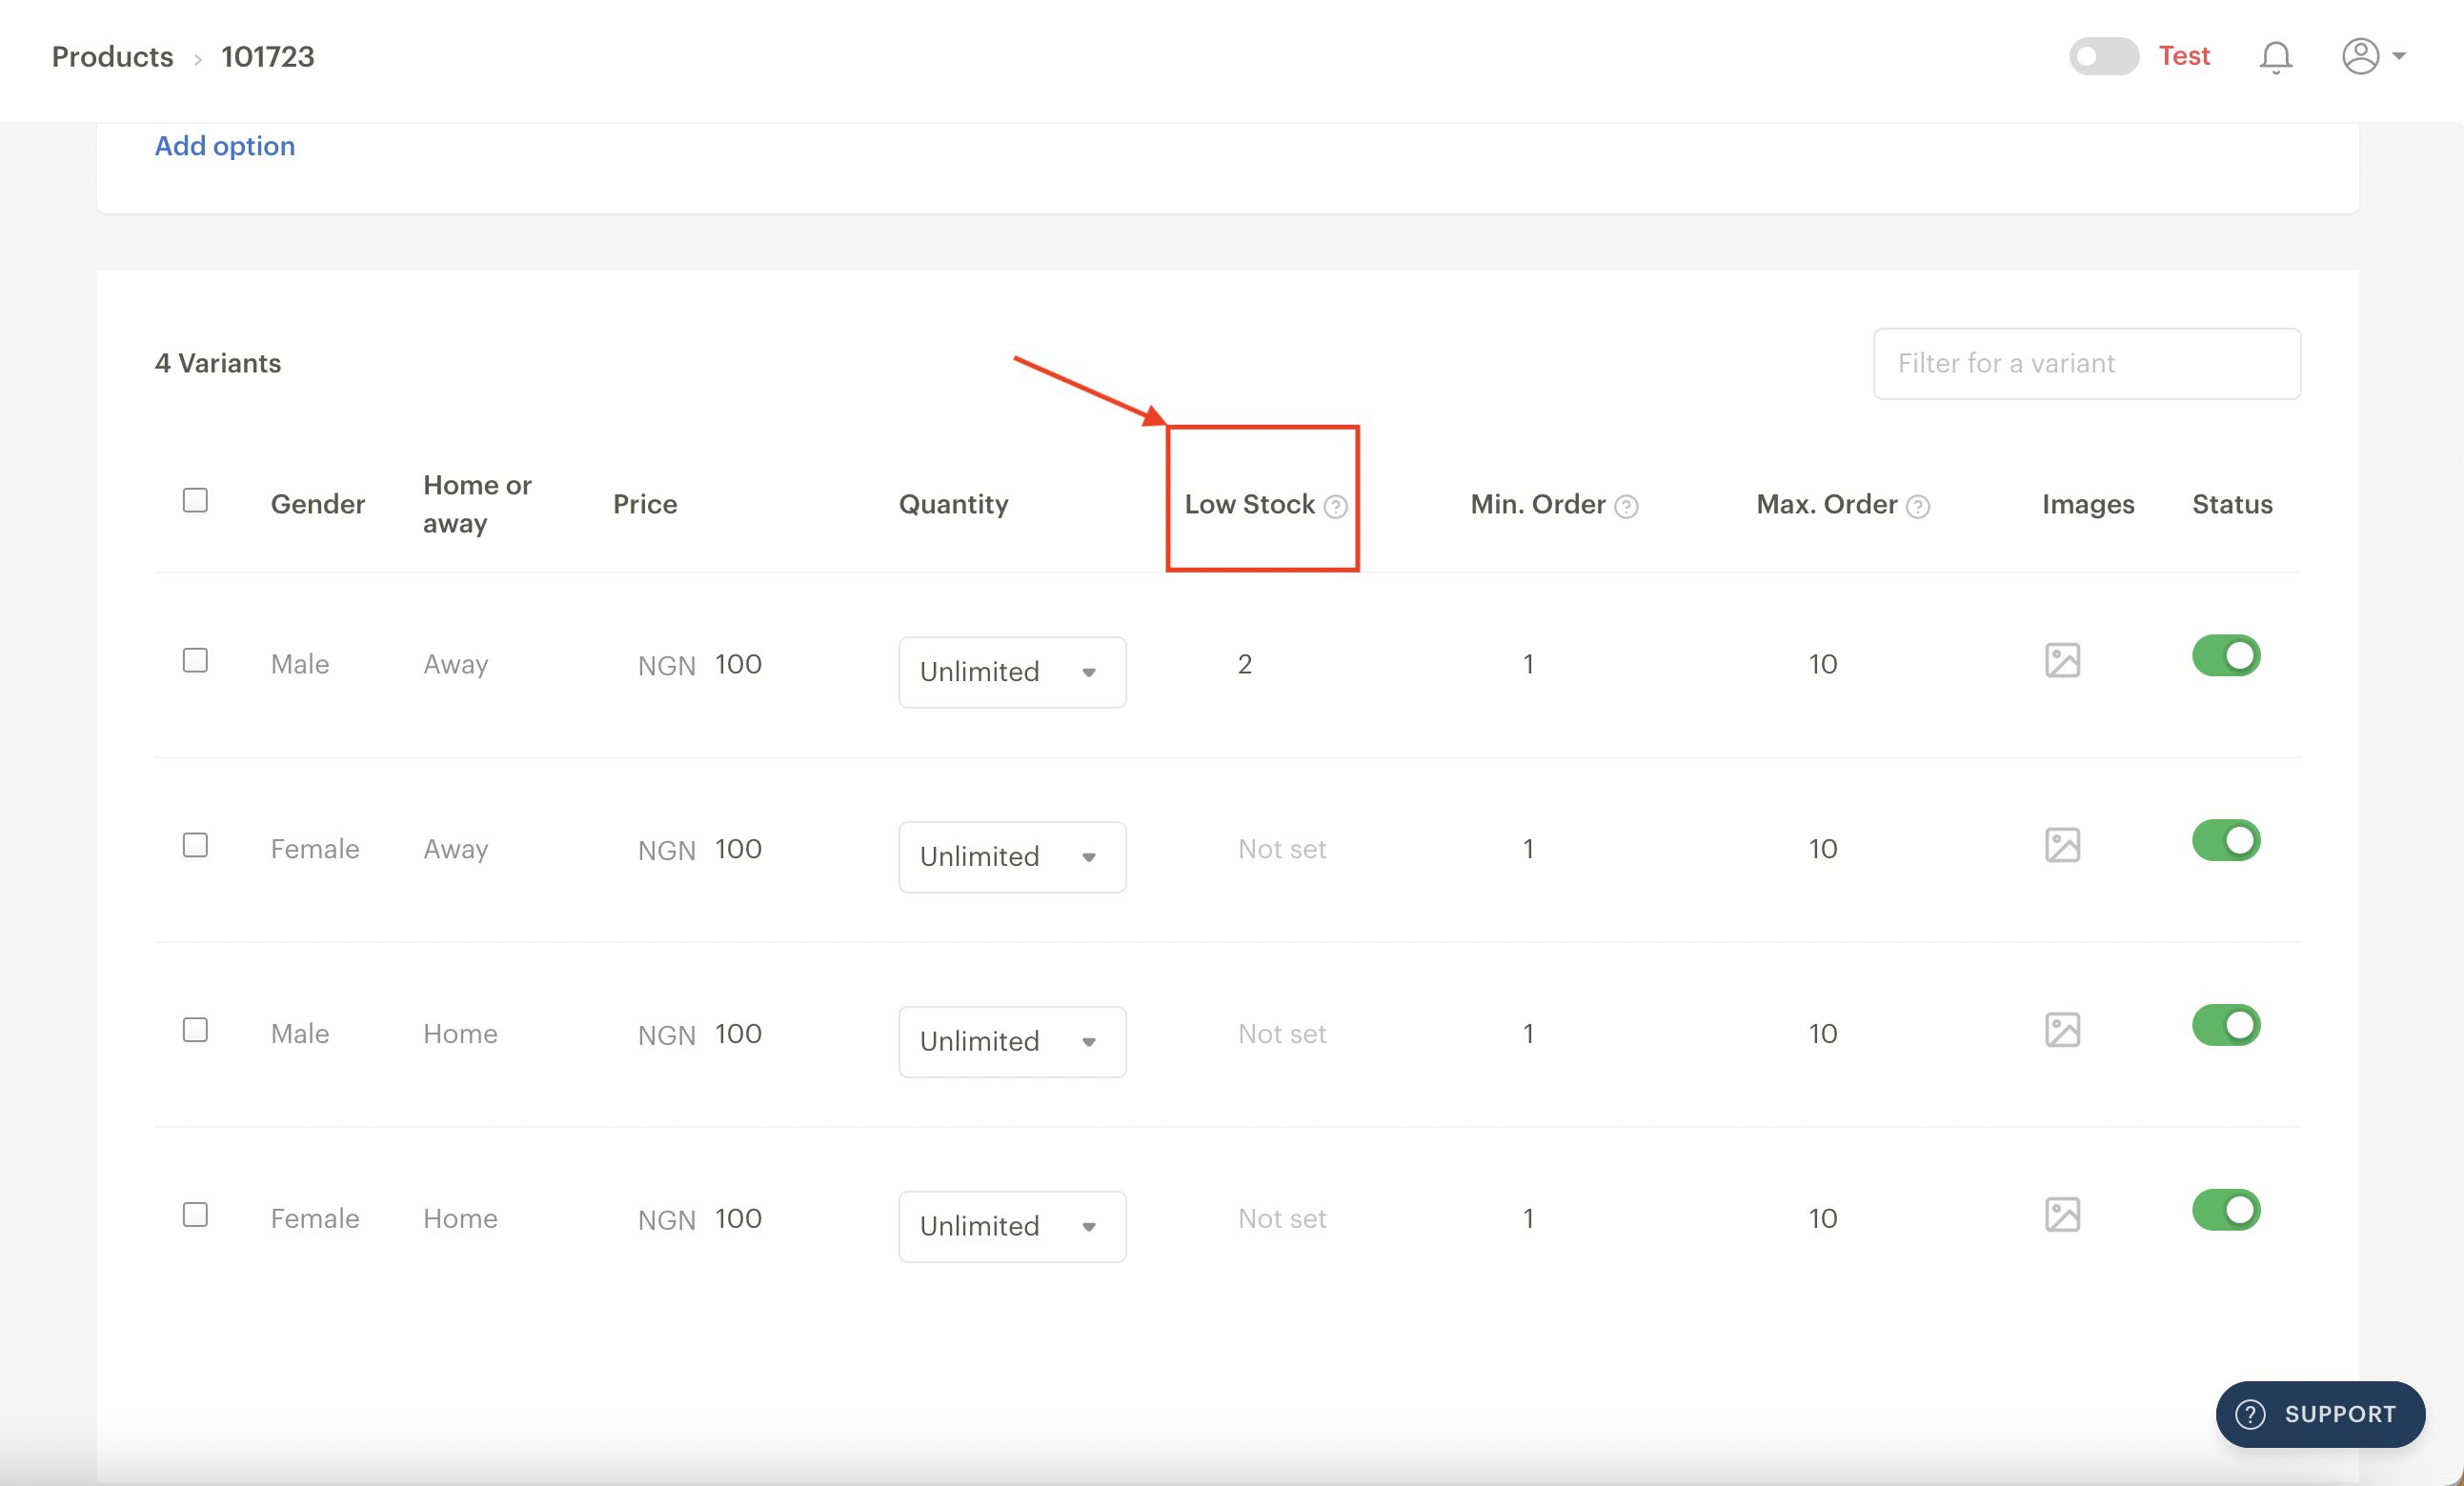
If you want to create a low stock alert for a product with variants, kindly follow these steps:
Click on the Inventory tab.
Scroll to the Inventory section, where the variants are listed.
Enter each product's preferred low stock value under the Low Stock column. Your entries are automatically saved.
Variants
Variants help you define all the available variants of a single product. This saves you a lot of time and provides your customers with a smoother purchase experience.
For example, using multiple variants, you could sell the same t-shirt in three different sizes (small, medium, and large) or different colours (red, yellow, or green). You can also set up different prices for each variant.
To create multiple variants of the same product, kindly follow these steps:
Click on Products on the left side menu.
Create a new Product or click on an existing Product.
Click on the Inventory tab.
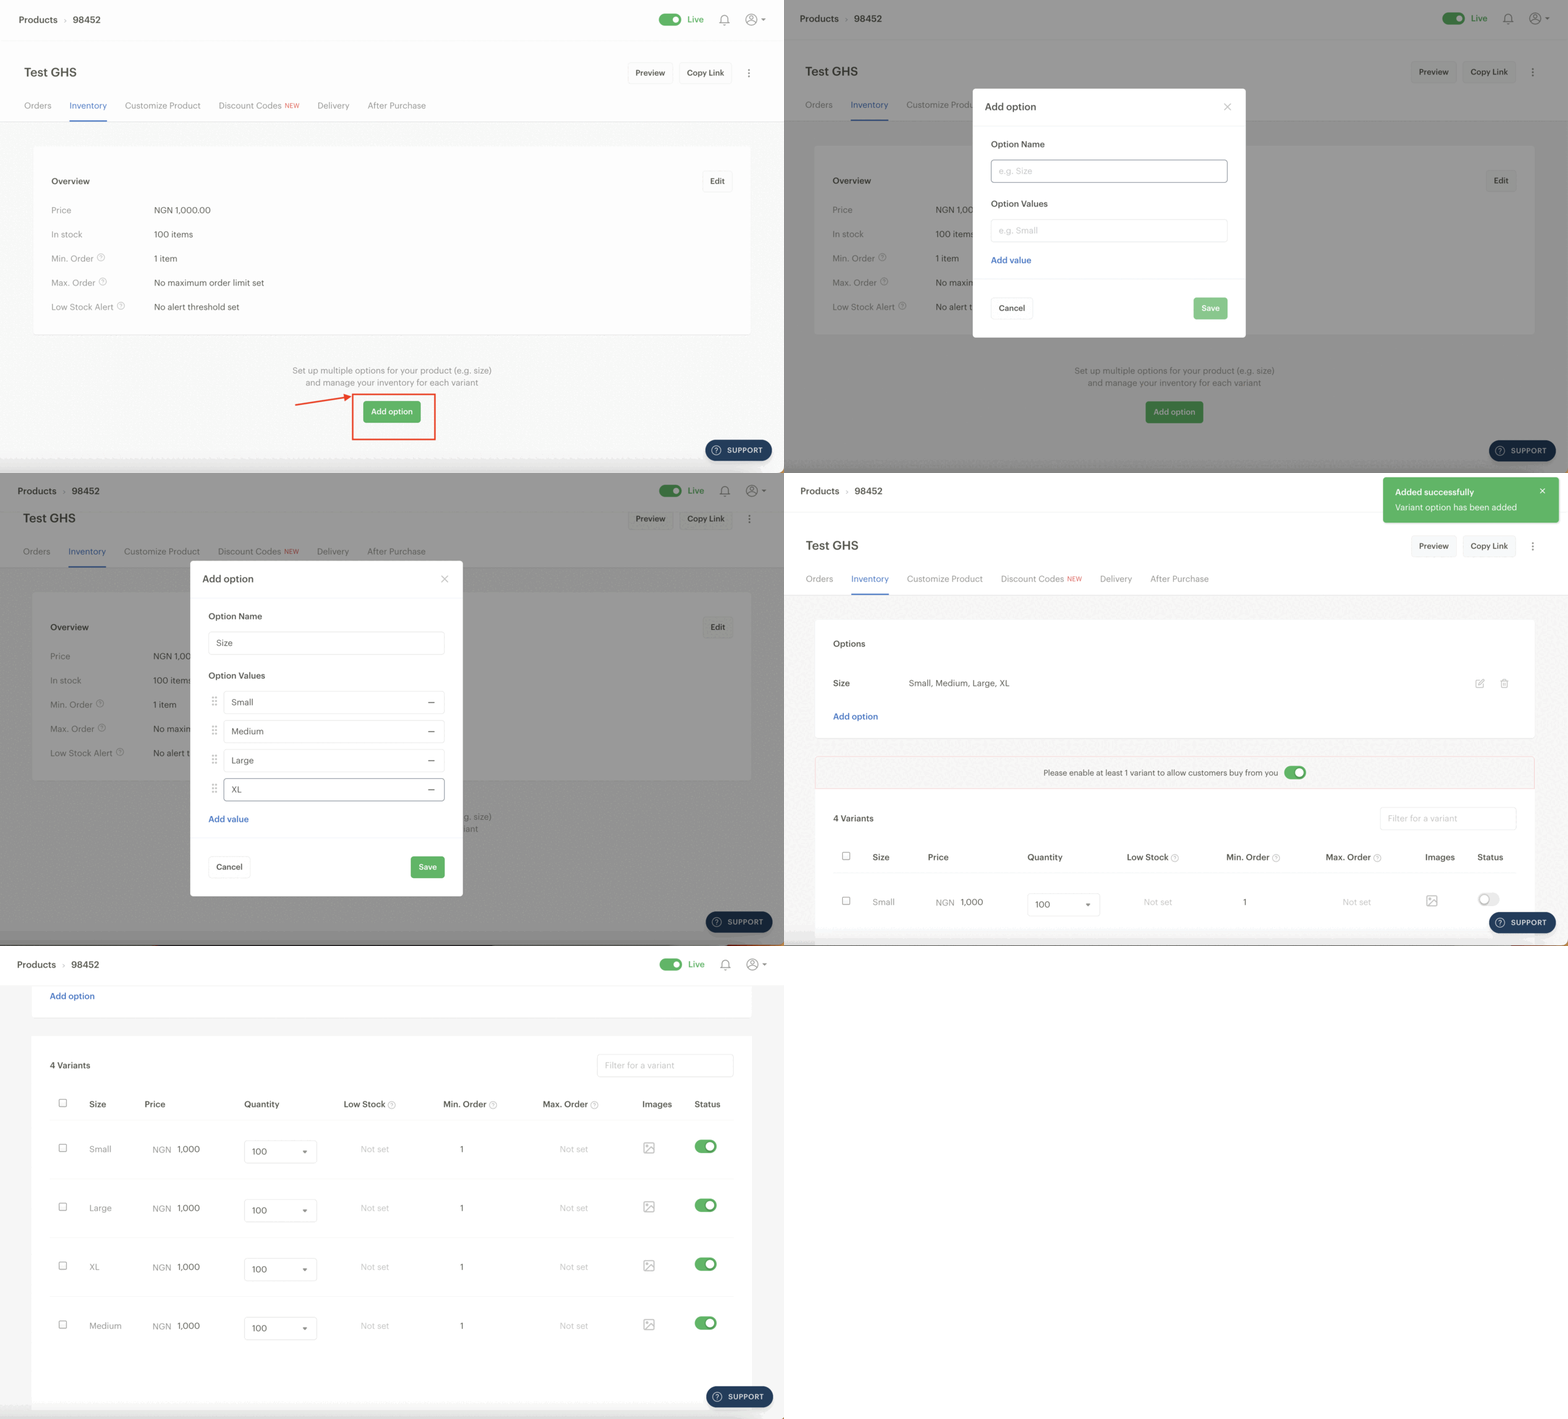
Click on ’Add option’ to reveal a pop-up to add your variant options.
Enter your preferred options under the ’Option Name,’ such as size or colour. You can create up to three variant options per product. For instance, you may have the following variants for a t-shirt: size, colour, and fabric type.
Enter as many as ten preferred ’Option Values’ for each option. For example, the Colour option may have up to ten colour values: red, blue, green, and yellow.
Enable at least one variant by clicking the toggle under the status column of your variant list.
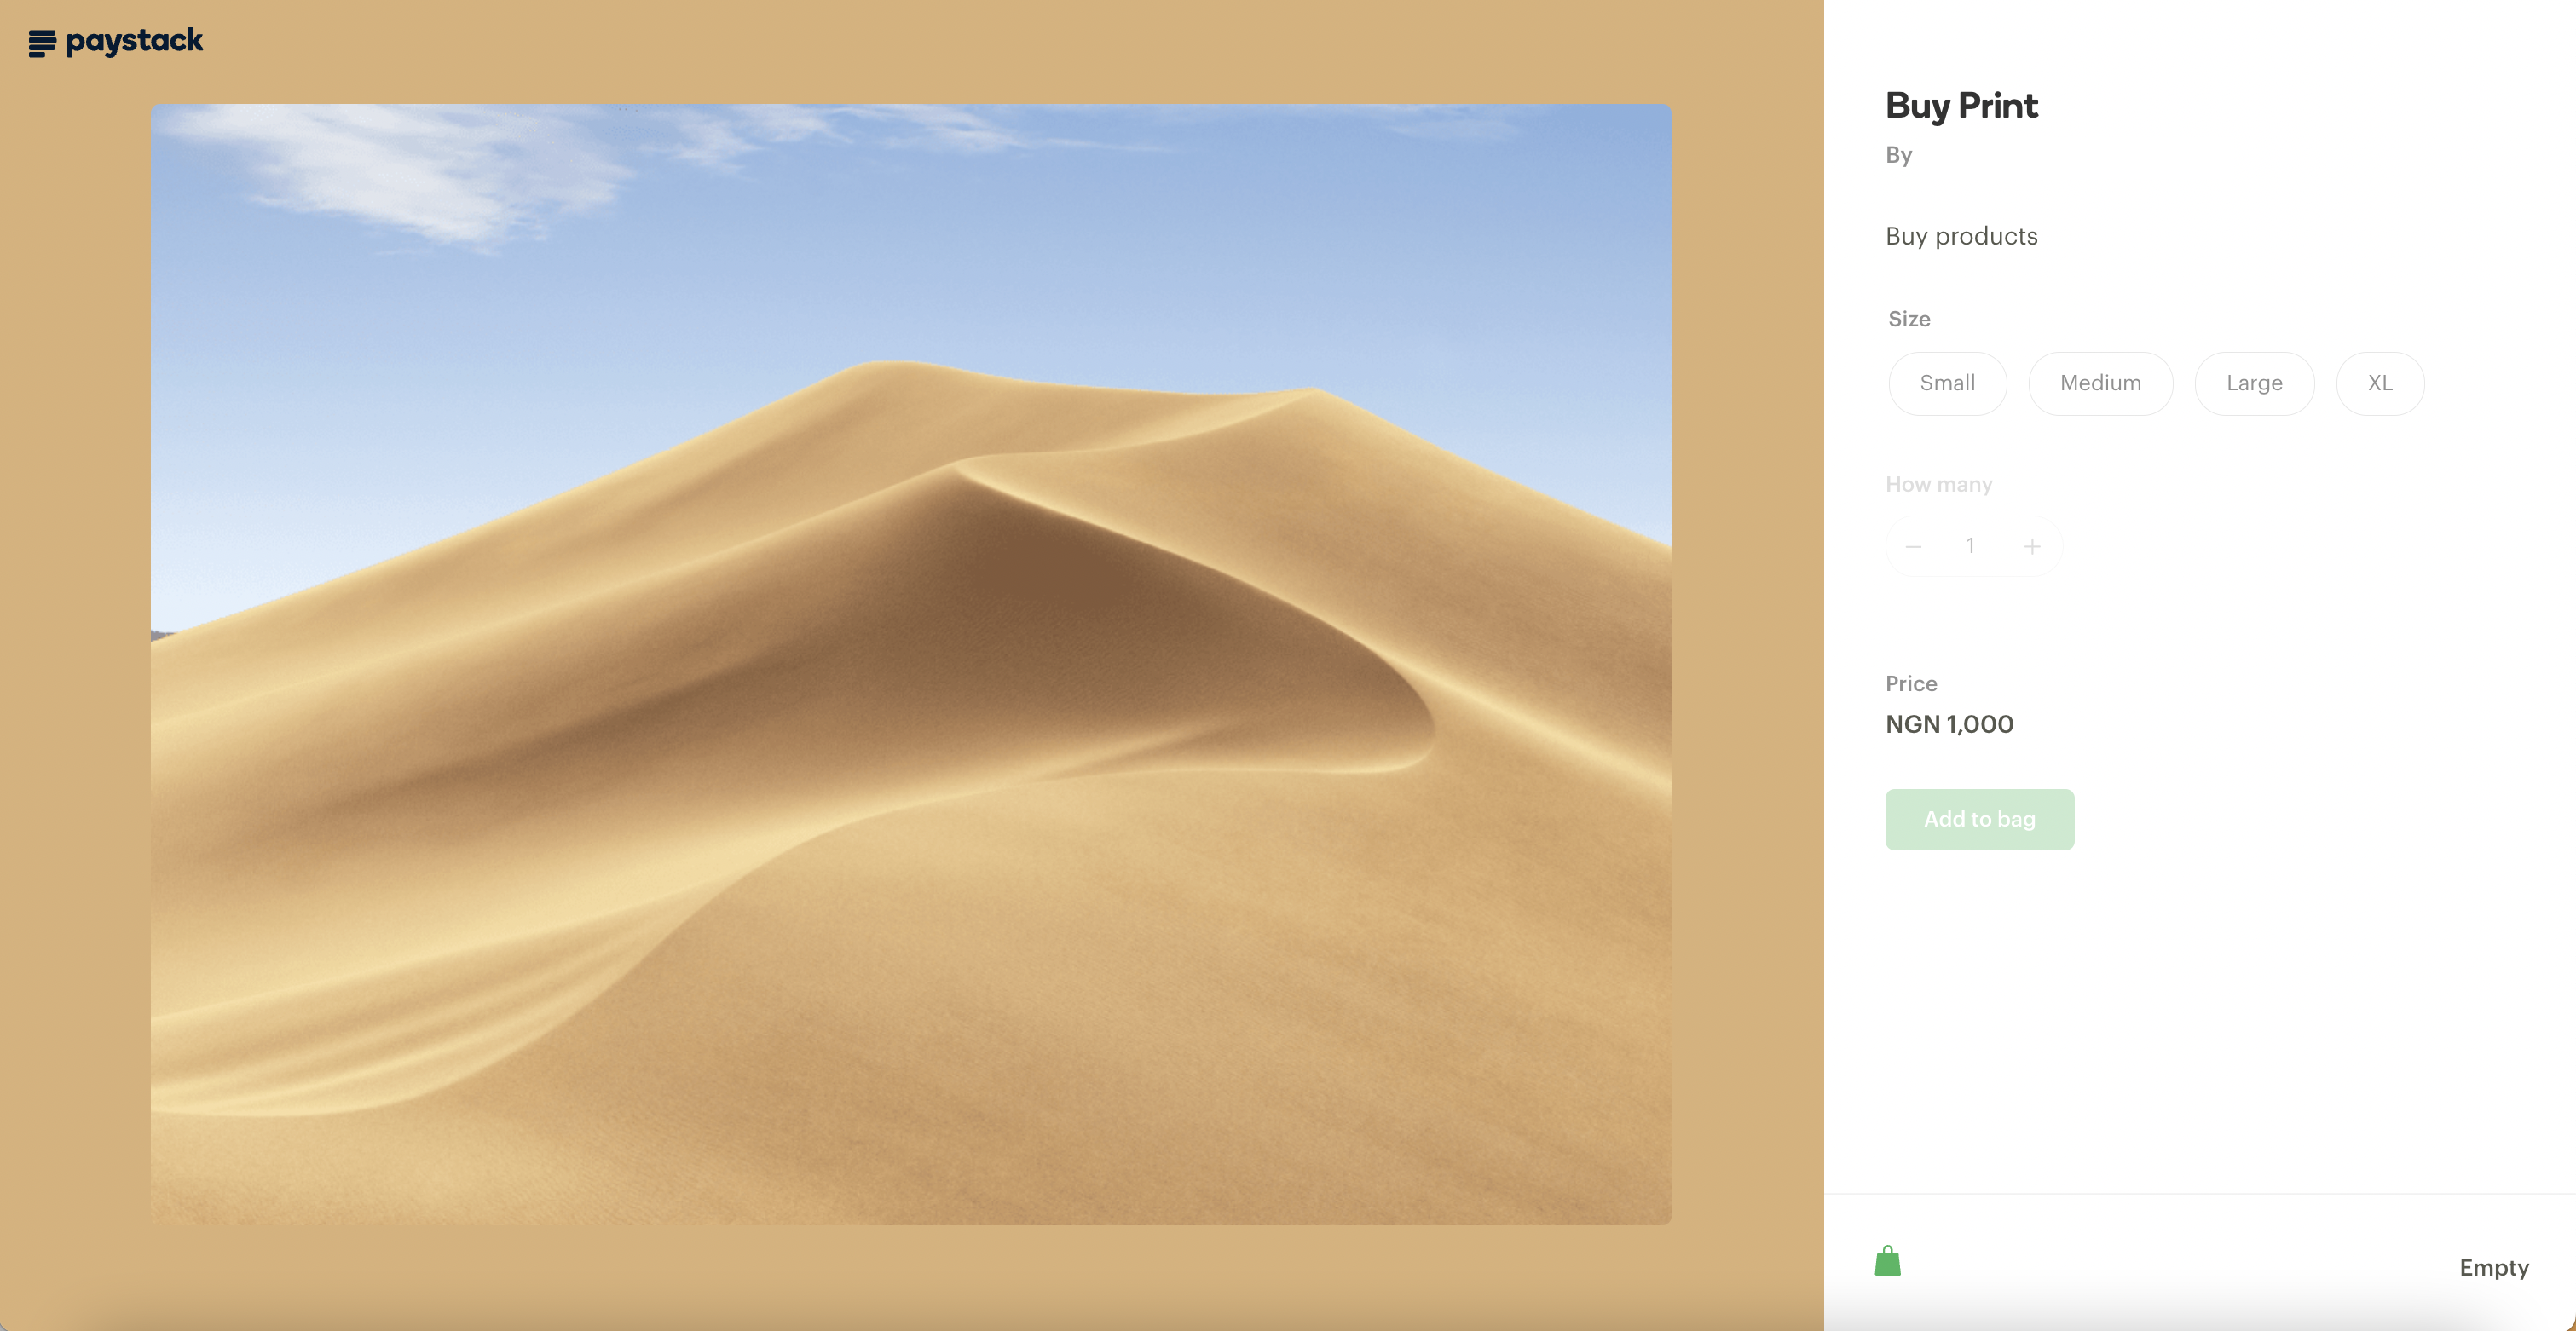
Your update will be automatically saved, and this is what it will look like on your customer's end:
You can edit or delete a variant by clicking beside the edit or trash icon on the right side of the variant under the Inventory tab.
Customize Product tab
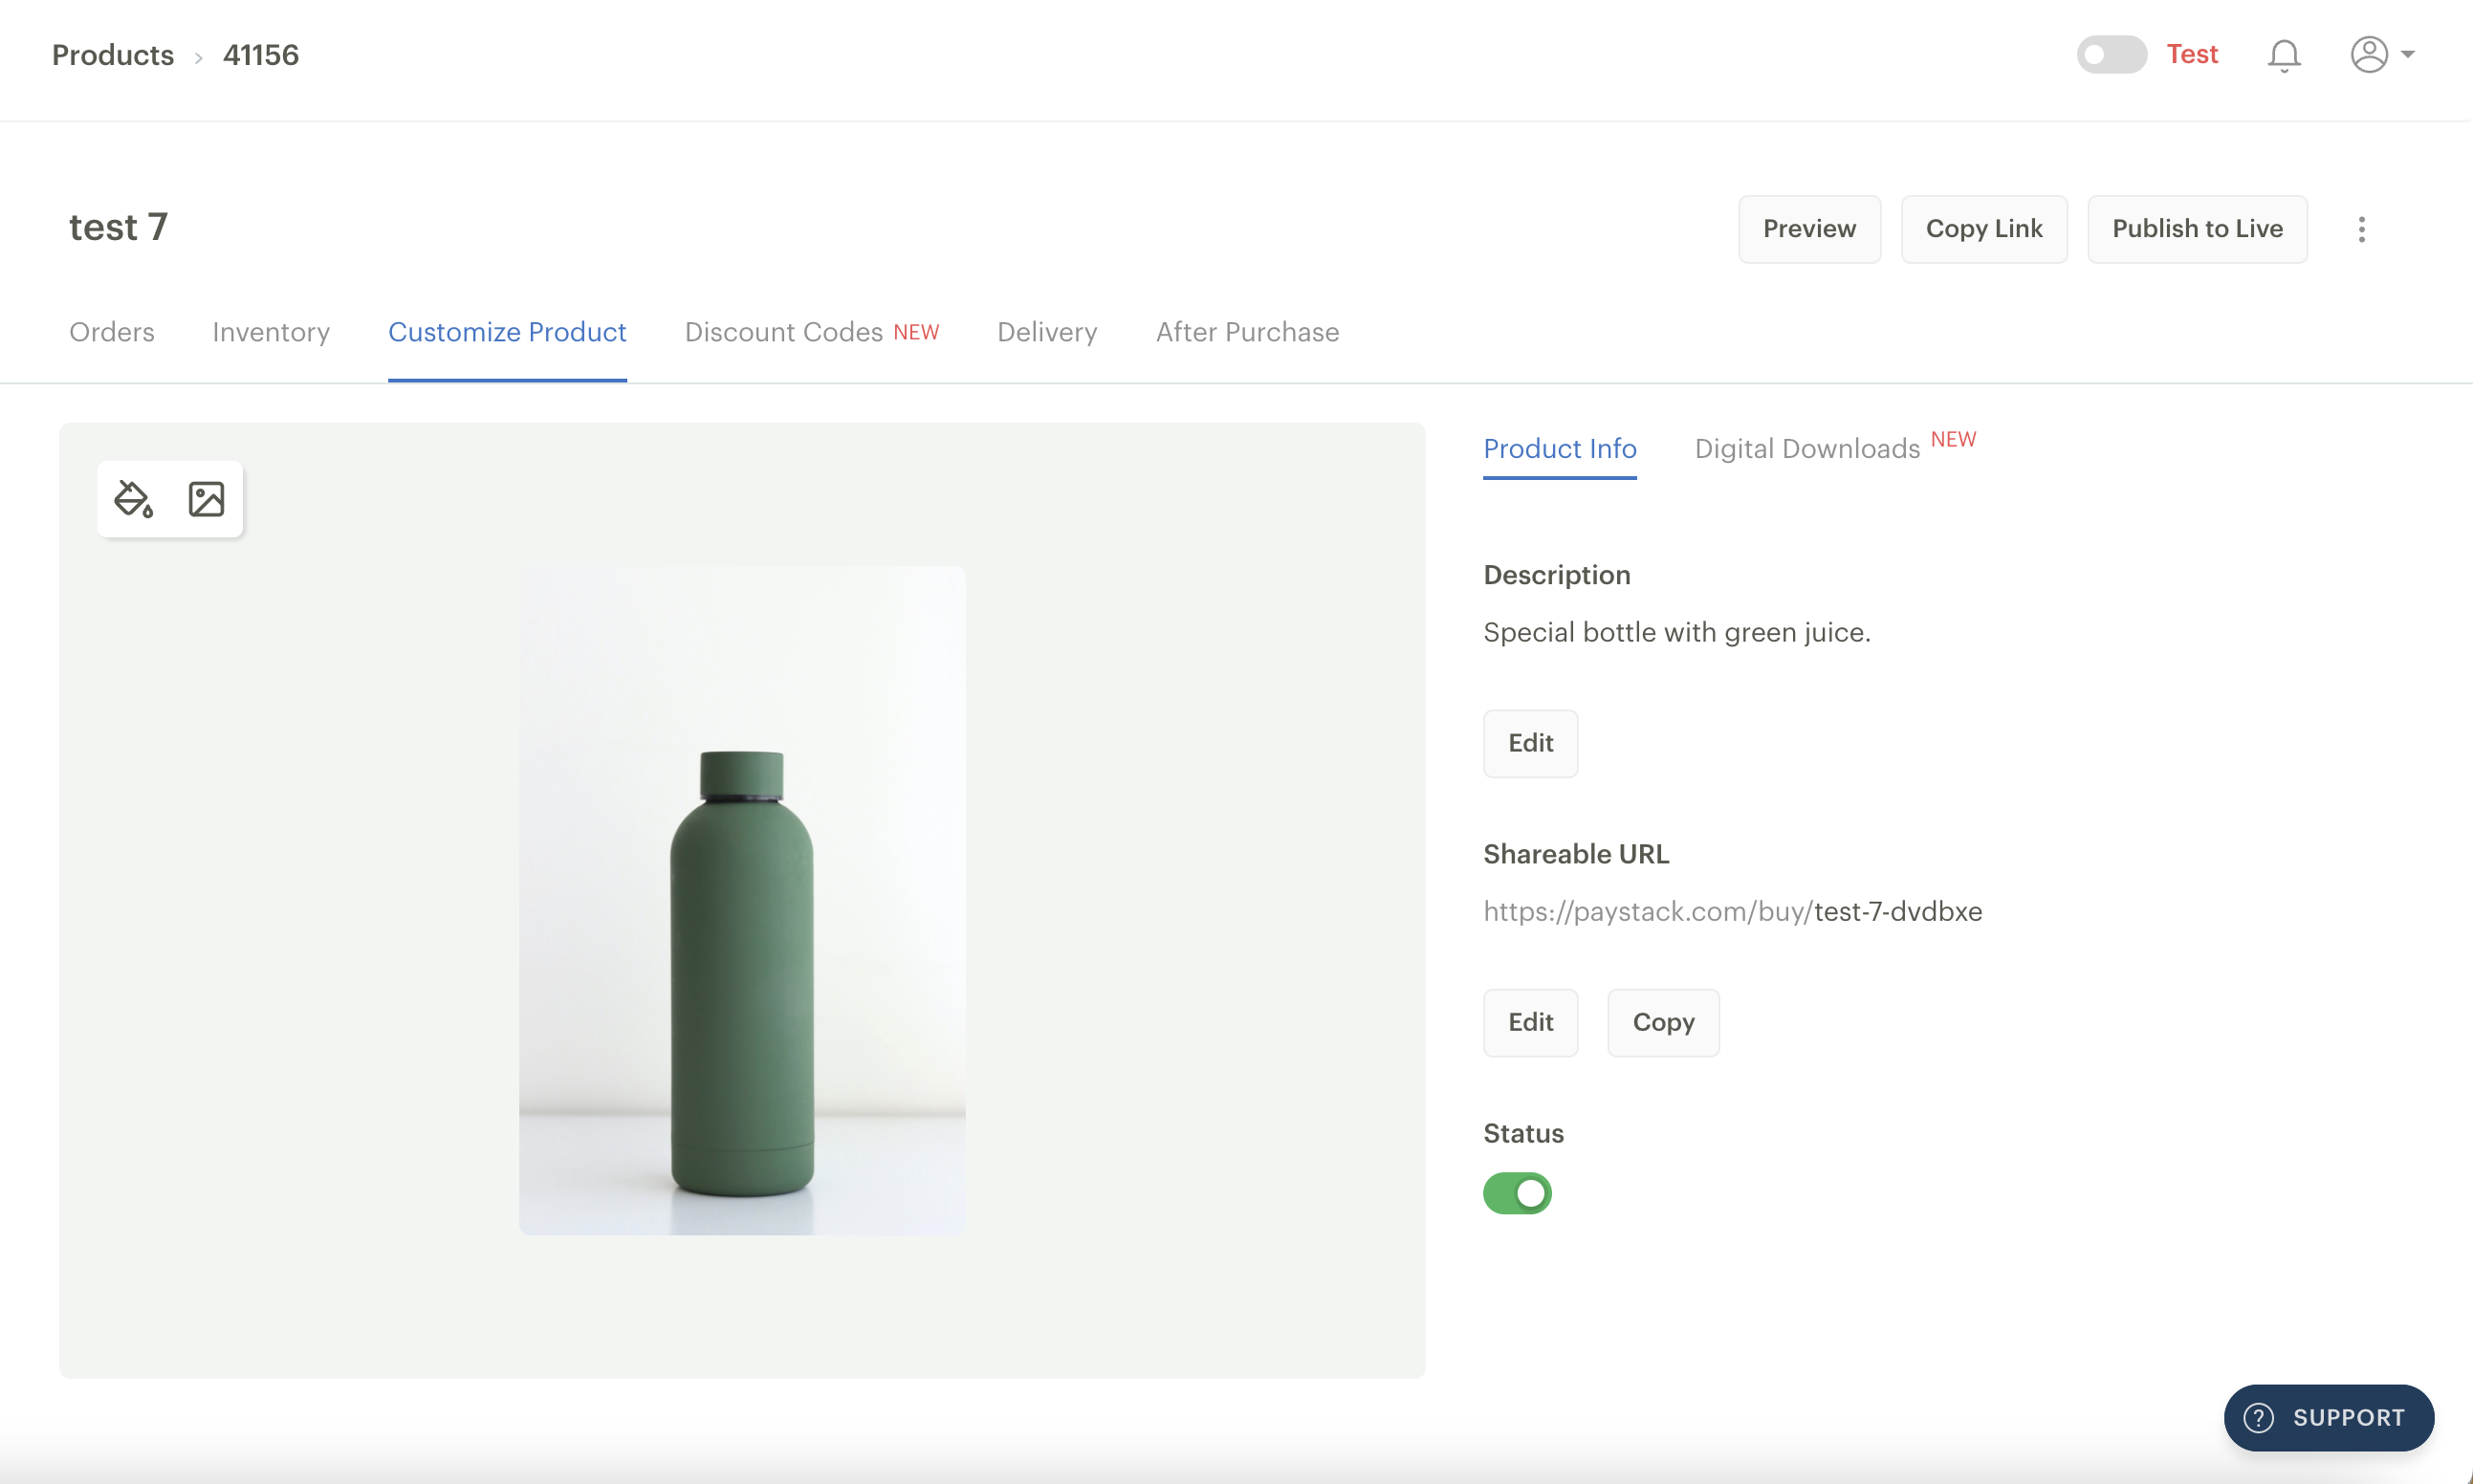
Paint fill icon (top right): This is a colour tool that lets you select the background colour of your Product.
Image icon (top right): Use this button to add pictures and videos of your Products. You can add up to six high-quality images, GIFs and videos.
Description: This shows the Product description your customers will see when they view your Product Link.
Shareable URL: This is a direct link to your Product, which can be shared with a customer to purchase it. You can edit the URL to suit your brand(e.g. paystack.com/buy/betashoestore) or copy and share it with your customers.
Status: You can use the status toggle to archive the Product. When you archive a Product, you can still view this Product on your Dashboard. However, your customers won’t be able to view or buy the Products. A green status indicates that the Product is active.
Digital Products & Downloads
Using Paystack, you can sell digital items like ebooks and other digital files to your customers where the product is immediately available to them after purchase. You can do this by creating a Digital Product on your Dashboard.
To create a Digital Product, simply visit the Products page on your Dashboard and follow the steps below:
Click 'New Product' on the Product page. Fill in details about the product (name, price quantity, etc.) and simply click 'Create' to create a Product.
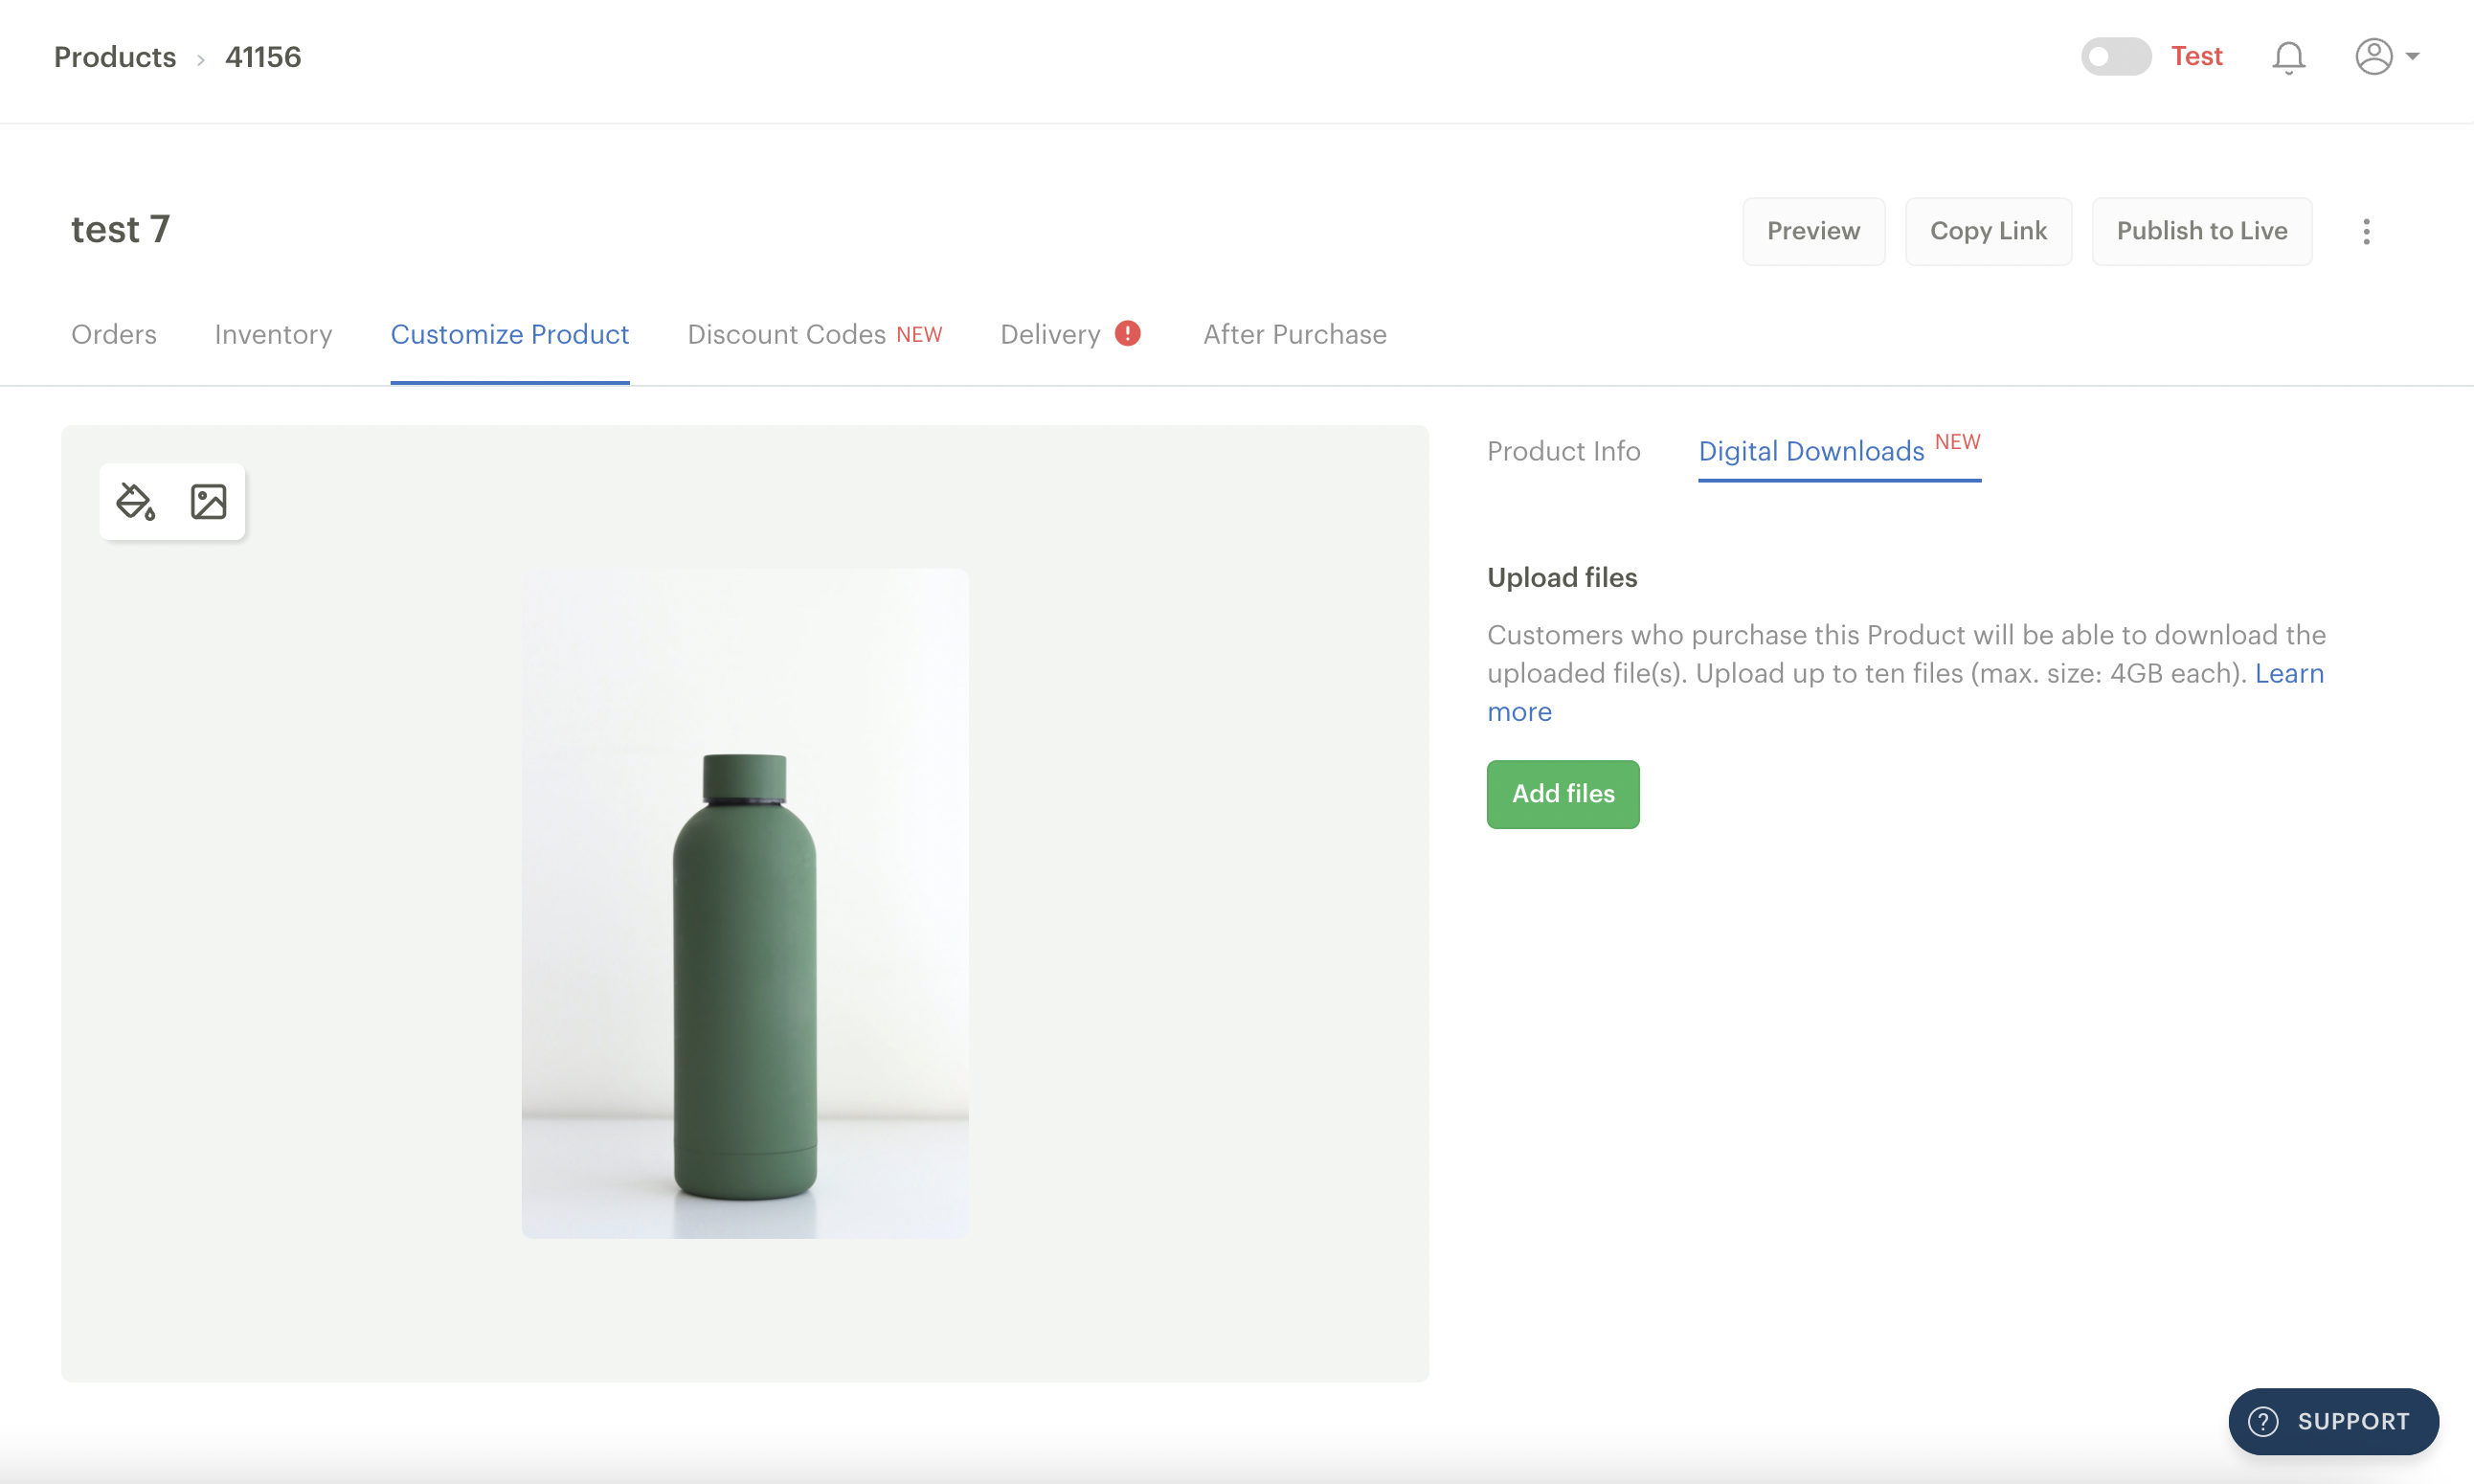
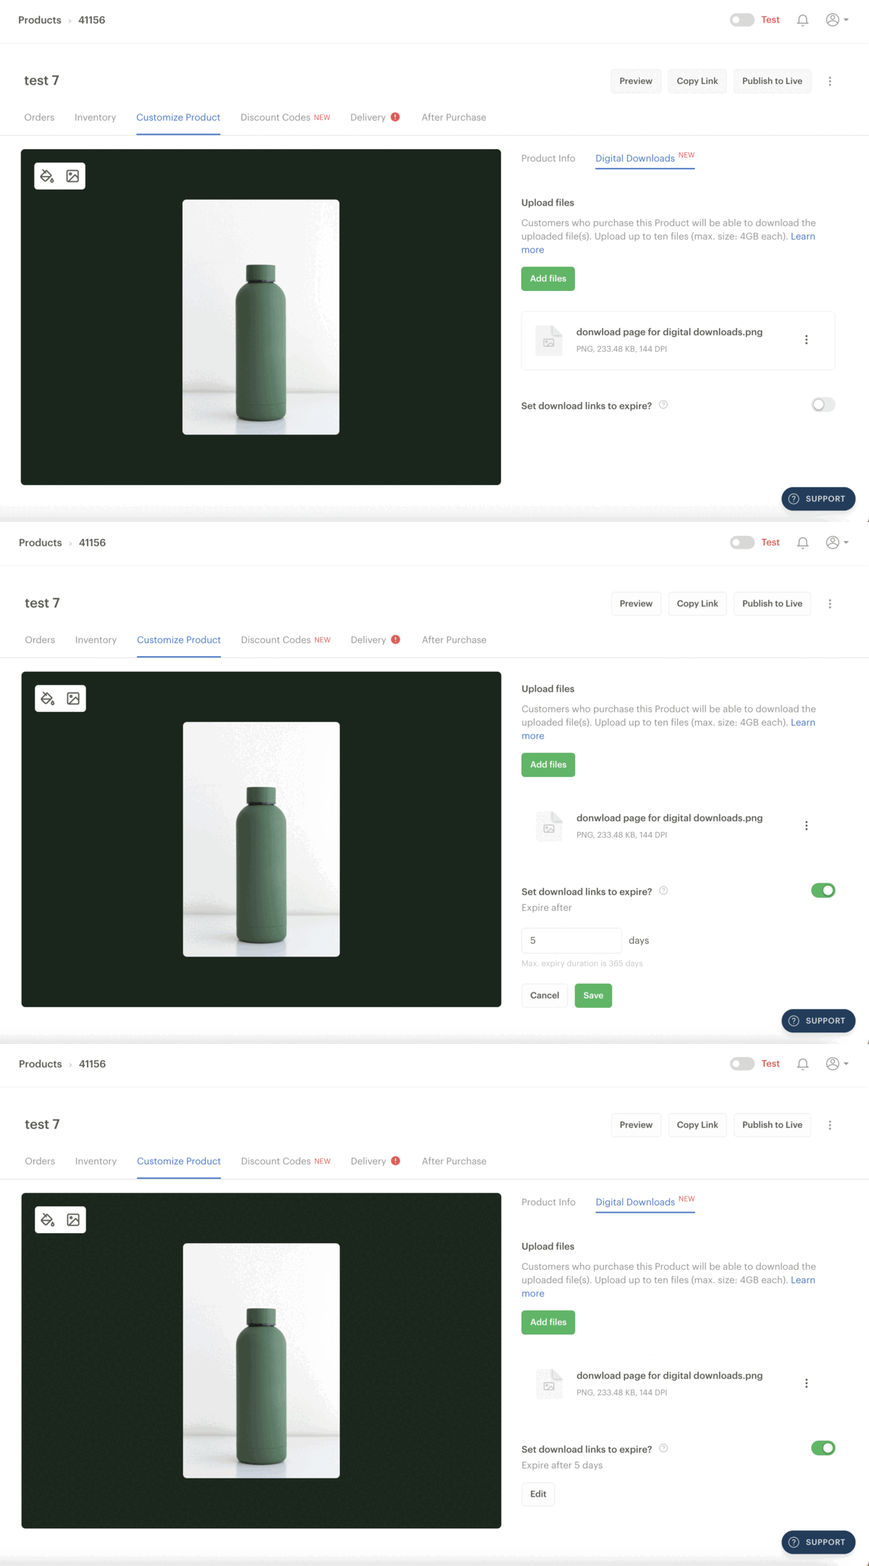
Go to the Customize Product tab and click the ‘Digital Downloads’ tab.
Click the ‘Add files’ button to select the file(s) you want to sell from your device and upload them. You can upload up to 10 files, but there are file size limits for each uploaded file and specific supported extensions.
File size limits
Max image file size - 40MB
Max video file size - 4GB
Max raw file size - 40MB
Max image megapixels - 50MP
Supported file extensions
File format | Supported Extensions |
Text | pdf, doc, docx, txt, odt, rtf, wpd |
Audio | wav, mid, midi, mp3, ogg, aac, m4a, flac, alac, aiff |
Video | avi, divx, flv, m4v, mkv, mov, mp4, mpeg, mpg, ogm, ogv, ogx, rm, rmvb, smil, webm, wmv, xvid, 3g2, 3gp, asx, avi, mov, mp4, mpeg, ogv, tts, webm, wm, wmv, wmx, wvx, asx, avi, m4v, mov, mp4, mpeg, ogm, ogv, webm, wmv |
Spreadsheet | csv, xlsx |
Compressed files | zip, pkg, rar |
Images | ai, gif, psd, svg, tiff, indd, 3dm |
Presets | xmp, fxp |
Slides | key, odp, ppt, pptx |
Other formats | aep, html, xlsx, htm, obj, fbx, ply, stl, wlr |
Accessing purchased files
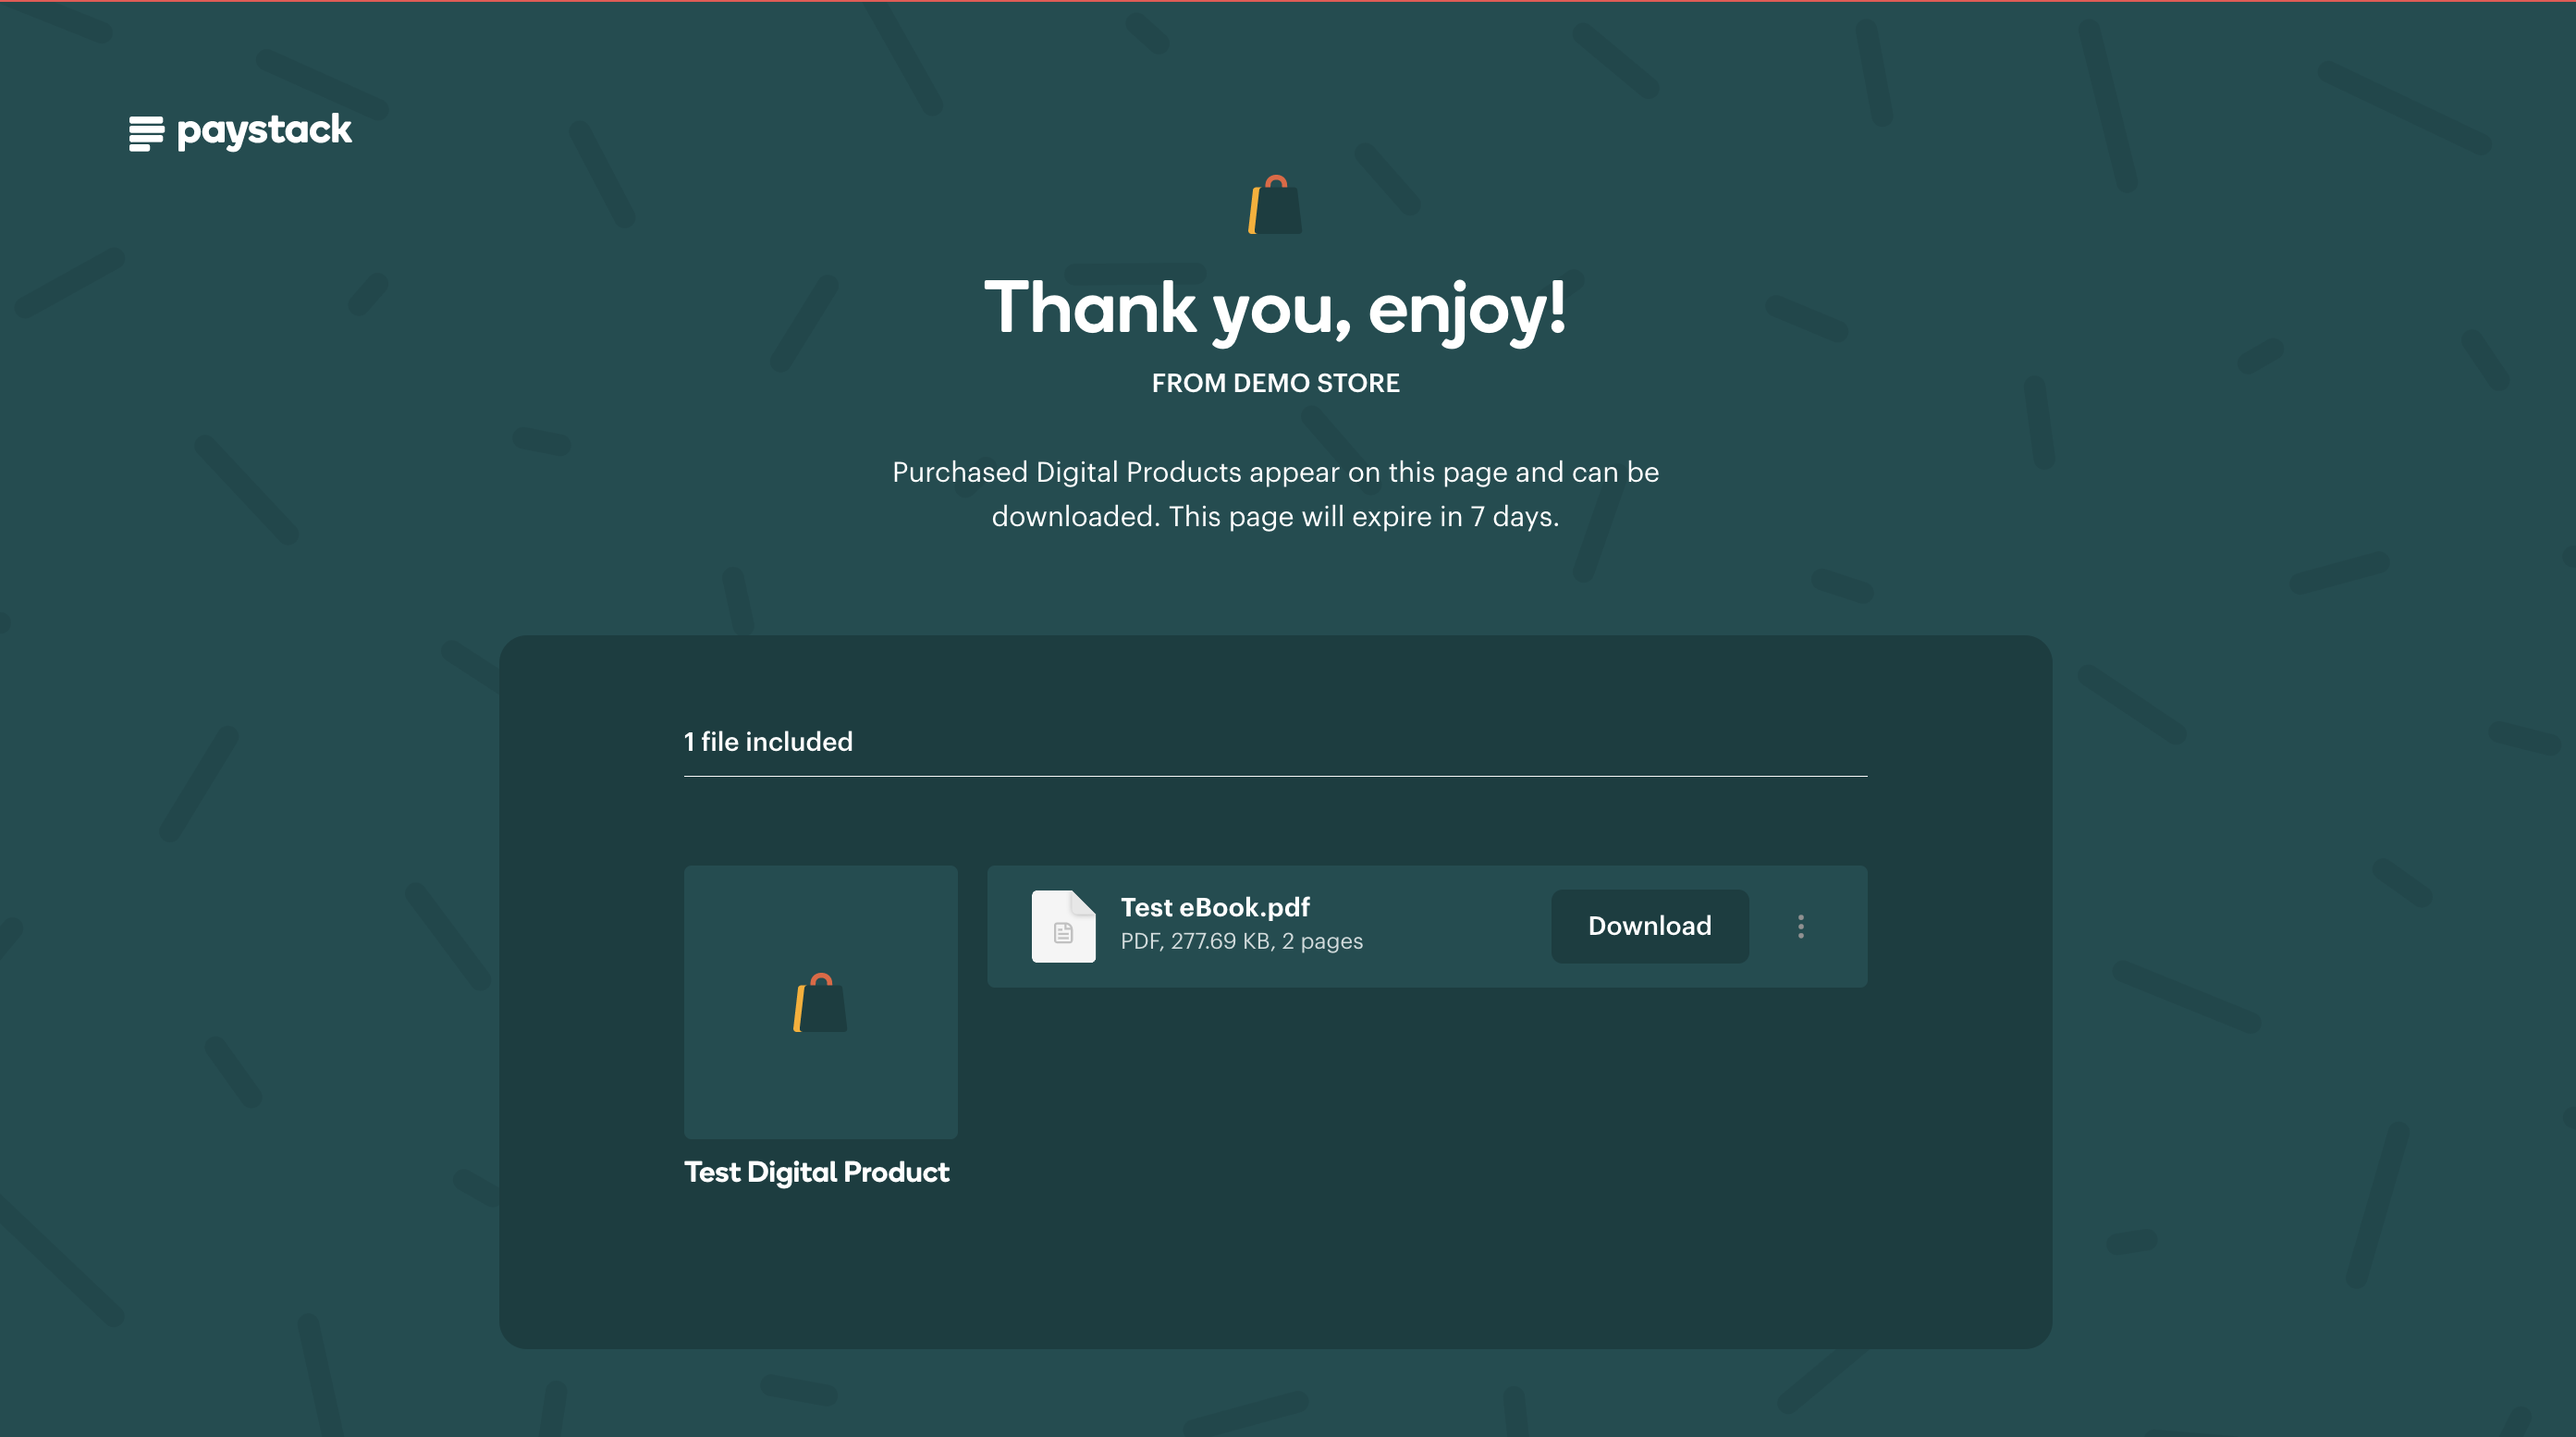
Customers purchasing a Digital Product will be redirected post-purchase to a unique download page. The link to the download page will also be included in the payment receipt sent to the customer. On the download page, customers can download files included in the Digital Product and report any issues they face with the files.
Protecting your download page
On the Dashboard, you can set a validity period for how long customers can access the download page after they purchase your Digital Product.
After uploading your content, click the ’Set download links to expire?’ toggle.
Specify the days you want the download page to be valid after a customer pays. The maximum expiry duration is 365 days.
Once this is done, customers who purchase your Digital Product can access files for the set validity period. If you don’t set a validity period, customers who purchase your Digital Product can access their download page anytime.
Discount Codes tab
Discount Codes are a great way to encourage your new and existing customers to buy more products from you. Once you create a Discount Code for a Product, anyone with your Product Link can apply the discount on checkout, which'll be deducted from the total amount they were initially supposed to pay.
To create a Discount Code for your products, follow the steps outlined below:
Go to the Products page on your Dashboard.
Select an existing Product or create a new one.
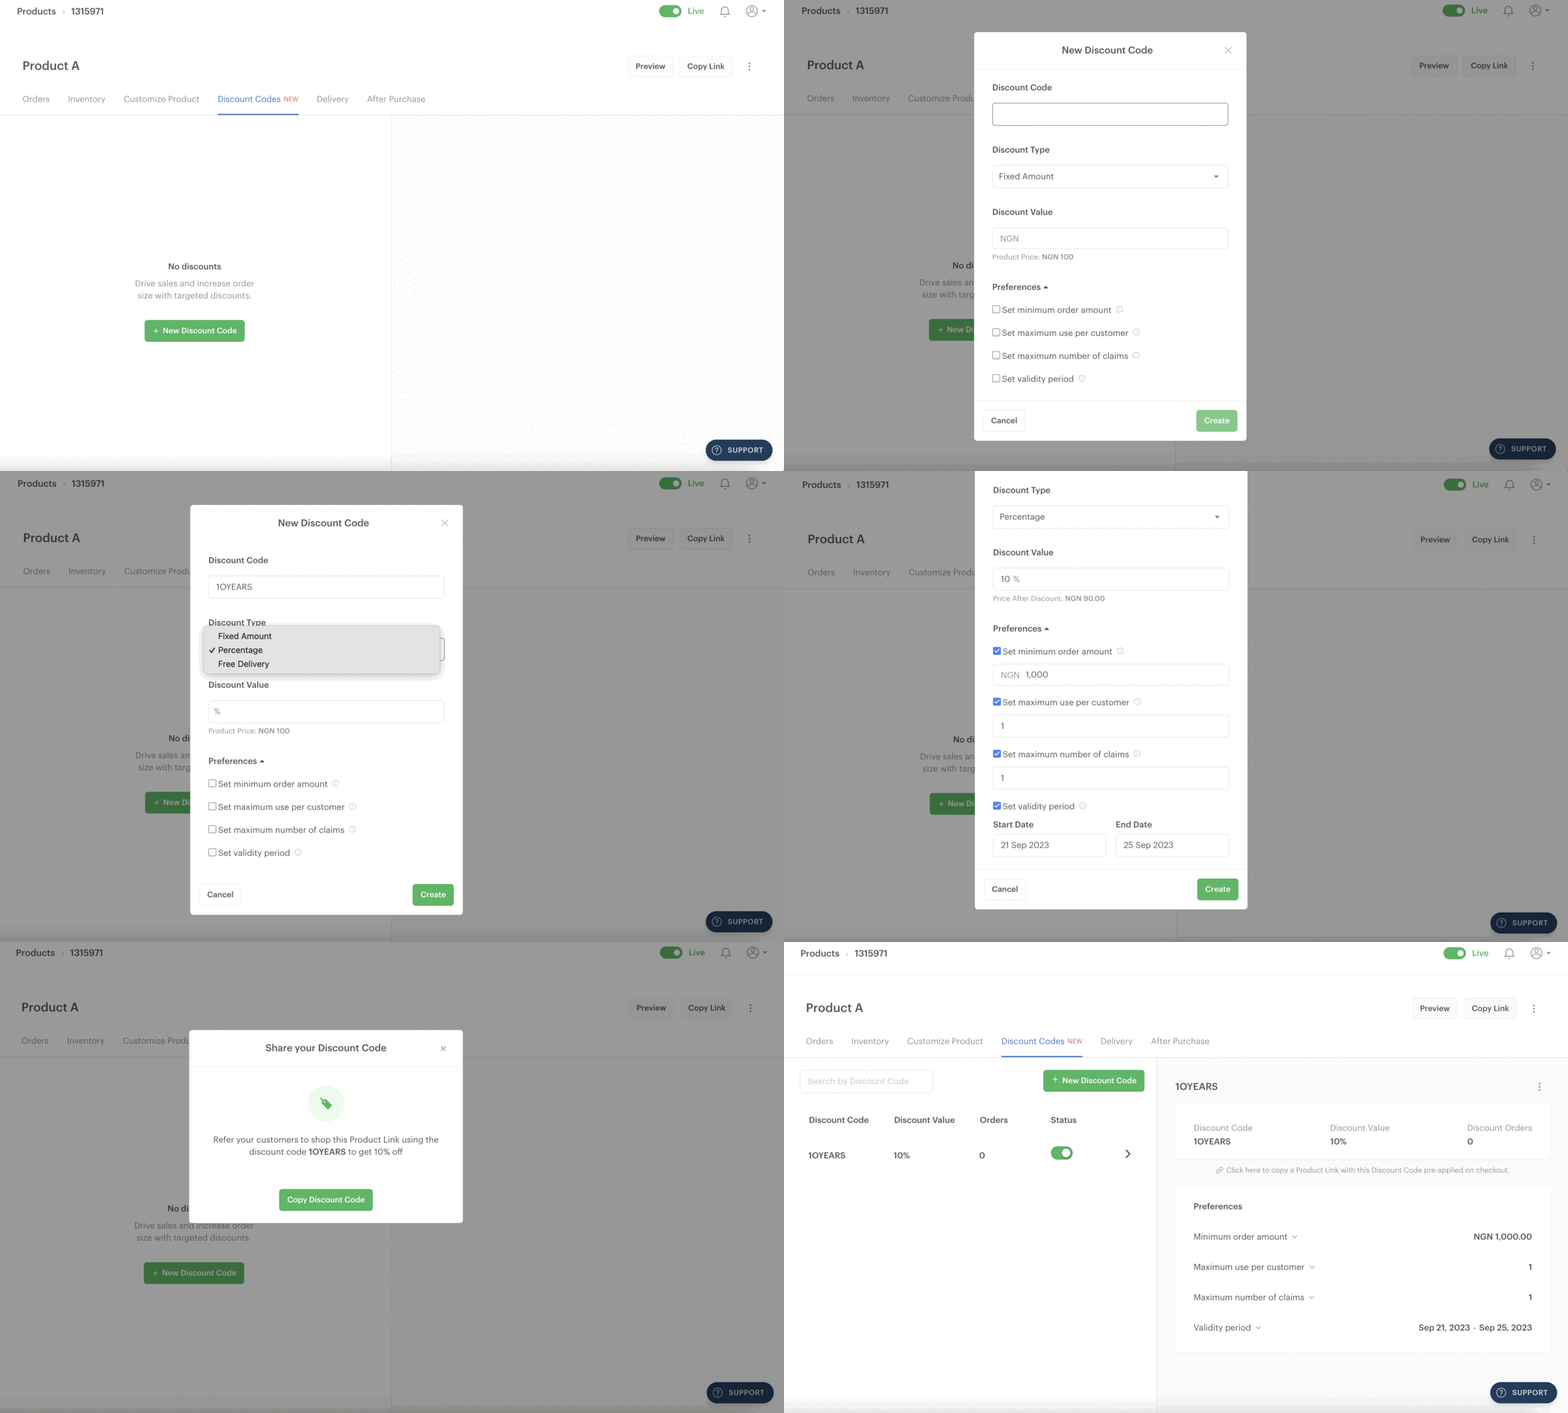
Click on 'Discount Codes,' and a prompt will appear.
Customise your Discount Codes preferences on the prompt and click the Create button. Once created, a Discount Code cannot be edited.
Discount Code customisations
Discount Code: Here, you'll need to enter the discount code you want your customers to apply on checkout after placing their orders. It can be a set of uppercase letters or alphanumeric characters i.e. a combination of uppercase letters and numbers like WINBT, TTHE123, etc.
Discount Type: The discount type is where you can select the kind of discount you want to give your customers. You can give a Fixed Amount discount e.g. NGN 500 off a customer's order, a Percentage discount e.g. 10% or a Delivery Fee discount (free delivery).
Discount Value: This is where you input the value for your discount depending on whether you're giving a fixed or a percentage discount.
Set minimum order amount: This is the minimum amount of items a customer can purchase to qualify for the discount. For example, a discount of NGN 500 on all orders from NGN 10,000 and above.
Set maximum use per customer: This is the number of times customers can apply a particular discount code to their order. For example, first-time customers can get a 10% discount on all their orders if they apply this discount code — WEL10 — at checkout.
Set maximum number of claims: This is the total number of times a discount code can be used on orders. For example, a maximum number of claims set at 20 means that the discount code cannot be applied more than 20 times on checkout. After the 20th claim, the discount code becomes invalid.
Set validity period: You can set a validity period if you want the discount to run for a specific period. For example, if you're running a Black Friday sale, you may set a validity period of November 15 - November 30. This means that any customer who tries to apply this Discount Code before November 15 and after November 30 cannot apply the discount successfully.
After creating your Discount Code, copy it by clicking the ’Copy Discount Code’ button on the pop-up and share it with anyone to apply on checkout.
You can also click the link on the ‘Click here to copy a Product Link with this Discount Code pre-applied on checkout’ text on the right half of the page to copy the link to your product link with the Discount Code already applied on checkout.
Applying a Discount Code on a Product
Customers can apply discount codes at Checkout in two ways:
By clicking on the product link with the discount code already pre-applied, which you might have shared with them, as explained above.
By going to the order form to manually input the discount code. To do this, they can follow the steps below:
Click on the Product Link and select the number of products they want to buy.
Click Buy Now and fill out the order form.
Click Review and Pay.
Click ’Have a discount code?’ and enter the Discount Code.
Click Apply. The discounted amount will show on the pay button (e.g. Pay NGN 170).
Select their preferred payment channel and complete the payment.
Disabling or deleting a Discount Code
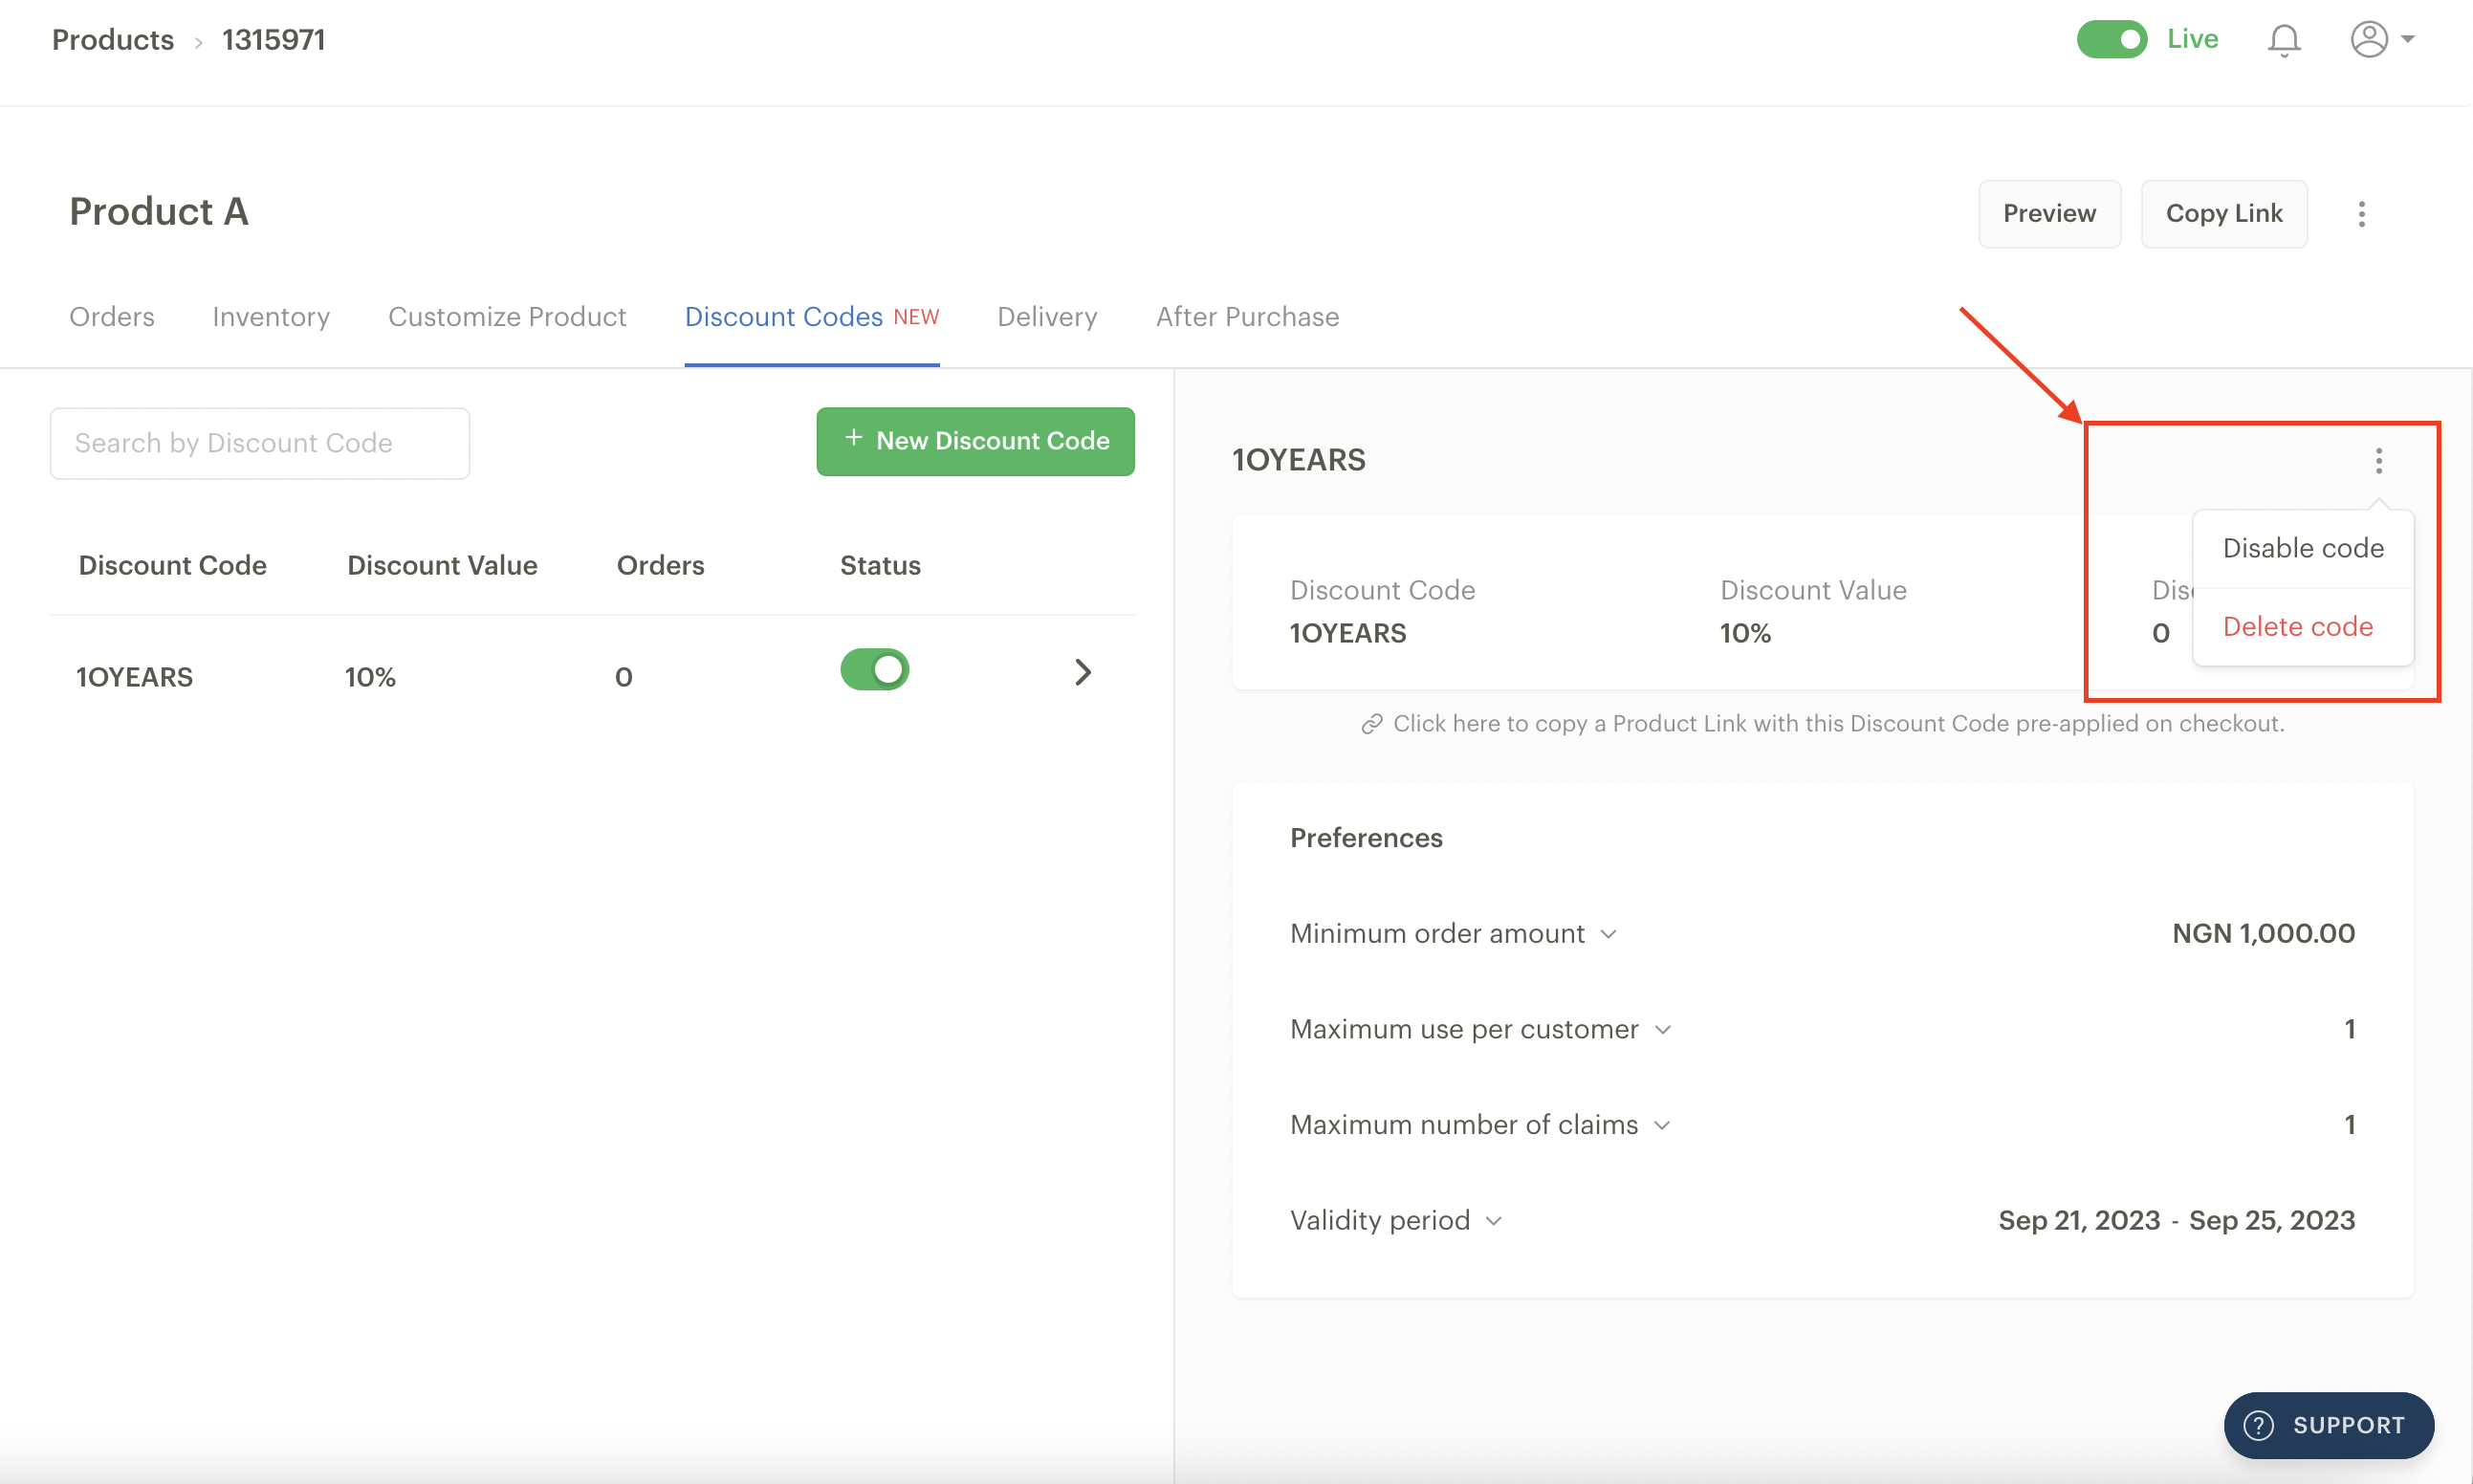
You can disable a discount code at any time if you no longer want customers to be able to claim the discount. To disable it, you only need to click on the three vertical dots at the top-right corner of the Discount Code page and select ‘Disable code.’ You can also reactivate the Discount Code whenever you run your discount sales again. To do this, simply click the Discount Code on your list of discounts and click on the green toggle under the Status tab.
To delete a discount code, click on the three vertical dots at the extreme right corner of the page and select "Delete code". Deleting a discount code means that the code will no longer be found on your Dashboard, and if you wish to reuse that same code in the future, you'd have to create a new one.
Delivery tab
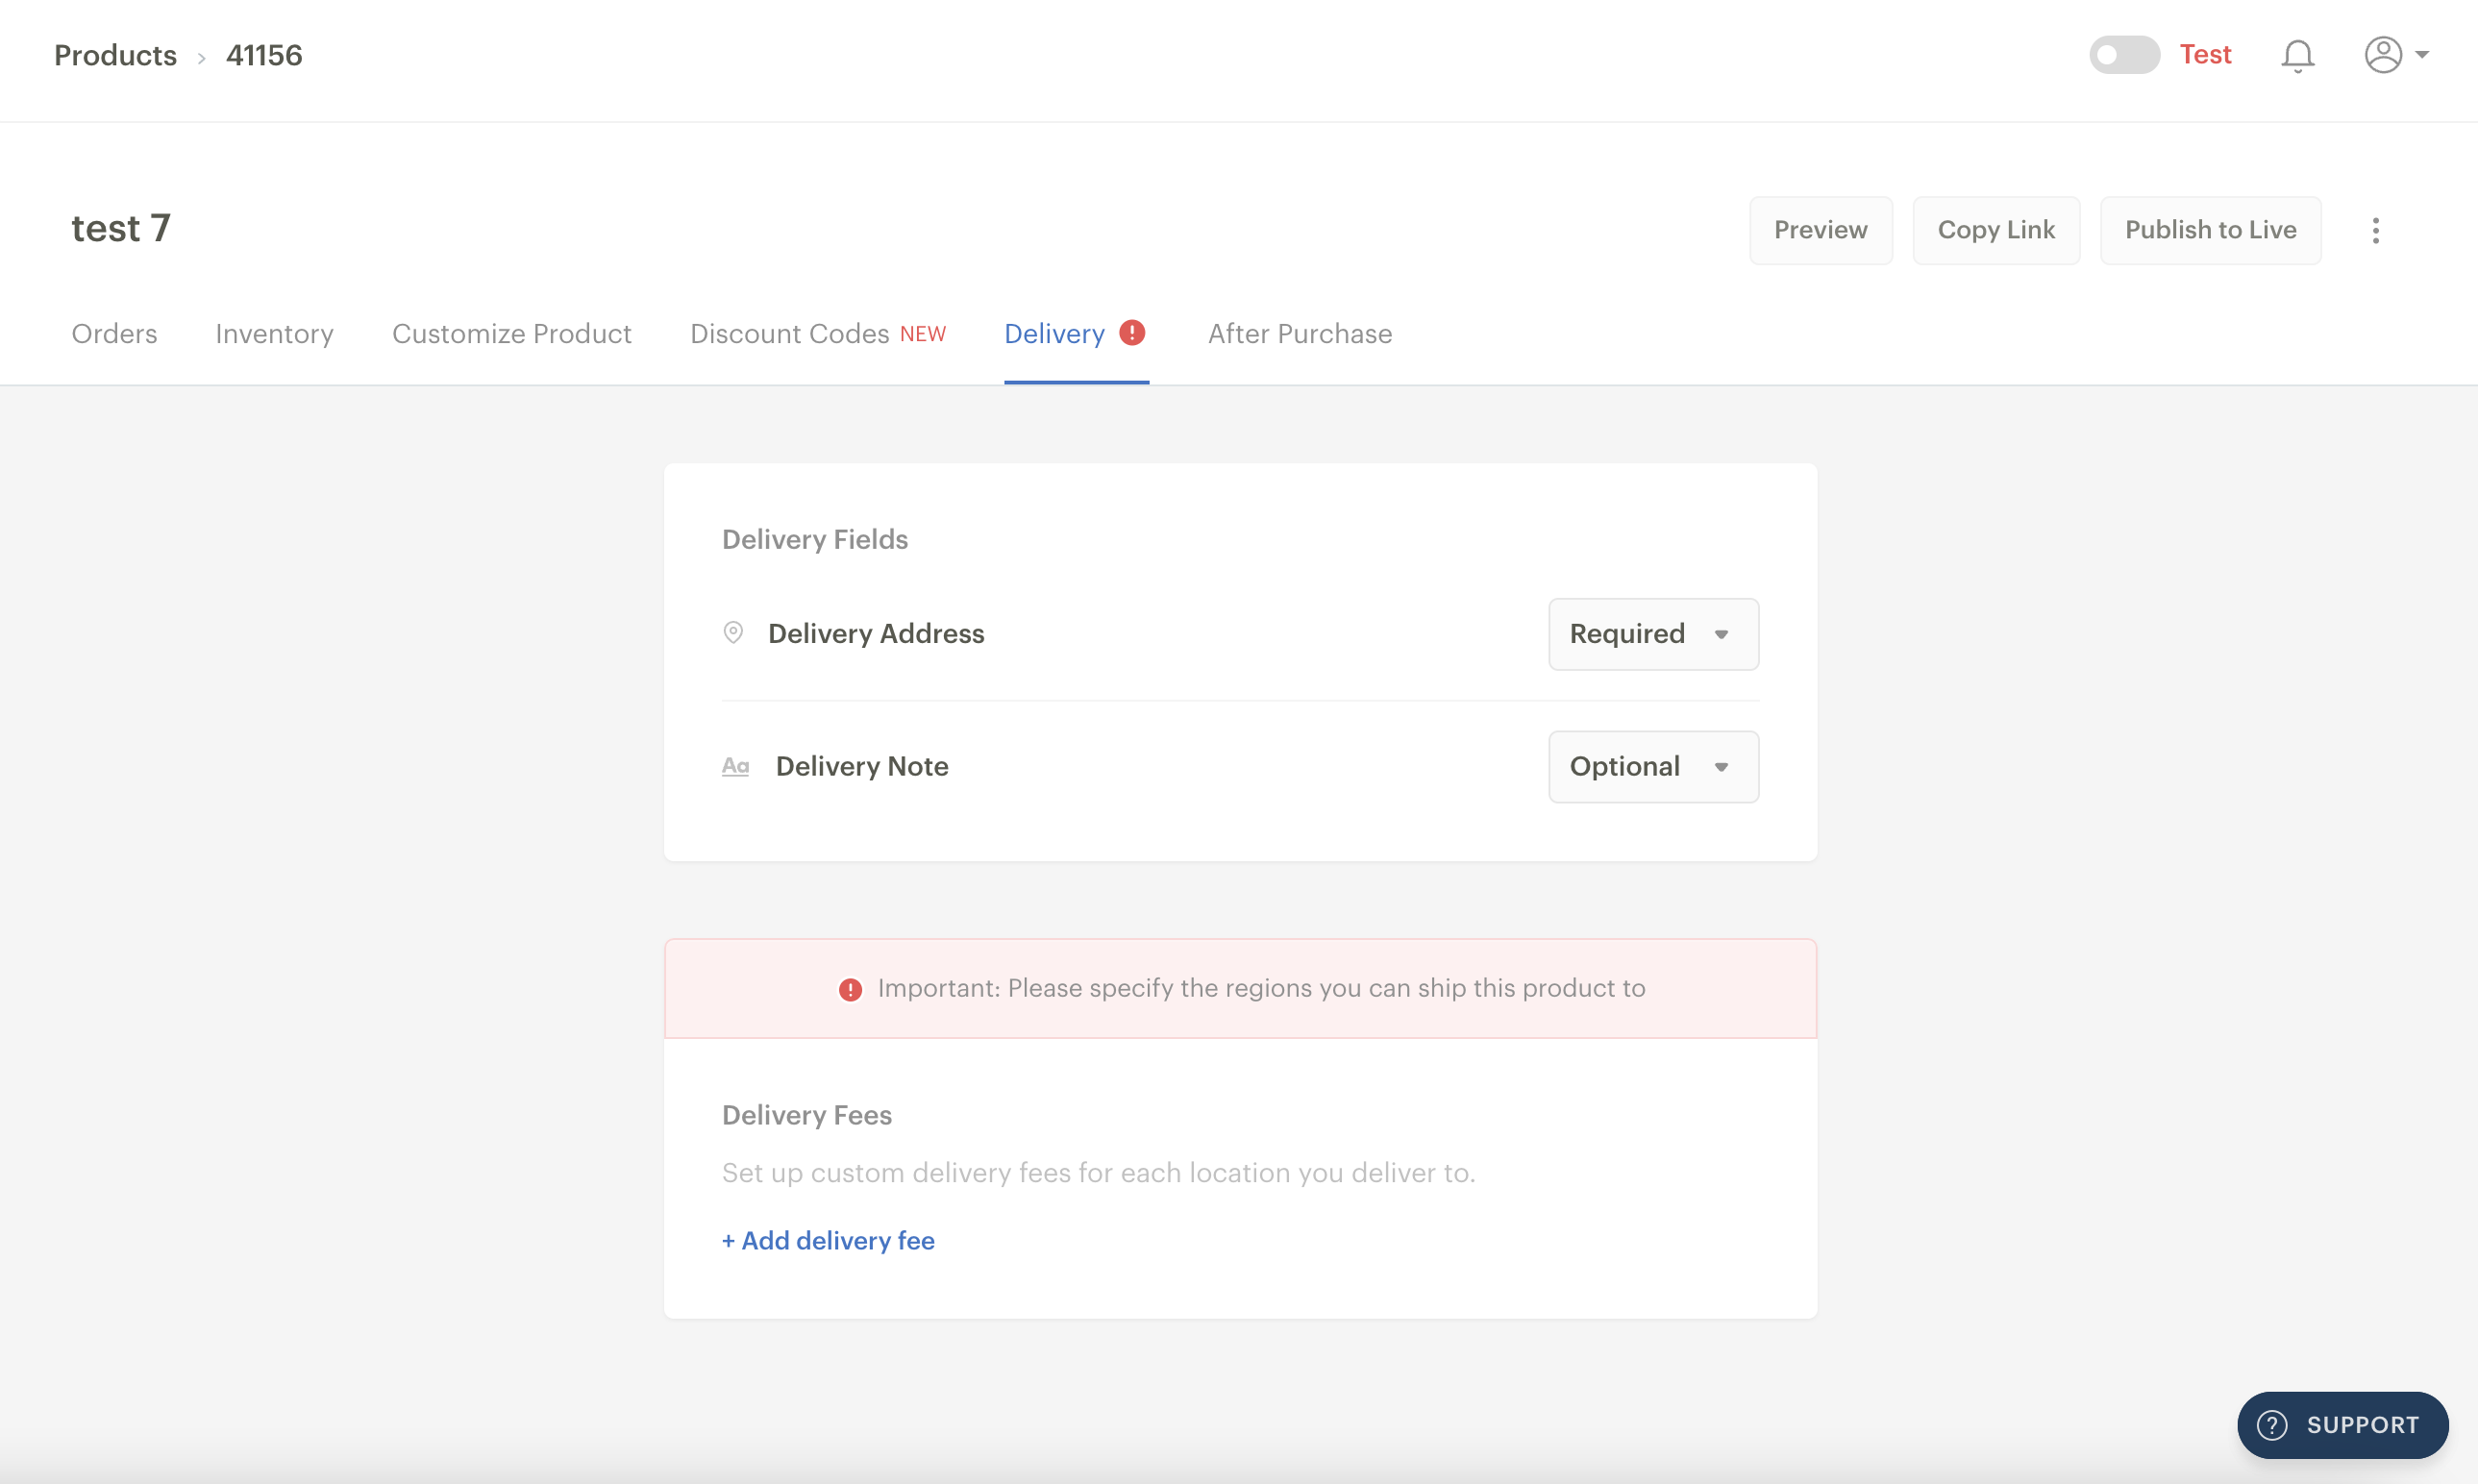
Delivery Address: You can set the Delivery Address field as ‘Disabled’ or ‘Required’ by clicking on the dropdown beside the ‘Delivery Address’ option. Disabling the Delivery Address means your customers won't be prompted to enter their delivery address when they pay.
Setting this as ‘Required’ means they must enter their delivery address before proceeding with payment.
This option is particularly helpful if you sell physical goods you must ship to your customer. If you make this Required, you must specify the different delivery locations or regions to which you can ship the product.
Delivery Note: This lets you set the Delivery Note field as Disabled, Required or Optional. The delivery note can be for specific delivery instructions or requests from the customers. Setting this field as ‘Required’ means customers must enter a delivery note. However, if this is set to ‘Optional,’ your customers can choose not to provide this.
Delivery Fees: This is where you set the delivery fee for your products. You can set different shipping fees for different locations with this option. Your customers must choose their location on the Product Link form from the options you’ve set before they check out. You can add as many locations and fees as you like.
After Purchase tab
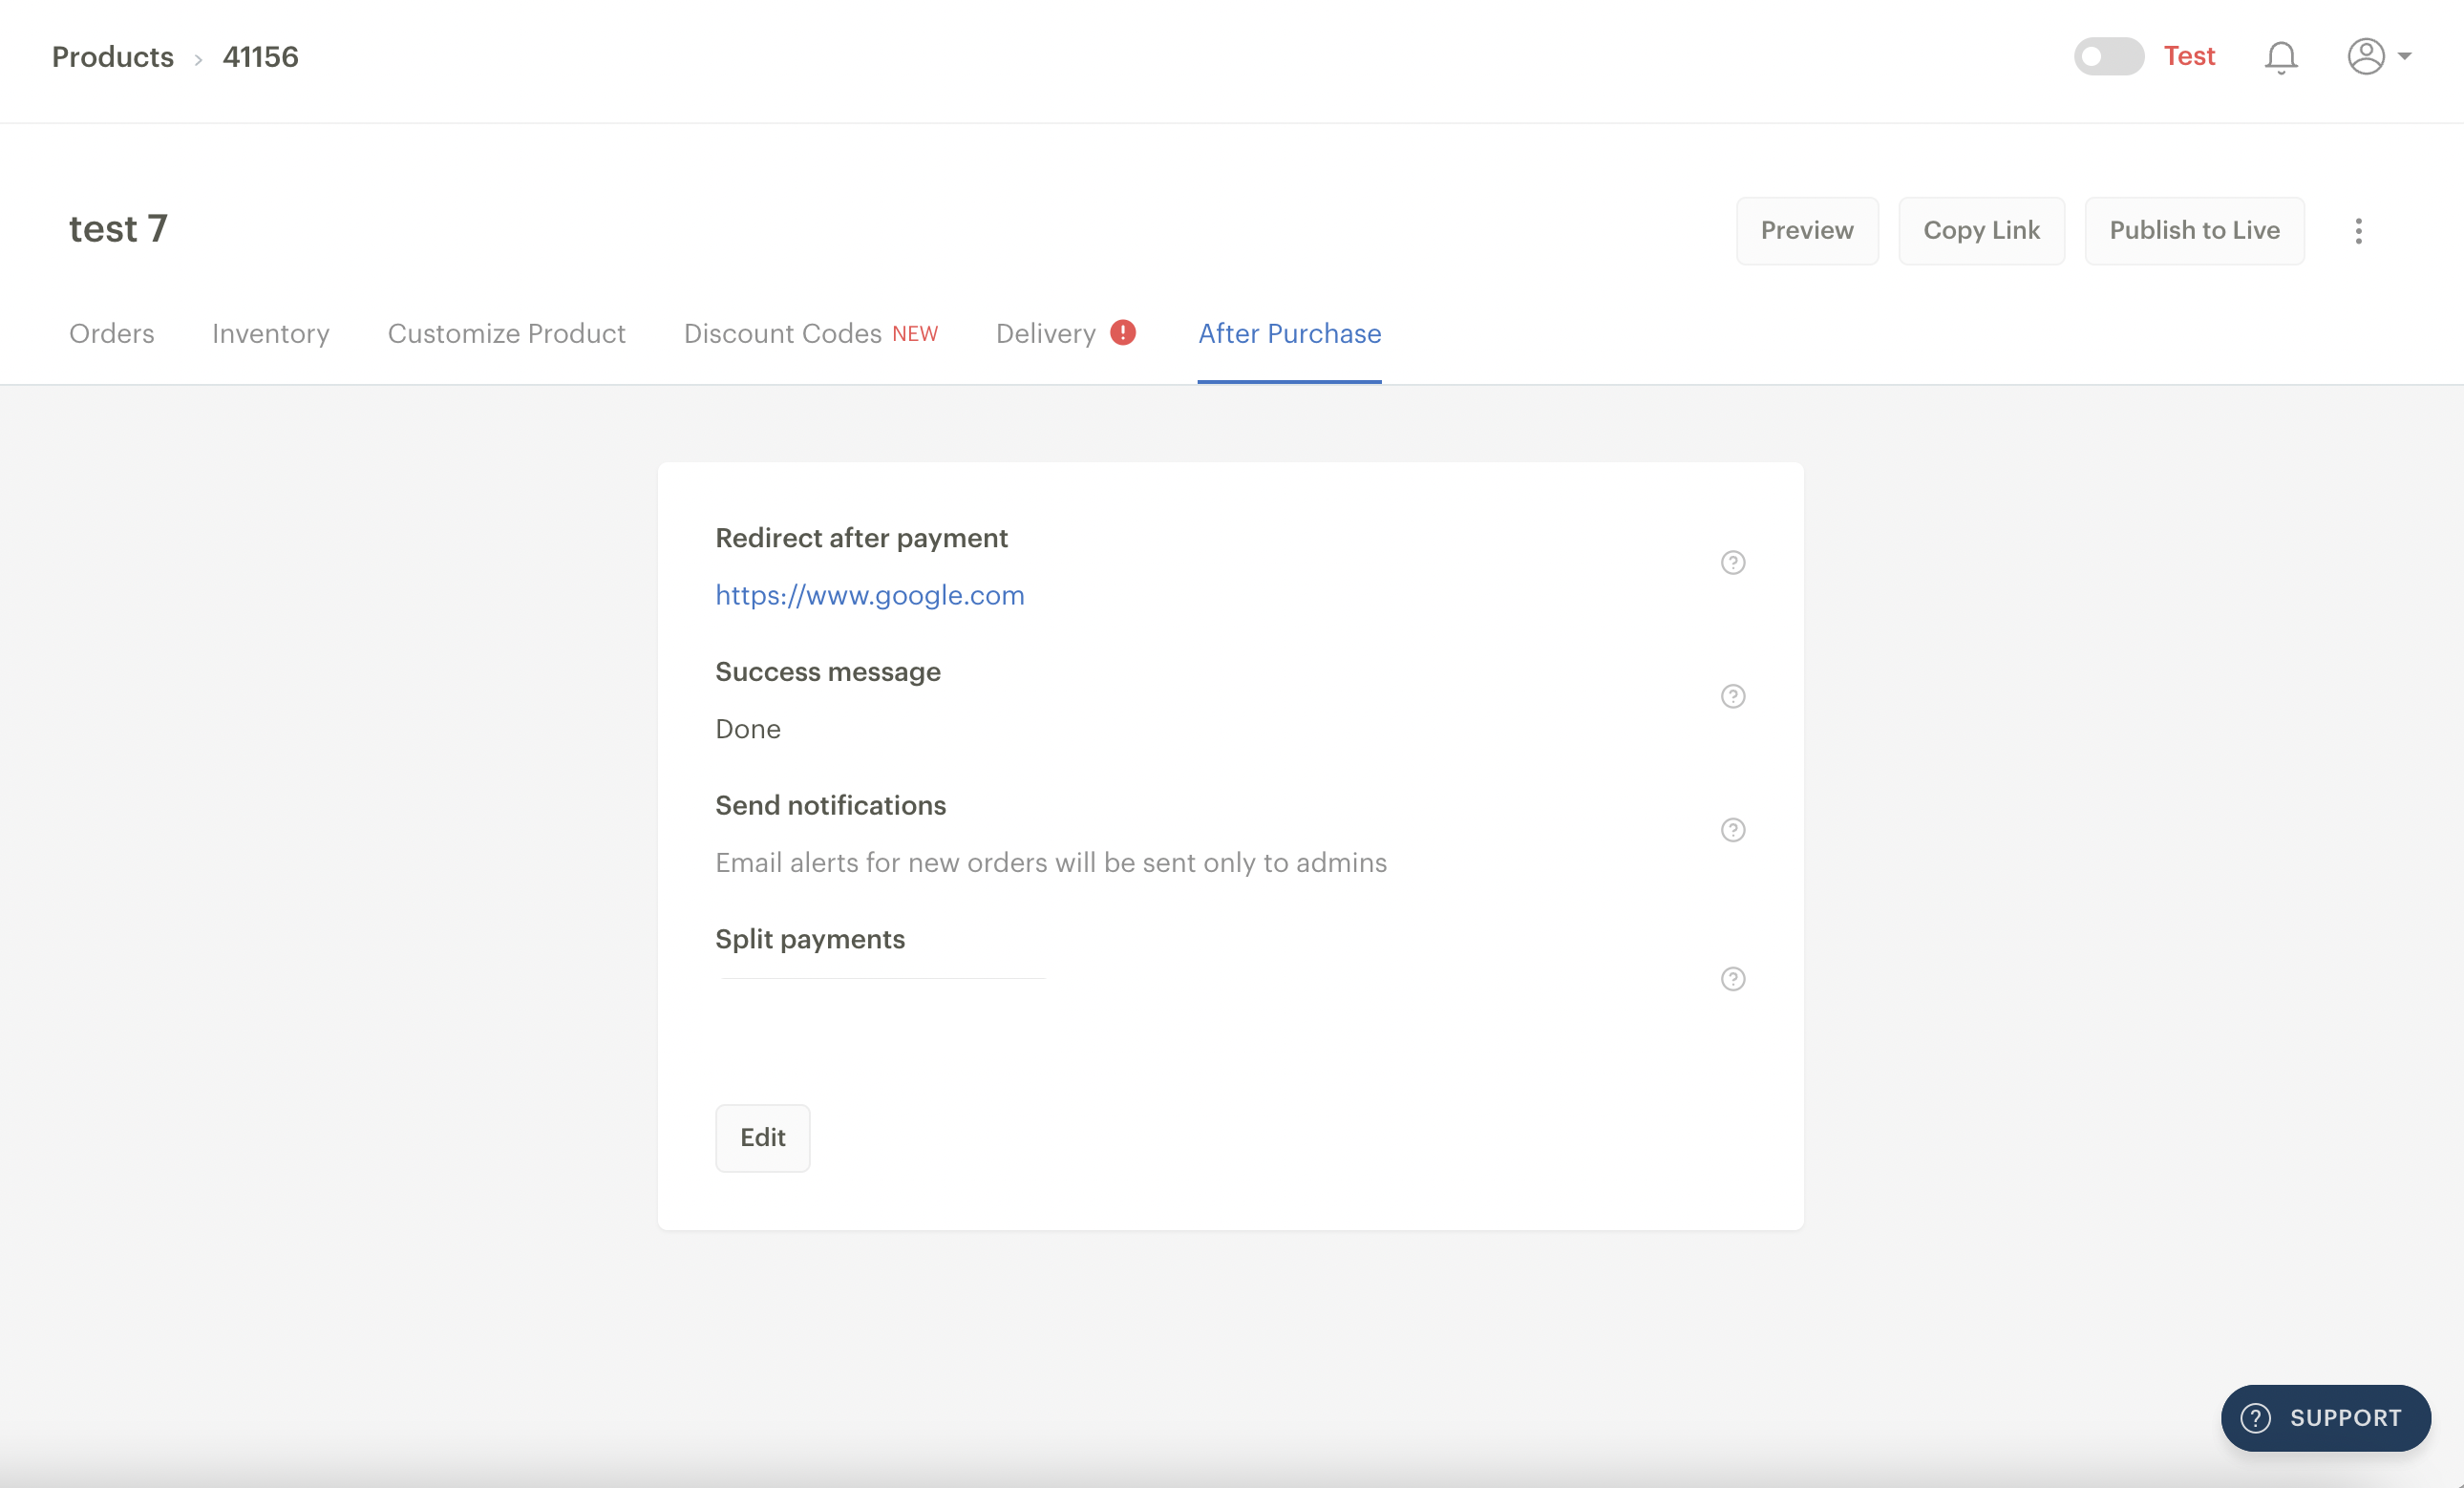
Redirect after Payment: The link you enter in this field is where customers are redirected after a successful transaction. By default, after a customer completes a successful transaction, they remain on a 'Thank You' page. Entering a URL here ensures the customers are redirected to a URL of their choice after payment.
Success message: Here, you can set a post-transaction message that customers will see after a successful transaction.
Send notification: You can choose to share successful payment alerts on this Product Link to other email addresses. By default, the admins on your Dashboard will receive these alerts.
Split payments: This lets you split money received from the transaction made from this page between your account and another payout account. For this to work, you'll need first to create a Subaccount. You can check this article out for more information on Split Payments.
Edit: Clicking on this button lets you edit any of the above-mentioned fields.
Other Product settings
Changing the price of a Product
To change the price of a Product you have created, all you need to do is click on the Inventory tab of the Product, choose the Edit option on the right side of the page, make the required changes, and click Save.
Deleting a Product
To delete a Product you have created on the Paystack Dashboard, follow these steps:
Go to the Products tab of your Dashboard.
Search for the Product you want to delete.
Click on the three horizontal dots at the bottom of the Product card.
Click Delete to confirm you want to delete the product.
You cannot restore a Product once it has been deleted.
Archiving a Product
You can archive inactive Products instead of deleting them. When you archive a product, you’ll still be able to view this product on your Dashboard. However, your customers won’t be able to view or buy the Products. You can archive a product when you're no longer actively selling that product but still need to store and have access to data regarding that product, such as Order History.
To archive a Product, follow these steps:
Go to the Products tab of your Dashboard.
Select the Product you want to archive.
Click on the three vertical dots on the right side of the Product.
Click on Archive and confirm you want to archive the product.
Restoring a Product
You can restore an archived product if you want to make it active again. To restore an archived Product, follow these steps:
Go to the Products tab of your Dashboard
Click the Filter button to view all archived products.
Find the product you want to unarchive. You can restore that product in one of two ways. You can click on the ‘Restore’ text at the bottom of the Product card or click on the Product card to view the Product. Click on the three horizontal dots at the top right corner of the screen, and click on ’Restore Product.’
The Orders page on the Dashboard
The Orders page houses all information about all the Products that have been purchased through the Product Links and Storefront tools. On this page, you’ll find an overview of your orders and carry out all order management activities such as tracking orders, cancelling orders, tracking revenue, and marking orders as delivered.
To view your orders, log into your Paystack Dashboard and click on Orders on the left menu bar.
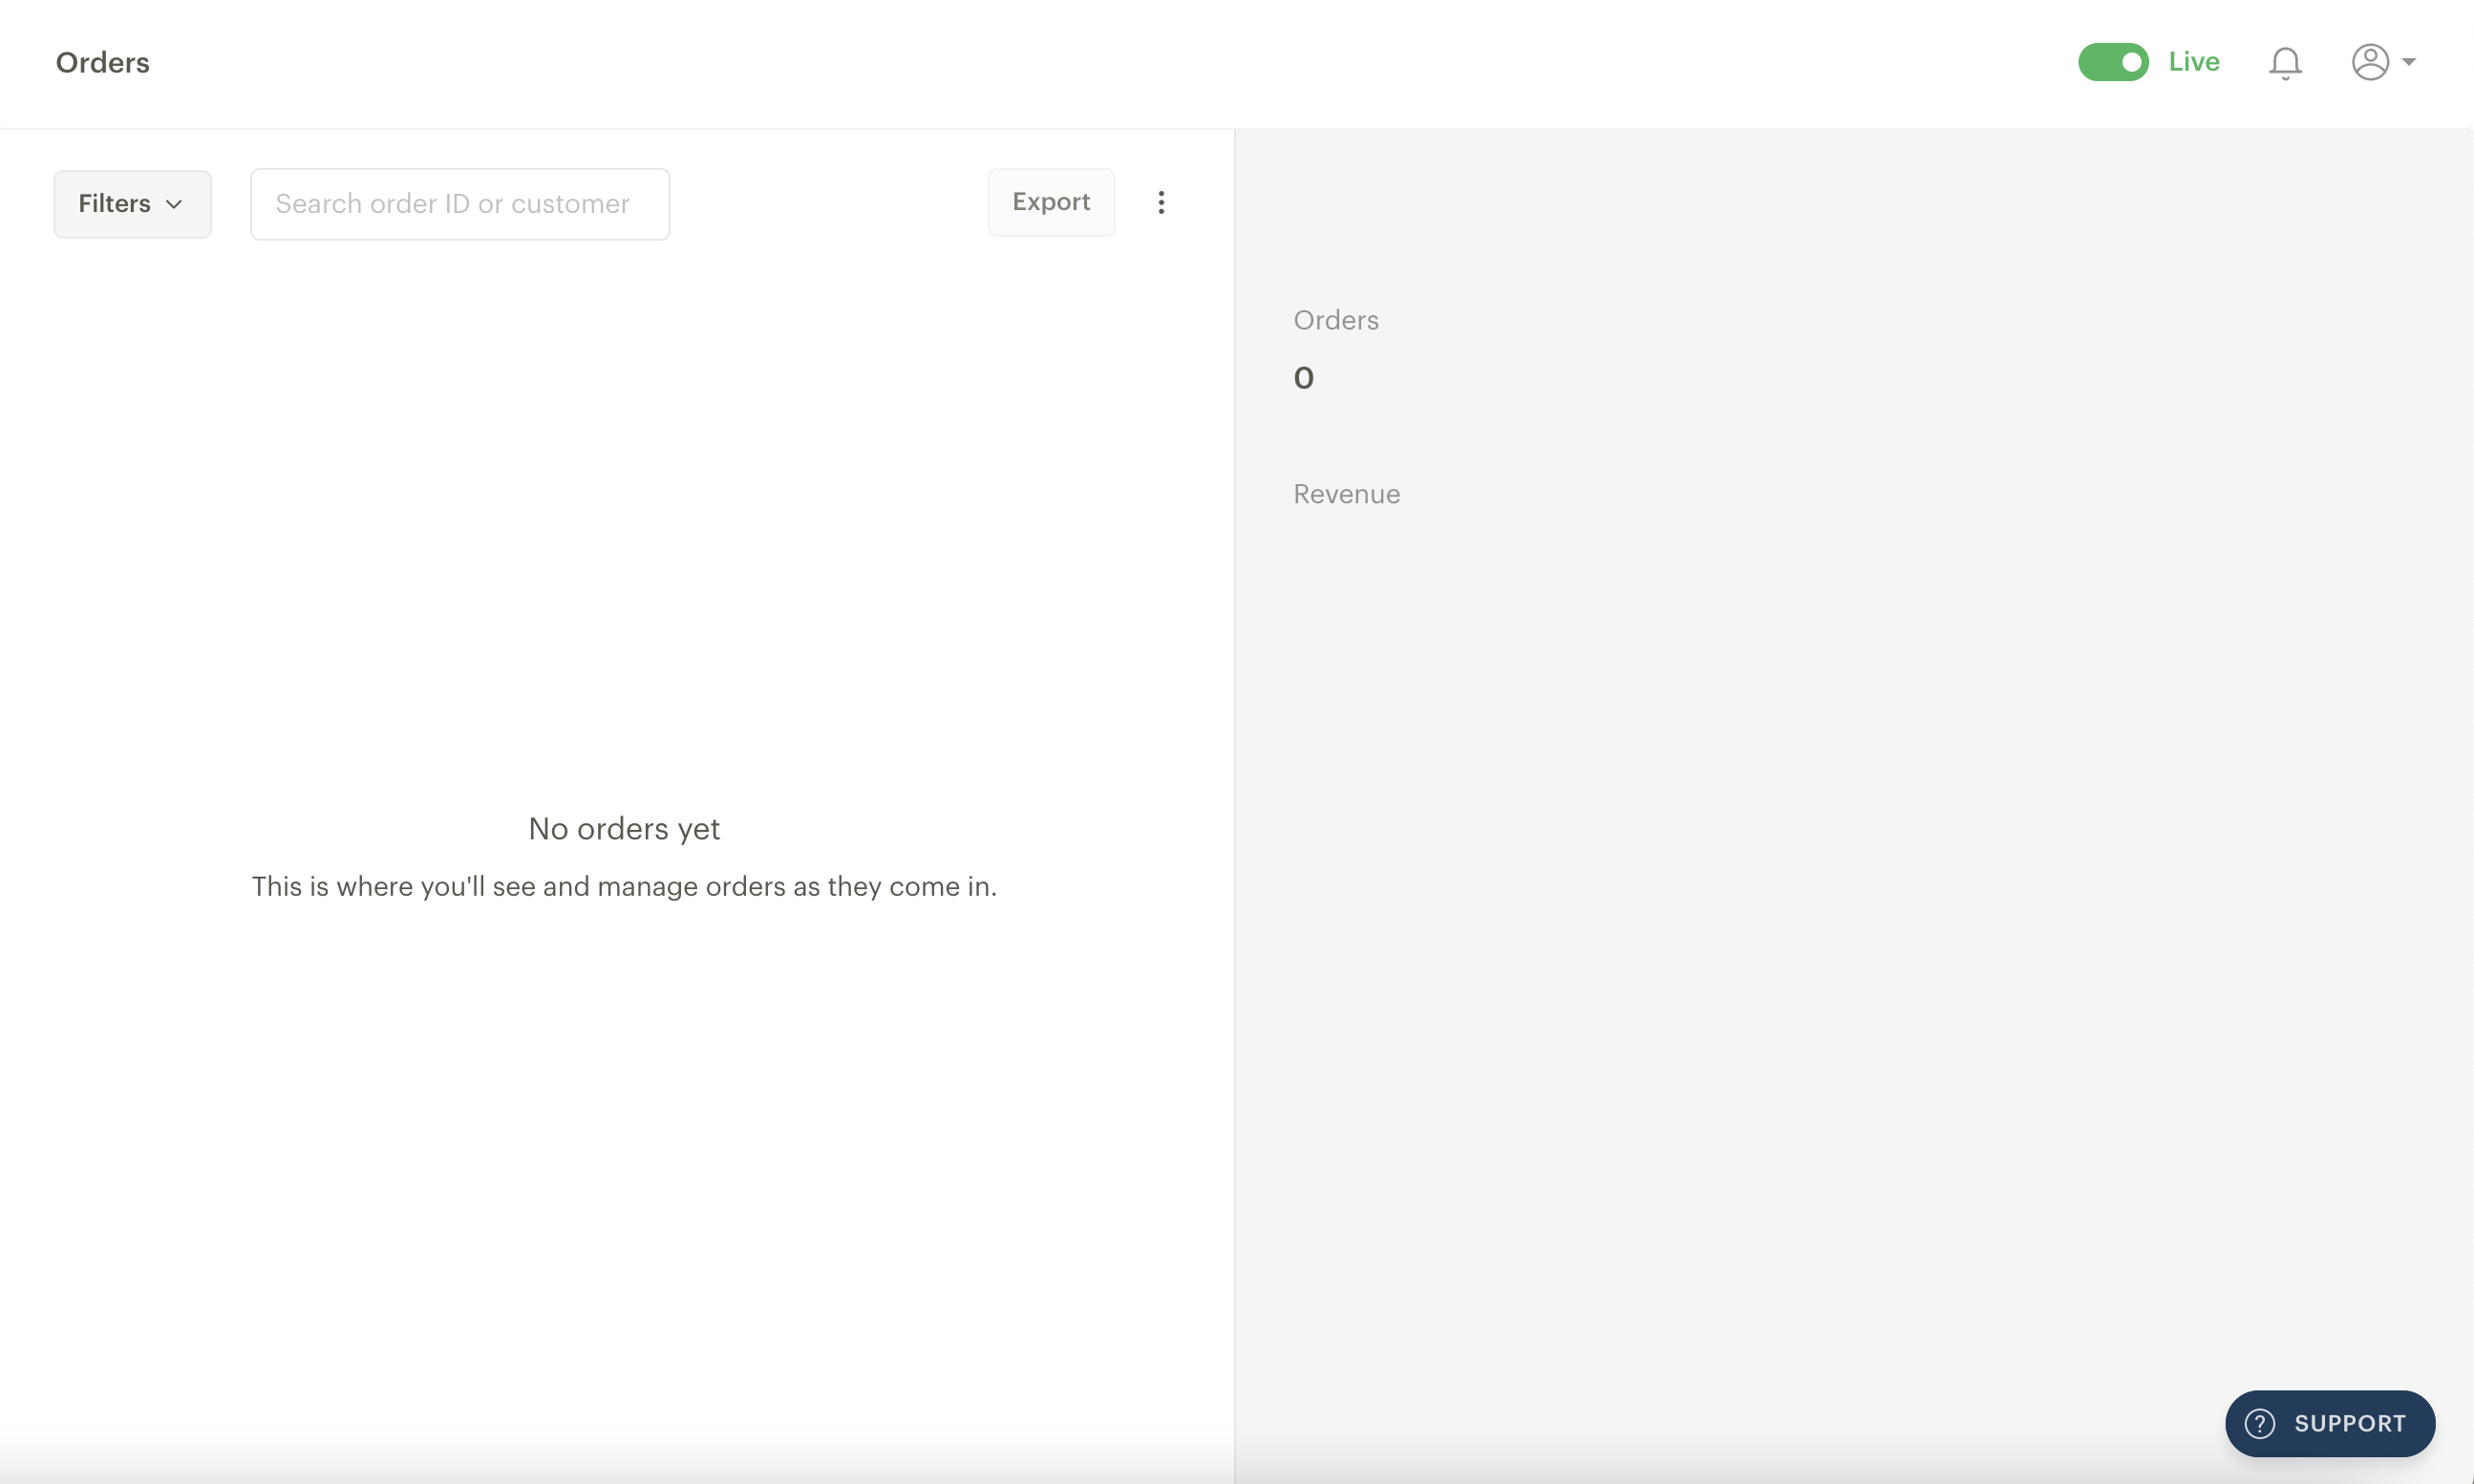
Filters: You can view orders based on the Product, status (pending, delivered, cancelled or refunded) and order date.
Search order: Search for orders with the Order ID or customer name.
Export: You can export all order information on this page with this button. Click on it to choose the columns you want reflected in the report. You’ll get the report in CSV format.
Orders: This is the total number of orders that have been placed across all your Paystack Products Link.
Revenue: This is the total amount that has been paid to your business through your Product Link(s) and Storefront(s).
A list of all your orders will appear on the left half of the page, and you can get more information on that order by clicking on it.
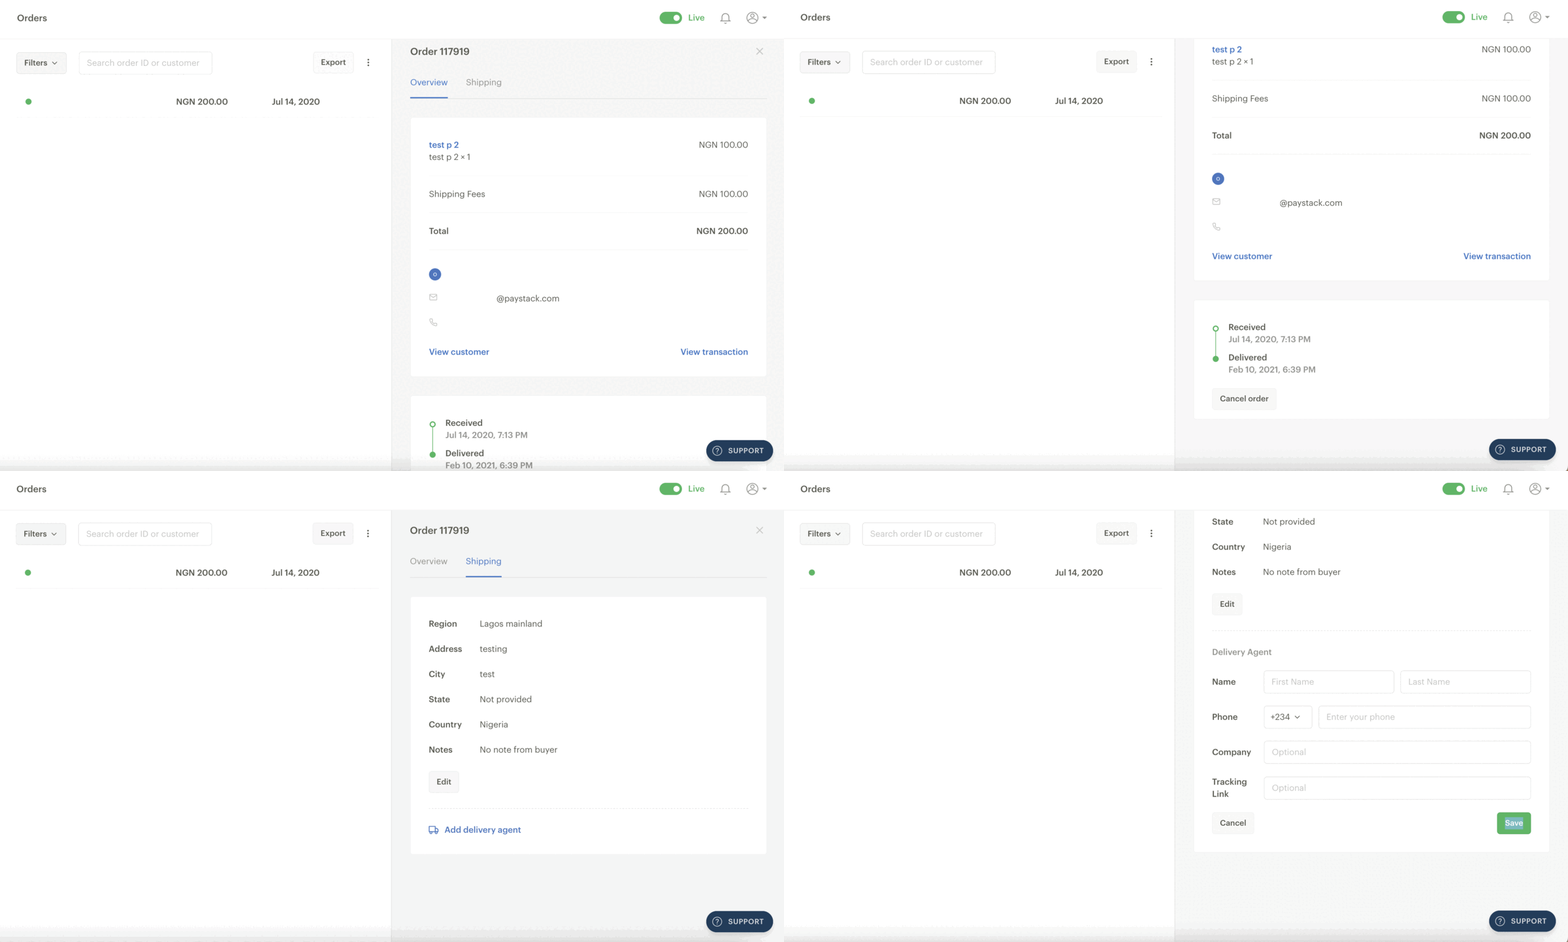
When you open an order, the first tab you'll see is the Overview tab. At the top left of the page, you'll find the Order ID, a numeric identifier for the order. You can choose between the Overview or Shipping tab depending on the information you need about the order.
Directly below the Order ID, you'll find details about the quantity of items in the order and the total order cost. If you need to access customer information, you can click on the ‘View customer’ button, or if you want to view transaction details, click the ‘View transactions’ button.
Further down, you'll see the order's reception and delivery dates (if applicable). If you need to cancel the order for any reason, a 'Cancel order' button is available at the bottom.
Switching to the Shipping tab, you'll see the customer's delivery information. Additionally, an option to add information about the delivery agent can enhance your ability to track the order's delivery process effectively.

