Payment Pages
Payment Pages are one of the easiest ways to collect payments with Paystack. Our Payment Pages allow you to create a simple payment form to collect either one-time or recurring payments.
The Page can be accessed by a link you can share with your customers via email, WhatsApp, Twitter or any medium you choose. This link is also unique to your business. All your customer has to do is open it and pay you via the payment options on the Paystack Checkout.
With Paystack Payment Pages, you have versatile options for collecting payments:
One-time Payment Page: This is a simple page to collect customer payments. You can set a fixed amount on the Page or allow customers to enter their desired amount before paying.
Subscription Payment Page: Use this page to gather customer recurring payments. They only need to pay once on this Page to initiate the subscription.
Product Payment Page: Simplify the process of selling a single product from your inventory with this page.
Setting up a One-time Payment Page
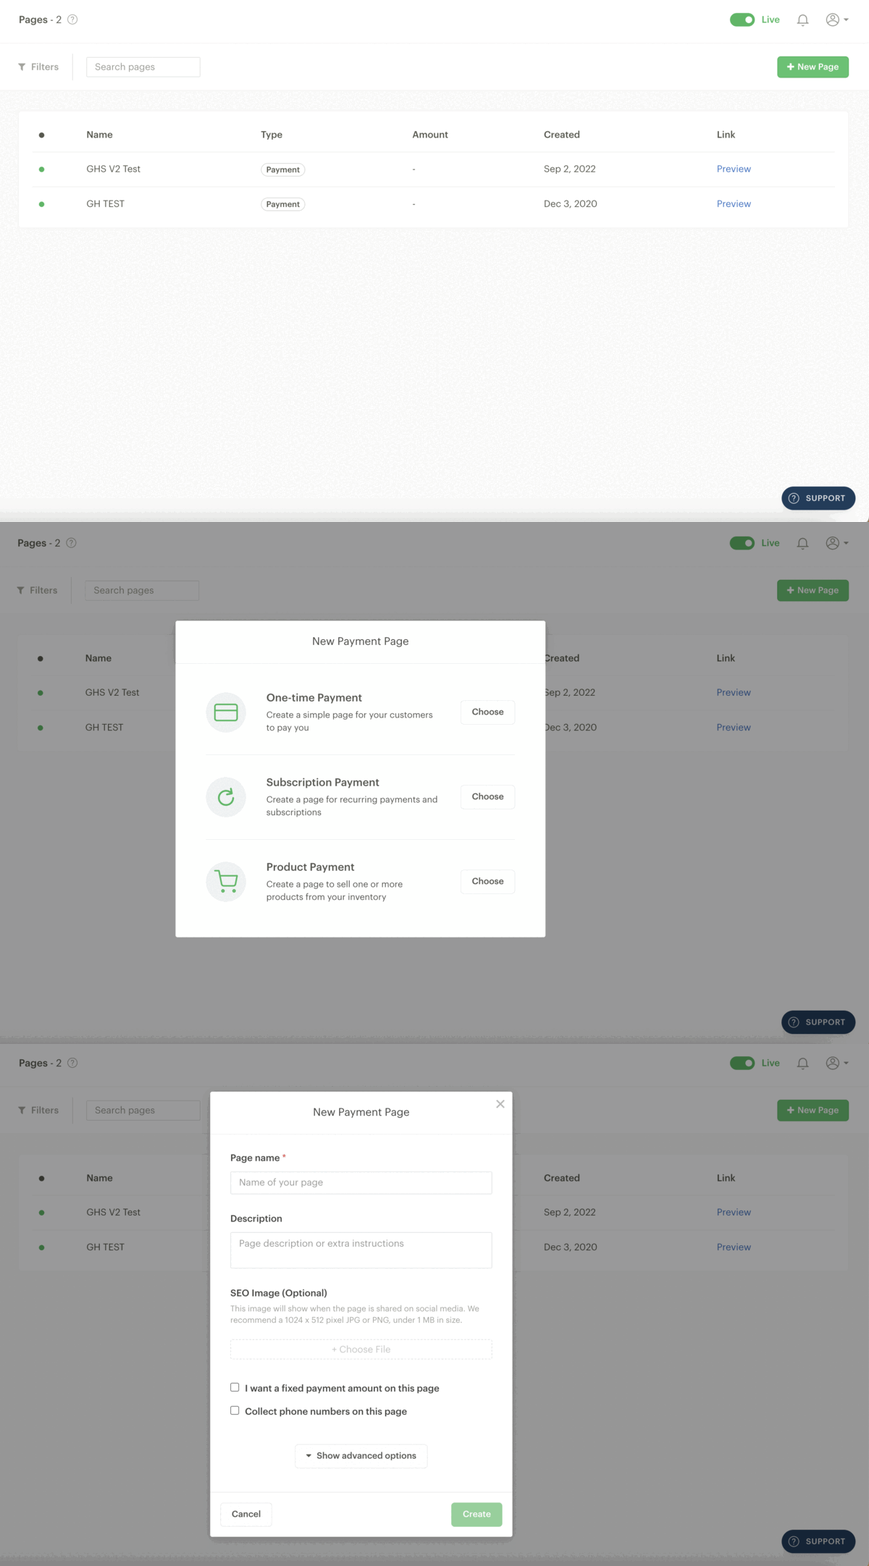
On your Dashboard, click on the Payment Pages menu.
Click the 'New Page' button on the top right.
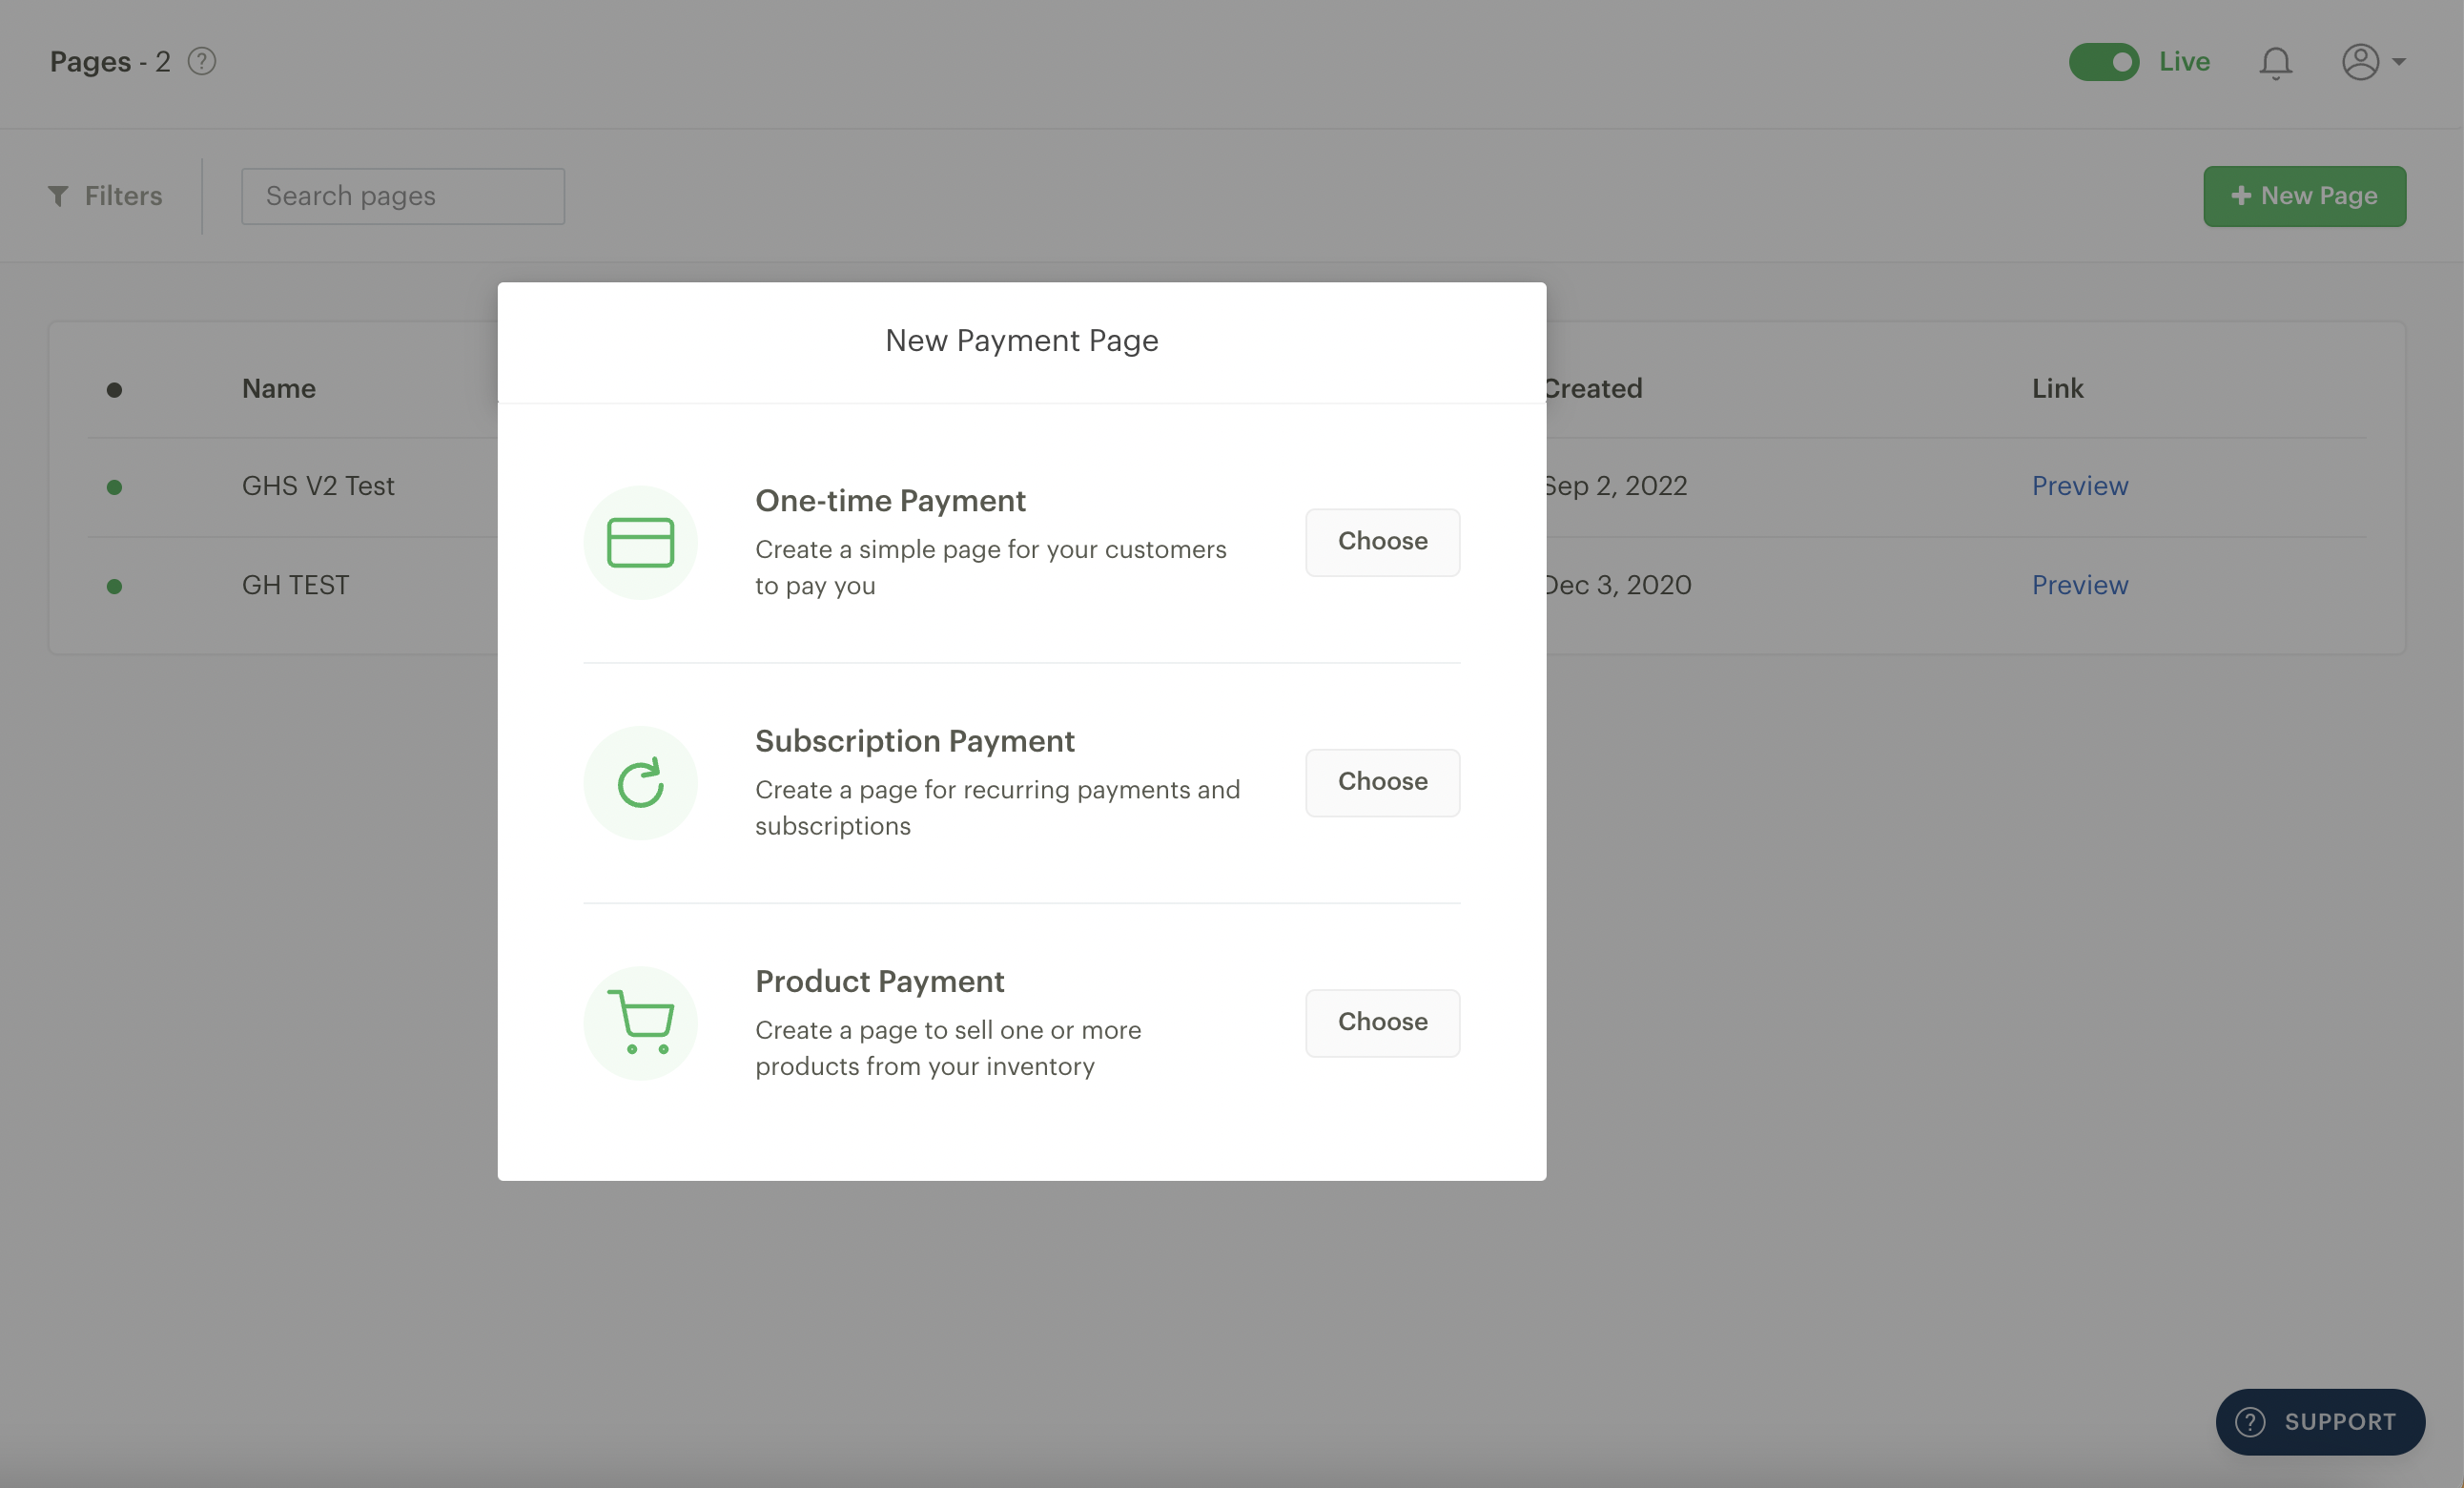
A pop-up will load, asking you to choose between 'One-time Payment', 'Subscription Payment' and 'Product Payment'. Select 'One-time Payment'.
A form will appear for you to provide details on your Payment Page. Simply complete these fields to your specifications and click 'Create'.
Here are a few tips for filling out the fields on your One-time Payment Page:
Page Name: This is the title at the top of your Payment Page. It's public, so it's a good idea to make the name descriptive (e.g. Pack of 6 Red Velvet Cupcakes).
Description: Complete this option to provide more information to your customer. This is an excellent place to give a compelling description of the product or service, explain your return policy, or do anything else that will compel customers to buy.
SEO image (optional): An SEO image is a picture you can add to your page to help it rank higher in search engine results.
I want a fixed amount on this page: By default, Payment Pages allow the customer to enter any amount they want (this is good for collecting donations, for example), but if you'd like to specify a price that you'd like everyone to pay, click this checkbox. You'll be able to enter a fixed price amount.
Collect phone numbers on this page: By default, Paystack collects the email addresses of all customers. Clicking this checkbox will include a mandatory phone number field the customer must fill out.
Setting up a Subscription Payment Page
With this Payment Page option, your customers can pay you at the following intervals: hourly, daily, weekly, monthly, quarterly, biannually and annually.
First, you must go to the Payment Pages menu on your Paystack Dashboard.
Click on 'New Page', which will load a pop-up asking you to choose between 'One-time Payment', 'Subscription Payment' and 'Product Payment'.
Select 'Subscription Payment'.
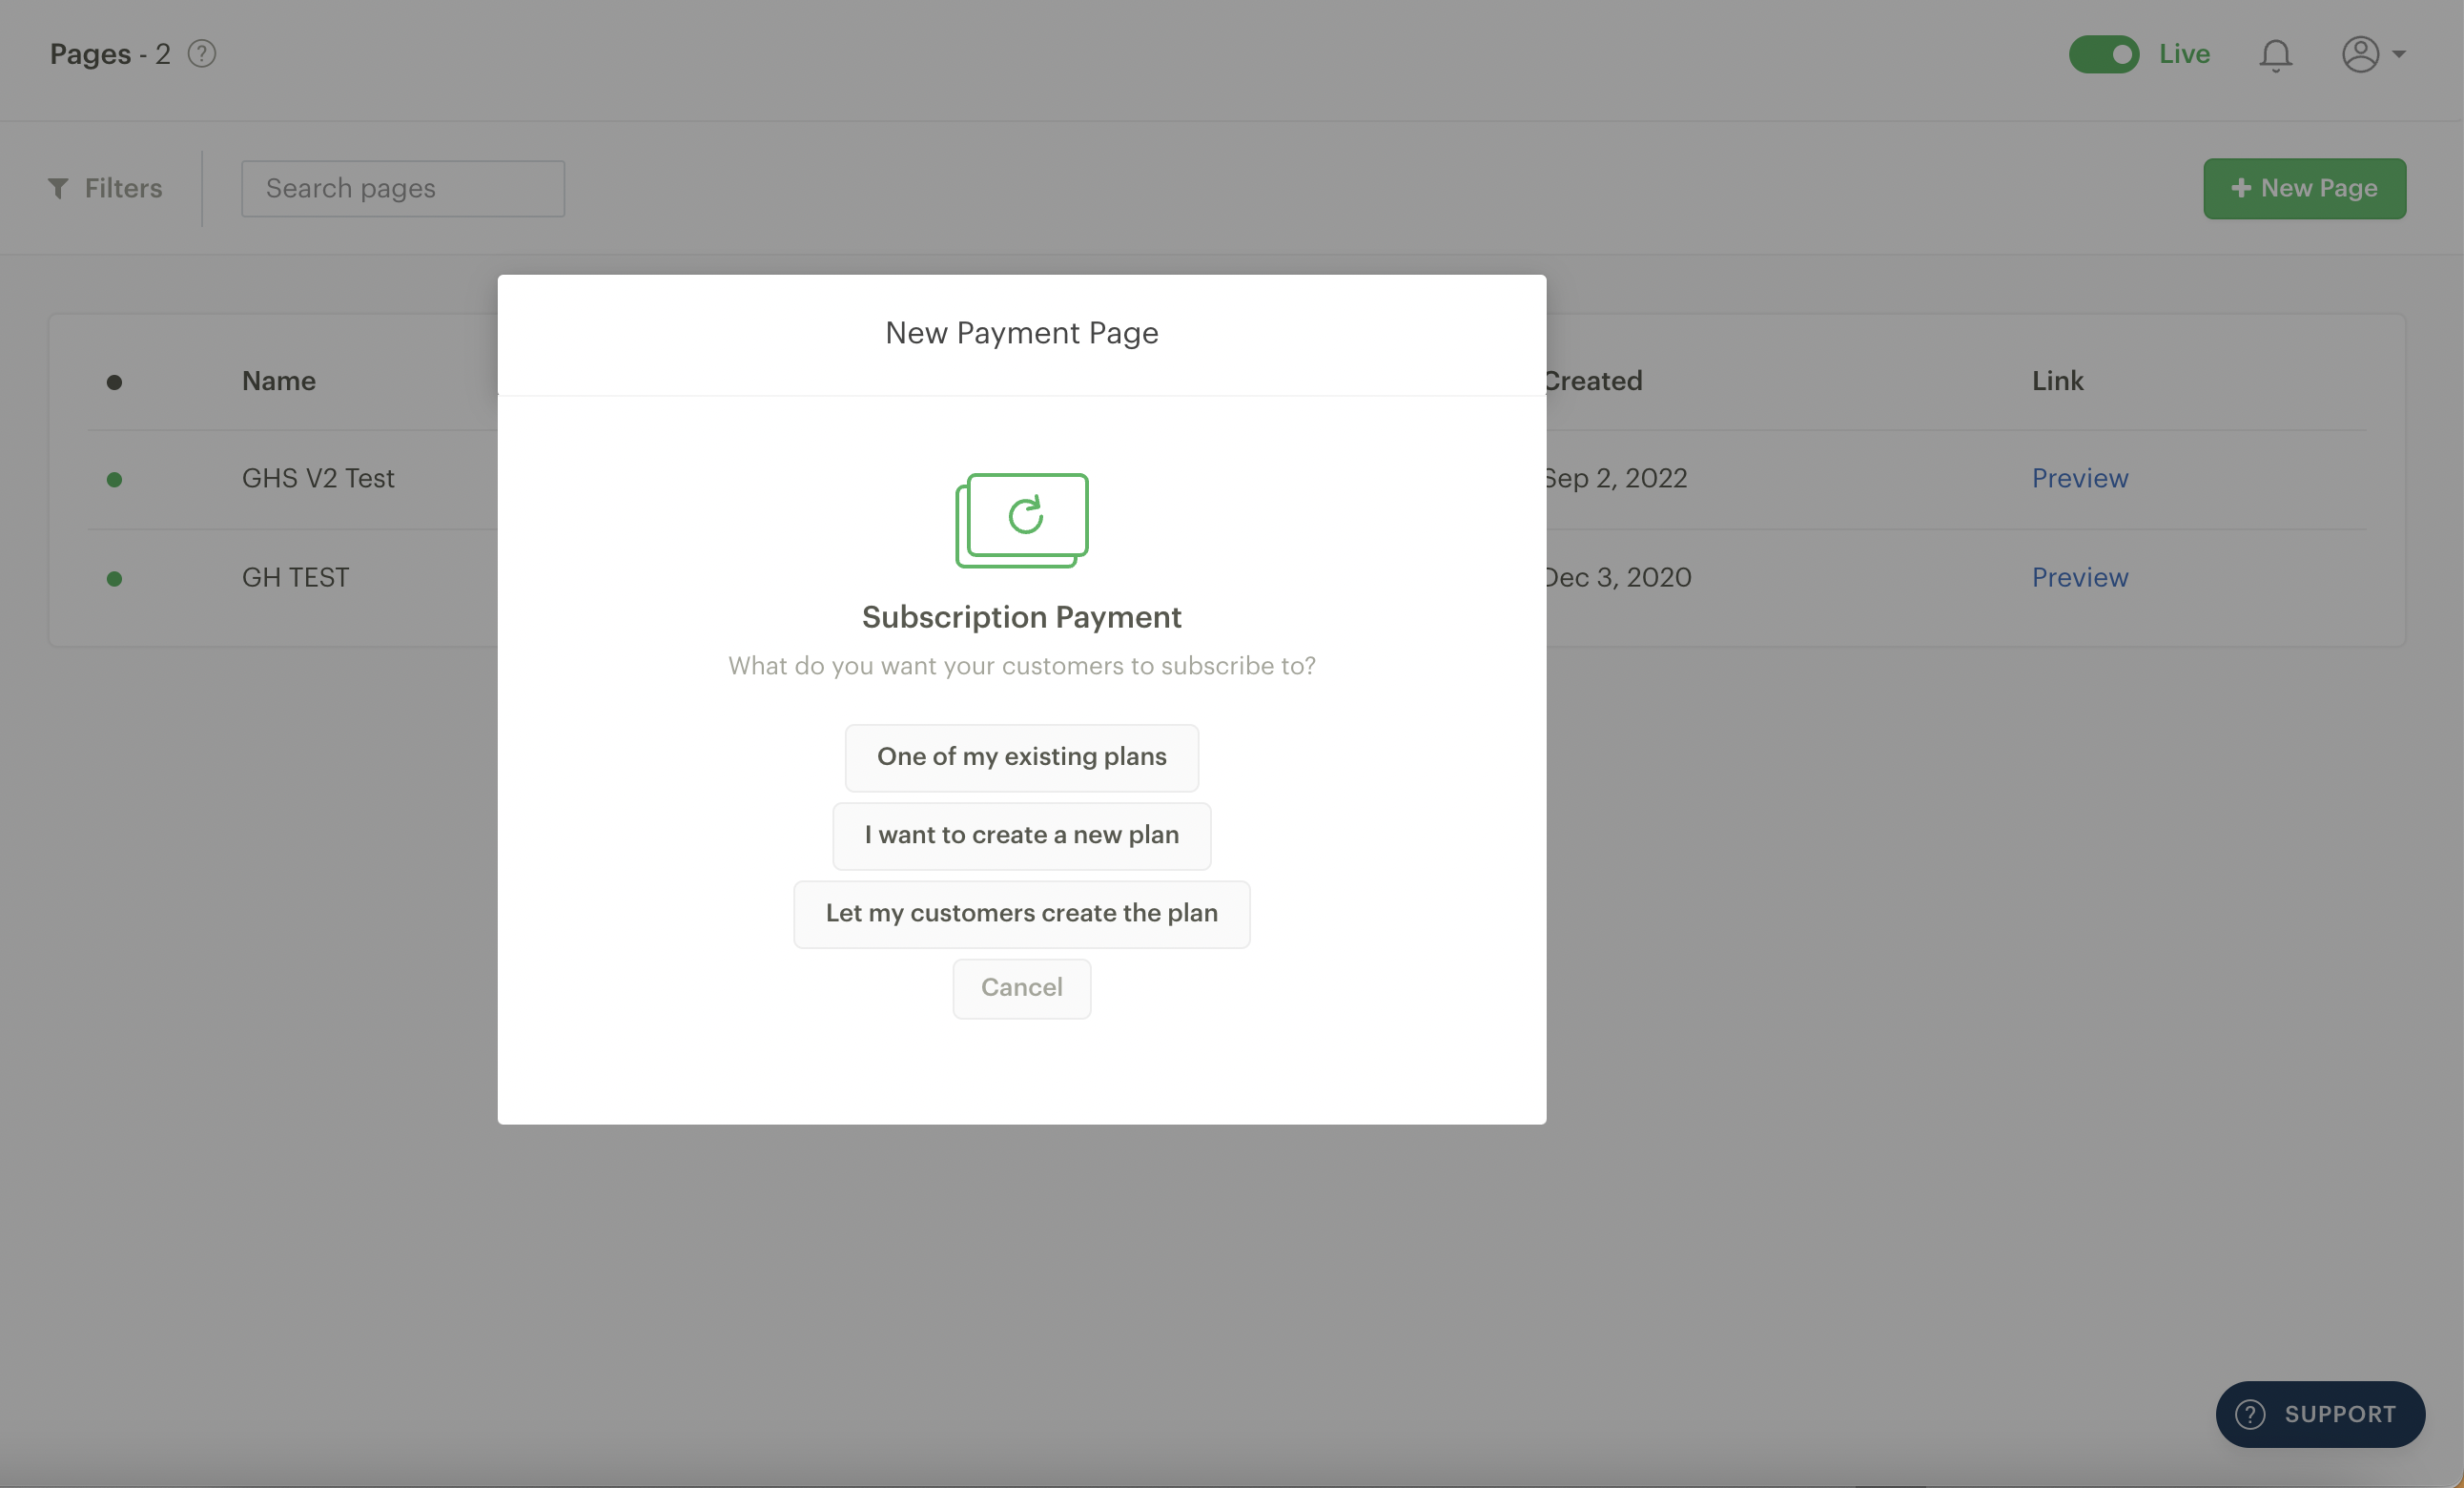
You will then be given some plan options.
Payment Pages for recurring payments work a little differently than Payment Pages for one-time payments: you'll need to create a Subscription Plan and then connect that to a Payment Page. These are the plan options you will be presented with:
One of my existing plans: Use this if you've already created a subscription plan, for example, on the Subscriptions page of the dashboard.
I want to create a new plan: Use this if you want to get set up quickly. You'll create the subscription plan and the payment page in the same step.
Let my customers create the plan: Use this if you want them to set the amount they'll pay and the period. A use case, for example, is an NGO that would like to allow donors to set their own donation amount and whether they'd like to pay on an hourly, daily, weekly, monthly, or annual basis.
The 'One of my existing plans' option
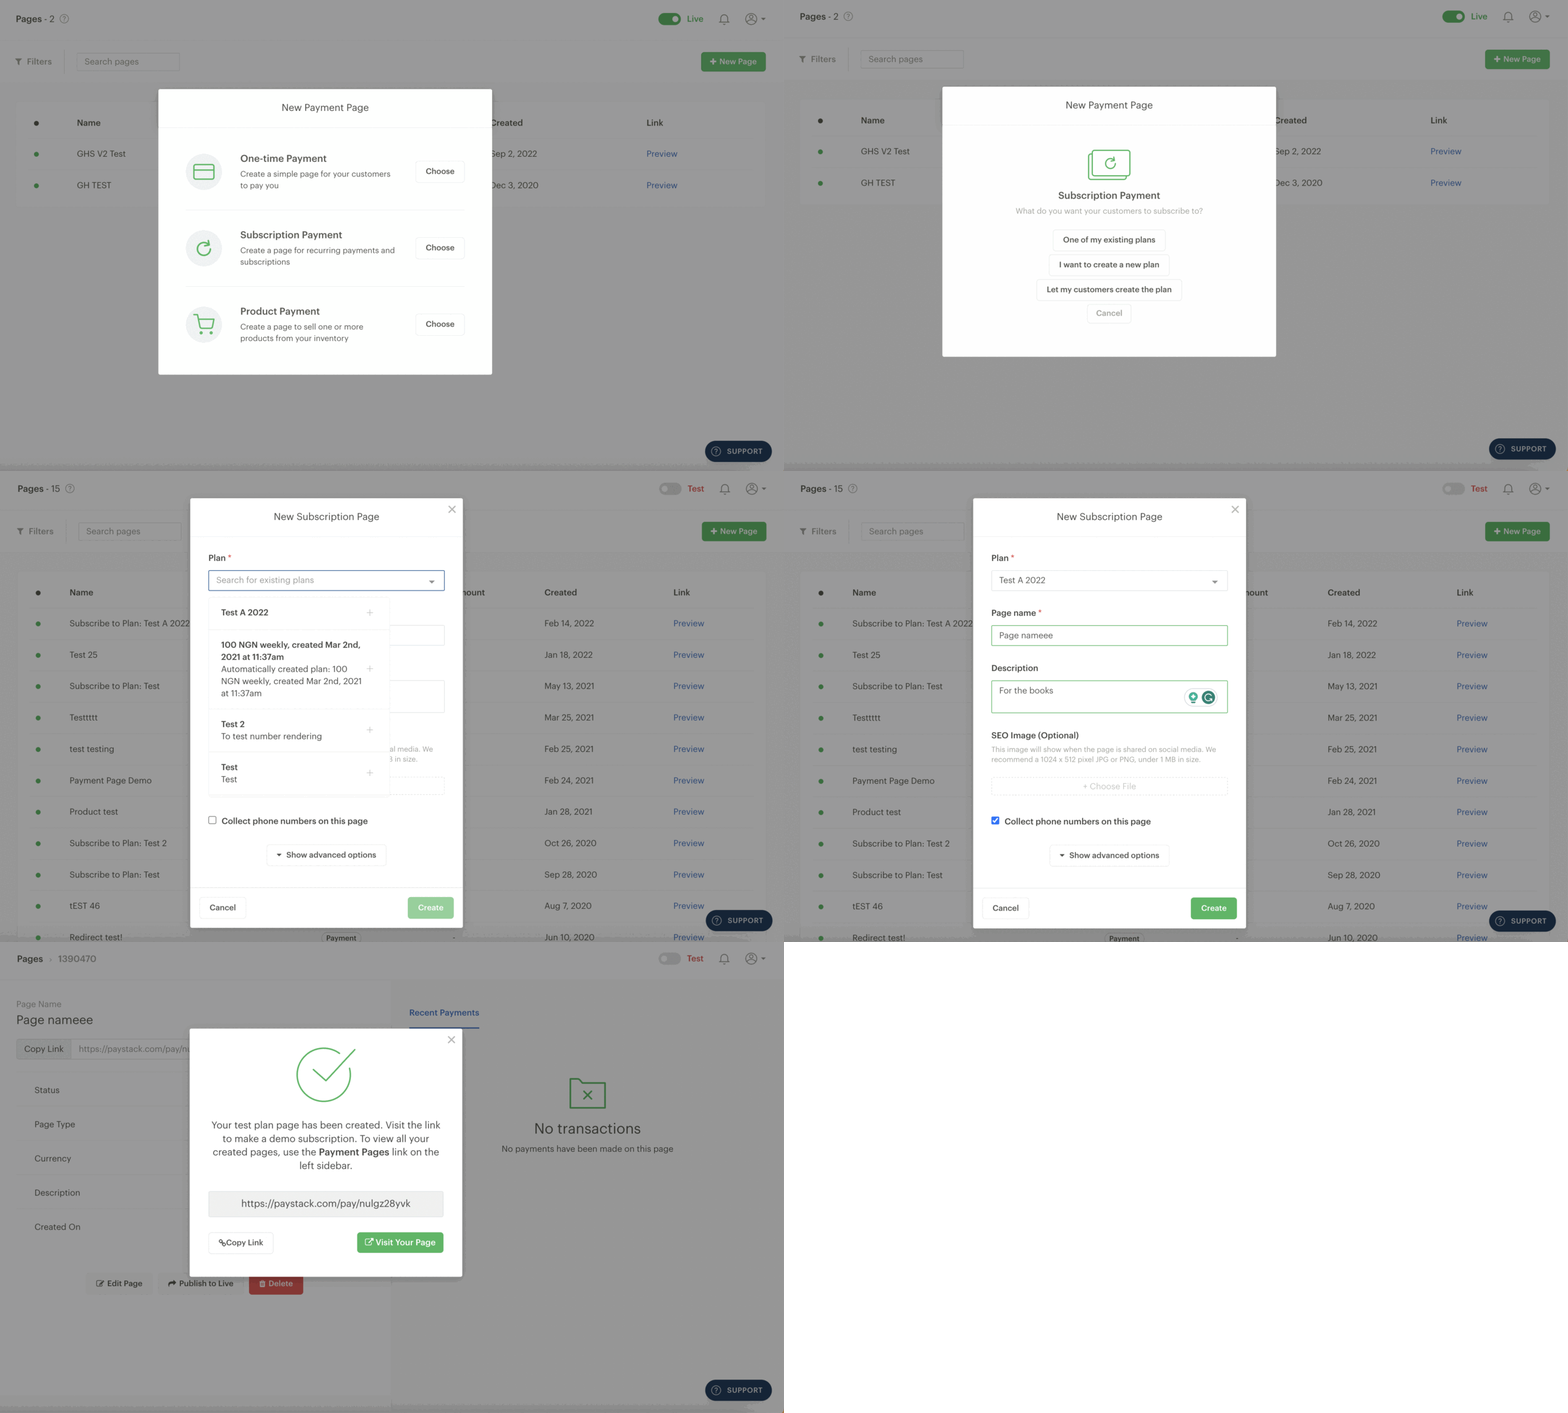
Click 'One of my existing plans' on the New Page popup.
You'll be presented with a list of subscription plans that were previously created for your business.
Simply select one of these plans, name your subscription page and complete the remaining optional fields to your taste.
When you are done, click on 'Create'.
You have successfully created a subscription page from an existing plan.
The 'I want to create a new plan' option
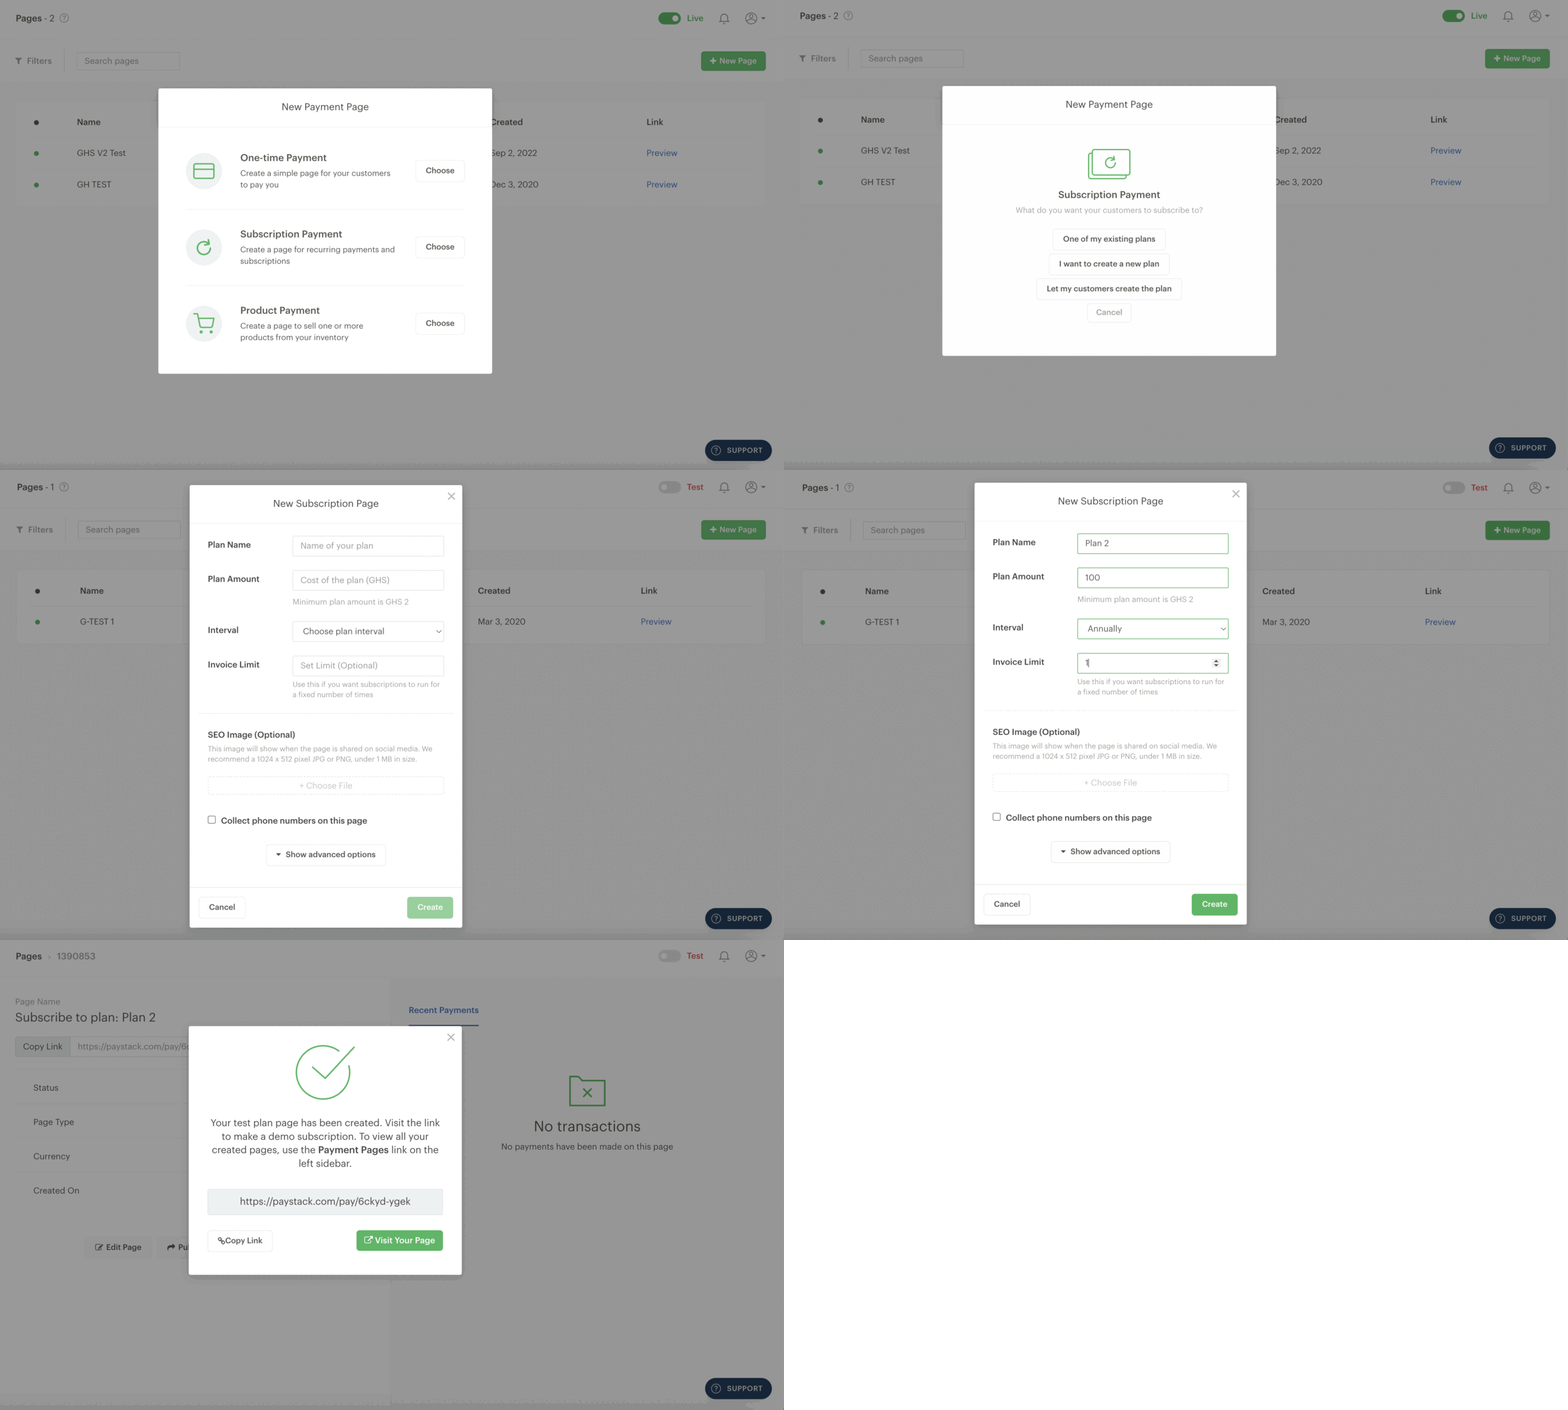
Click 'I want to create a new plan' on the New Page popup.
Indicate your plan specifications:
Plan Name: This is the title at the top of your Payment Page. It's public, so it's a good idea to make the name descriptive (e.g. Monthly grocery delivery).
Plan Amount: This is how much the customer will be charged at the desired interval frequency.
Interval: You can set the following payment interval frequencies: hourly, daily, weekly, monthly, quarterly, biannually and annually.
Invoice Limit: Use this if you set a maximum number of times the person can be charged. For example, if you set the interval to ‘Monthly’ and enter an Invoice Limit of 3, the customer will be charged thrice and never again.
Collect phone numbers on this page - By default, Paystack collects the email addresses of all customers. Clicking this checkbox will include a mandatory phone number field the customer must fill out to complete their subscription.
When you are done completing all the fields, simply click 'Create'. You would have successfully created a new plan and subscription page.
The 'Let my customers create the plan' option
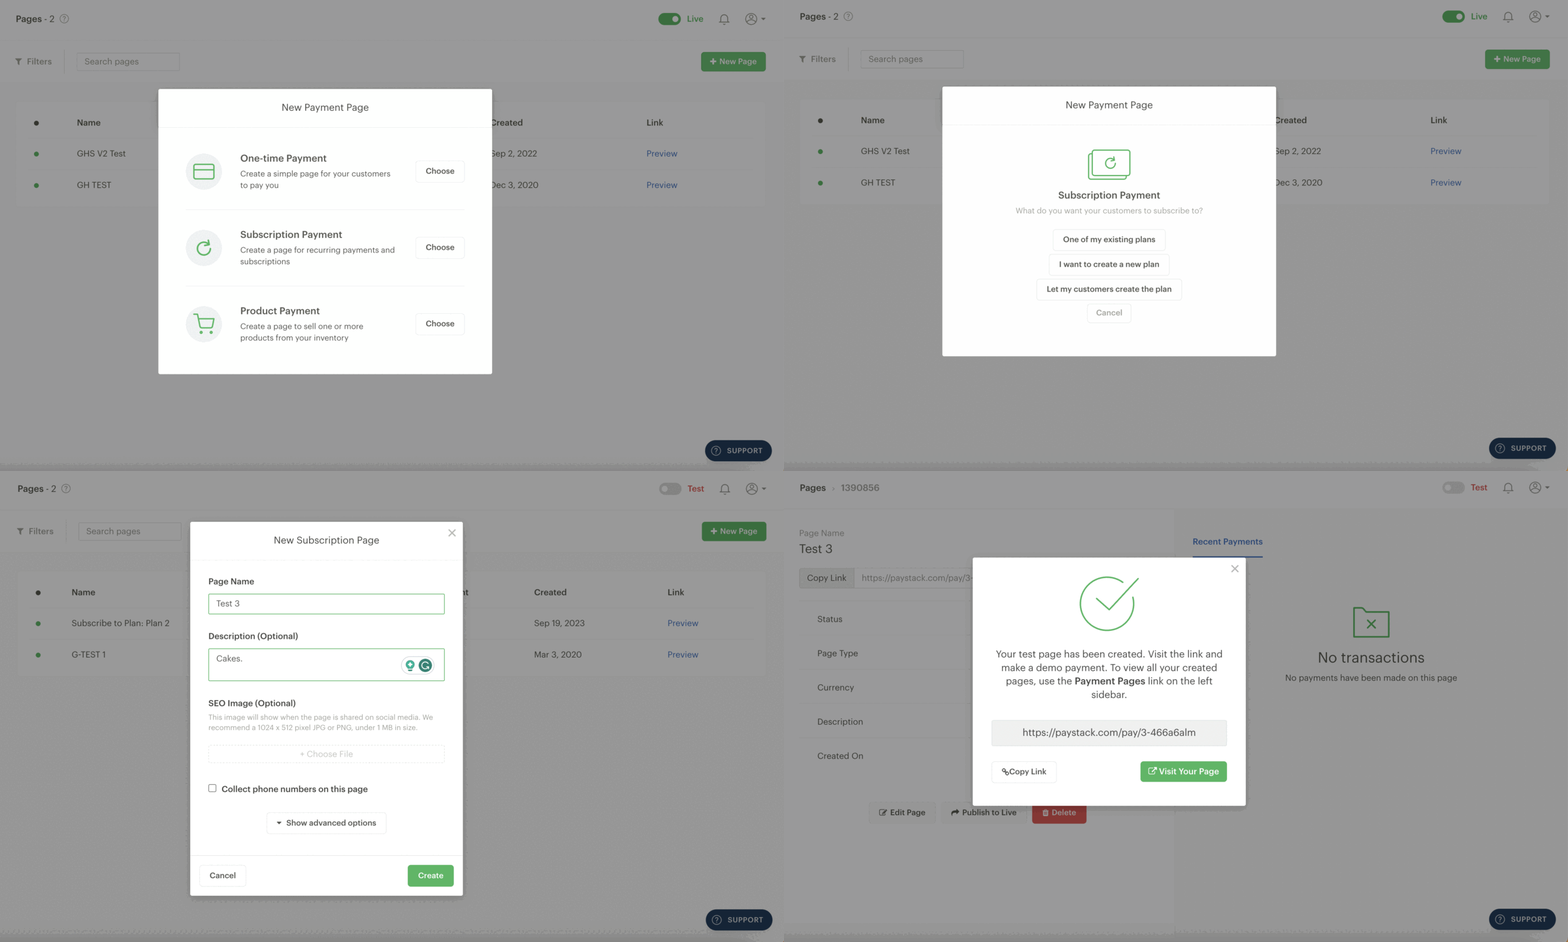
Click 'One of my existing plans' on the New Page popup.
You will need to fill in some general information for this customisable plan:
Page Name: This is the title at the top of your Payment Page. It's public, so it's a good idea to make the name descriptive (e.g. Monthly grocery delivery).
Description: Complete this option to provide more information to your customer. This is a good place to give a compelling description of the product or service, explain your return policy or anything else that will compel customers to buy.
Collect phone numbers on this page: By default, Paystack collects the email addresses of all customers. Clicking this checkbox will include a mandatory phone number field the customer must fill out.
When you are done completing all the fields, simply click 'Create.'
Setting up a Product Payment Page
On Paystack, a Product is an item or service you sell. You can sell a single product using Product Links or multiple products simultaneously using a Product Payment Page. After creating your Products, you can also list two or more of them on a Payment Page so that your customers can see more of what you sell and select the items they'd like to pay for.
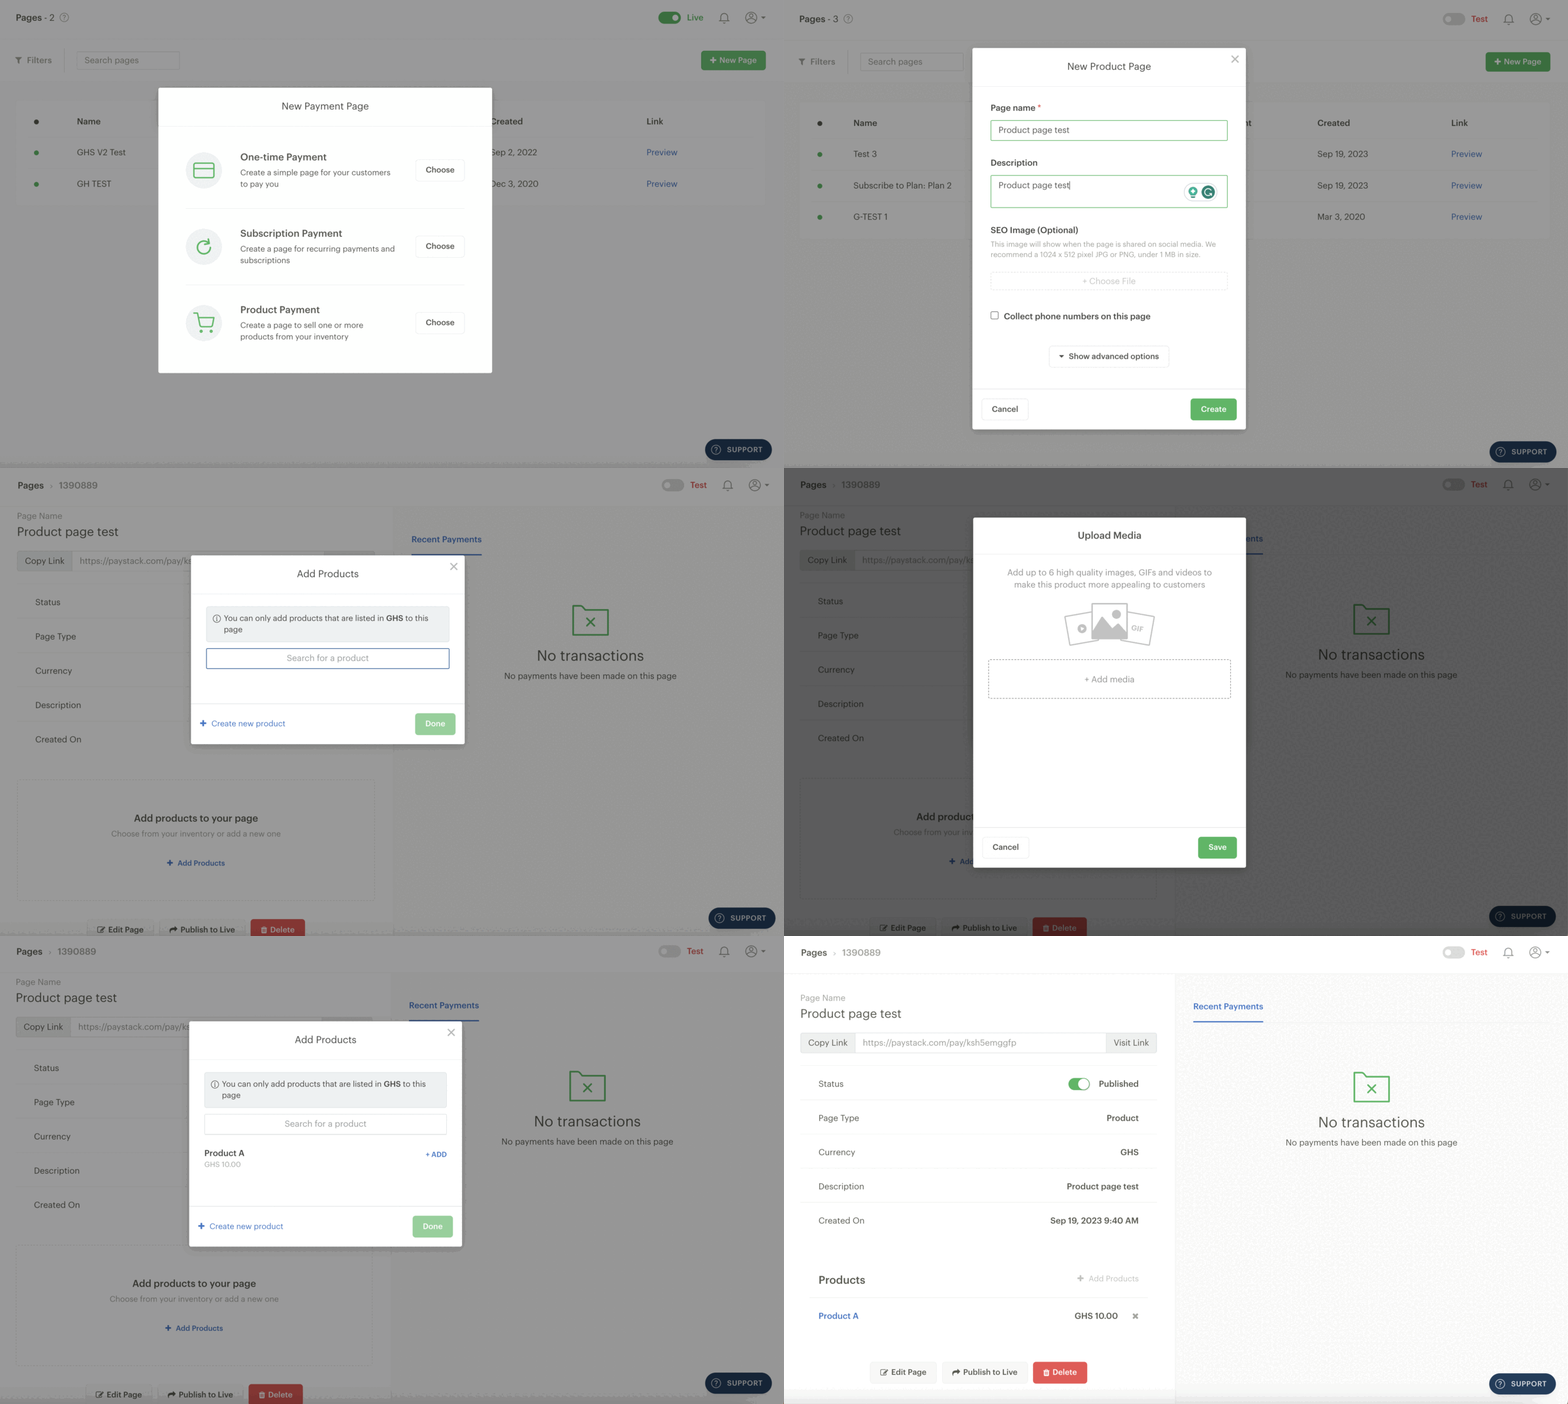
On your Dashboard, click the Payment Pages menu and the 'New Page' button on the top right.
Choose the Product Payment option.
Fill in a Page name to serve as the title for your page and a description of the Page, and click ‘Create.’
A pop-up will appear, prompting you to add Products to the page. You can add Products from your existing Products, or you will need to create a new Product if you don’t have one yet. You will see a dropdown to select from existing Products if they exist. You will see the ‘Create a new product’ option on the pop-up if you have to create one.
On the Product creation pop-up, you must give the Product a name, description and price. You’ll also need to confirm if it’s a physical product and include optional media (you can add up to six high-quality images, GIFs and videos).
Click ‘Save’, and the new Product will appear on the form. All you need to do is click the ‘+Add’ button to add it to the Page.
Click ‘Done’ to complete the process and successfully create your Product Payment Page.
Advanced options on a Payment Page
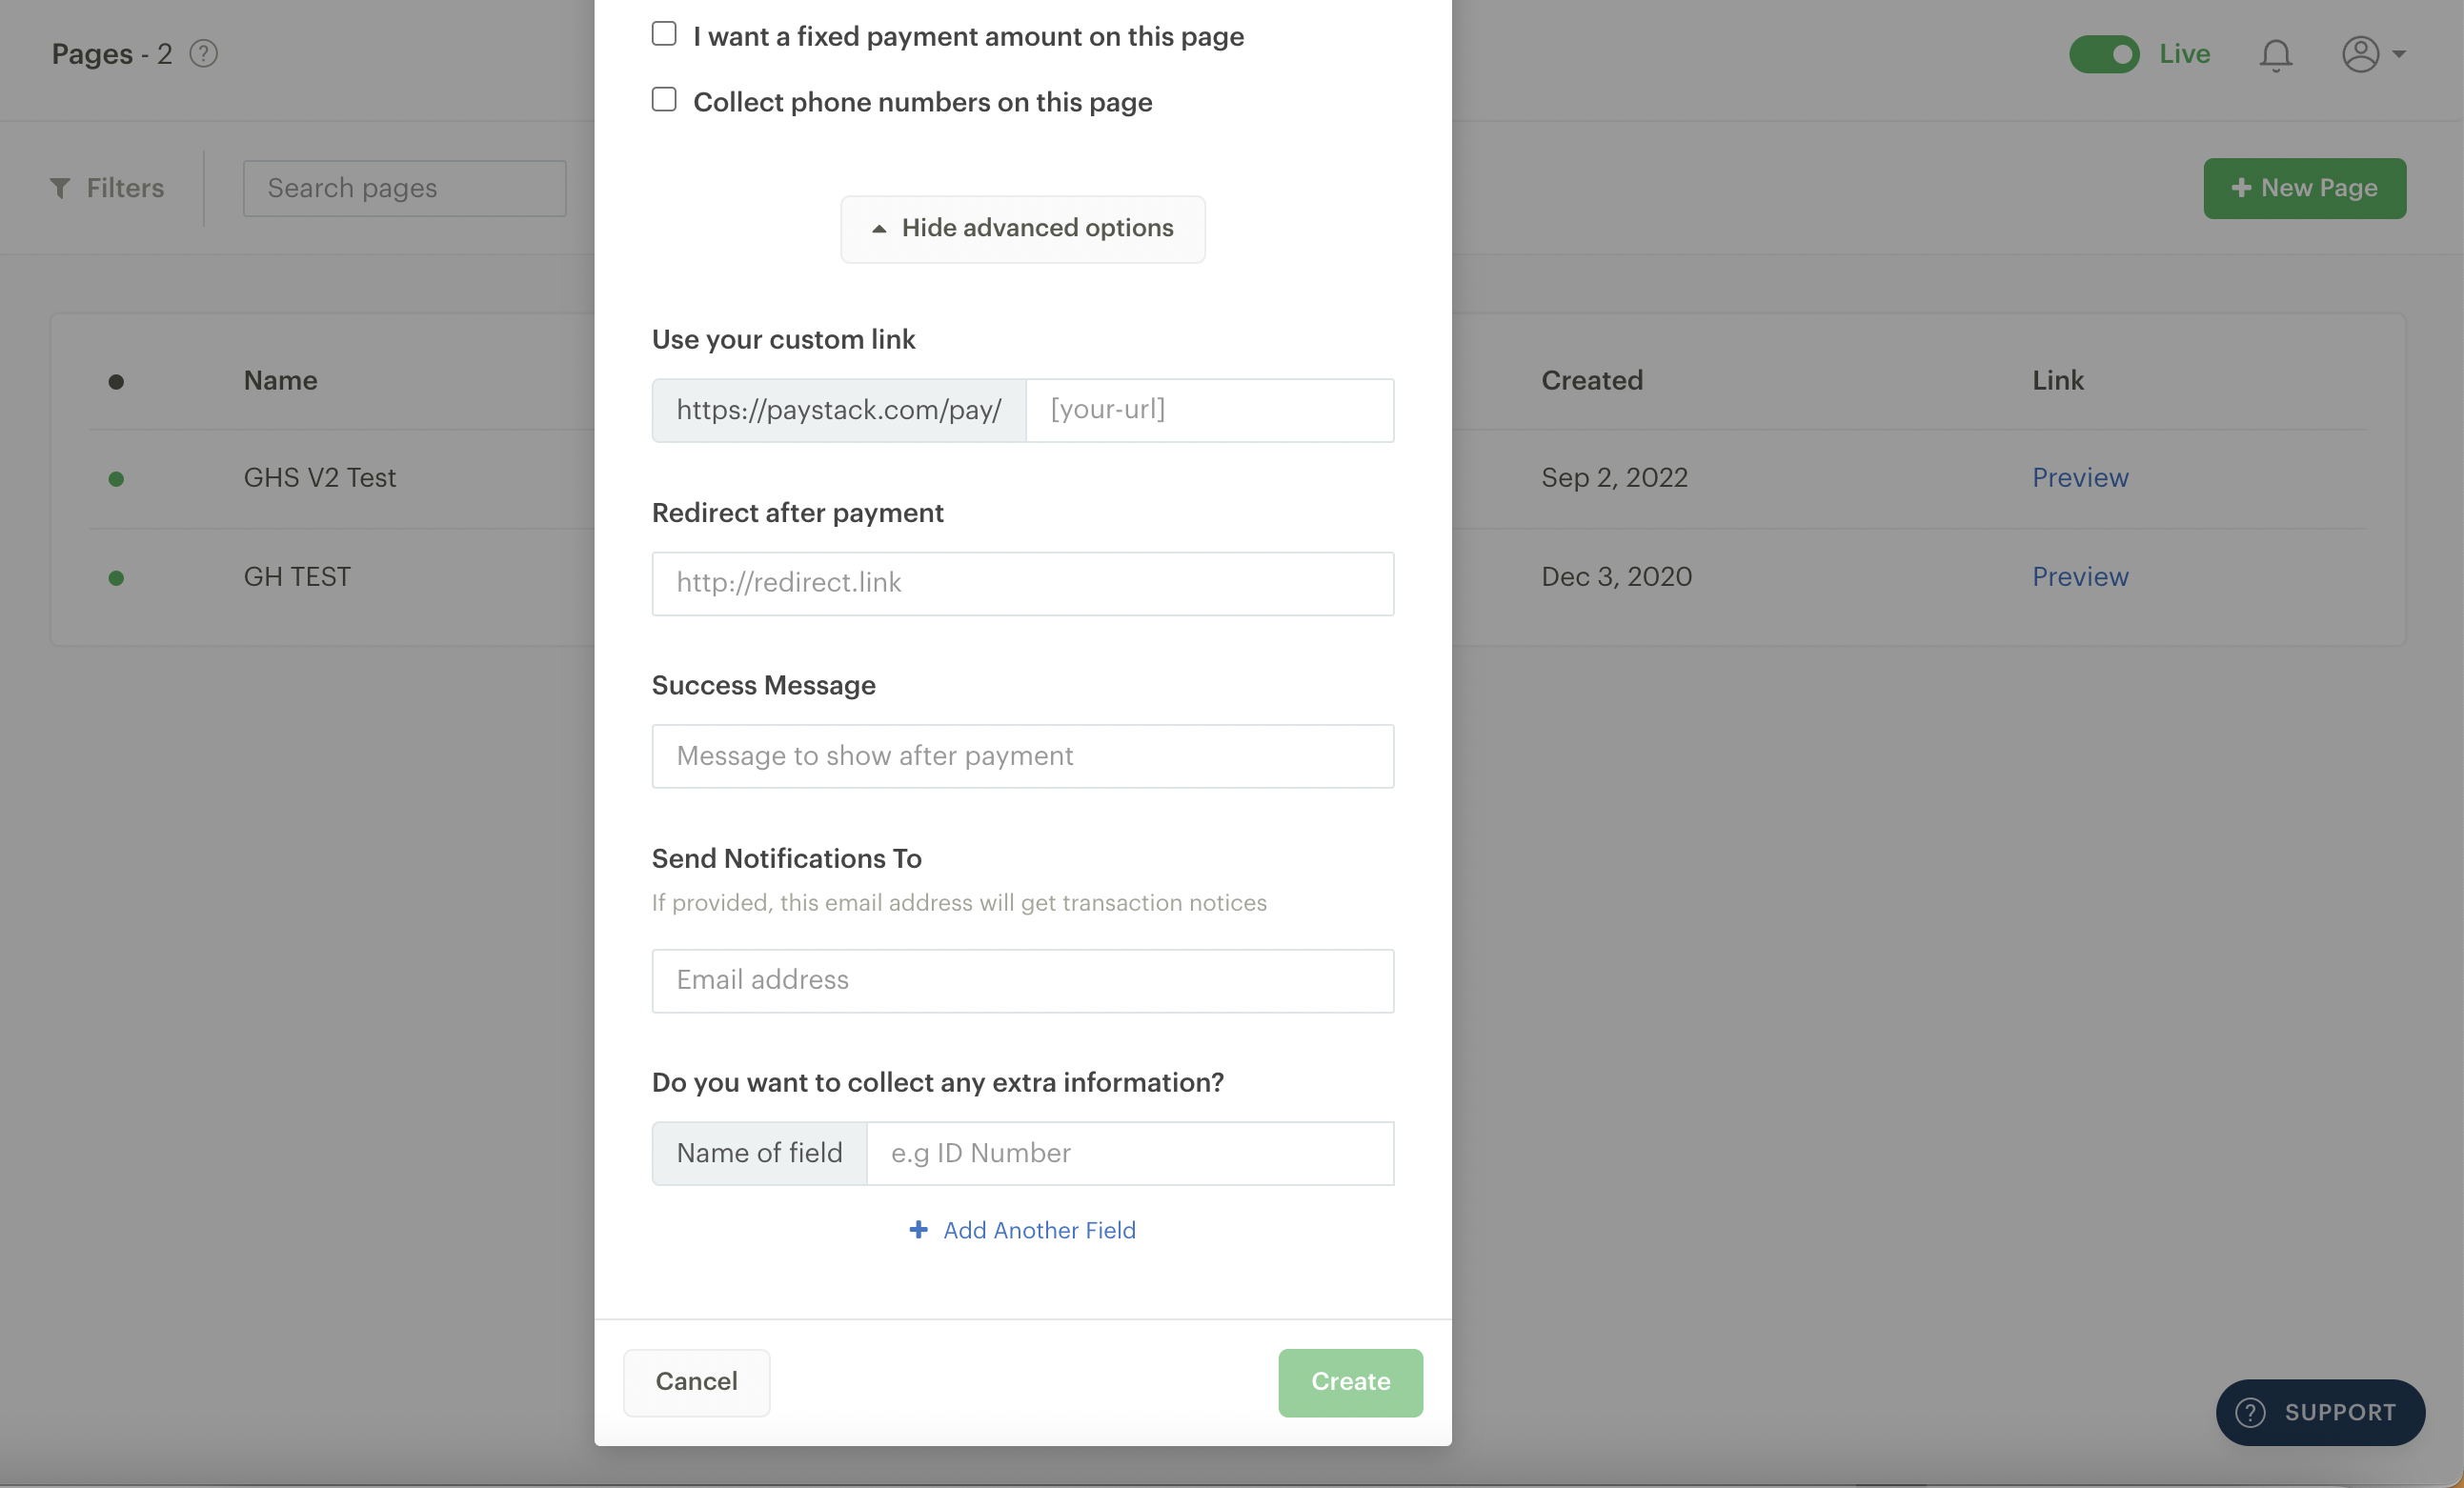
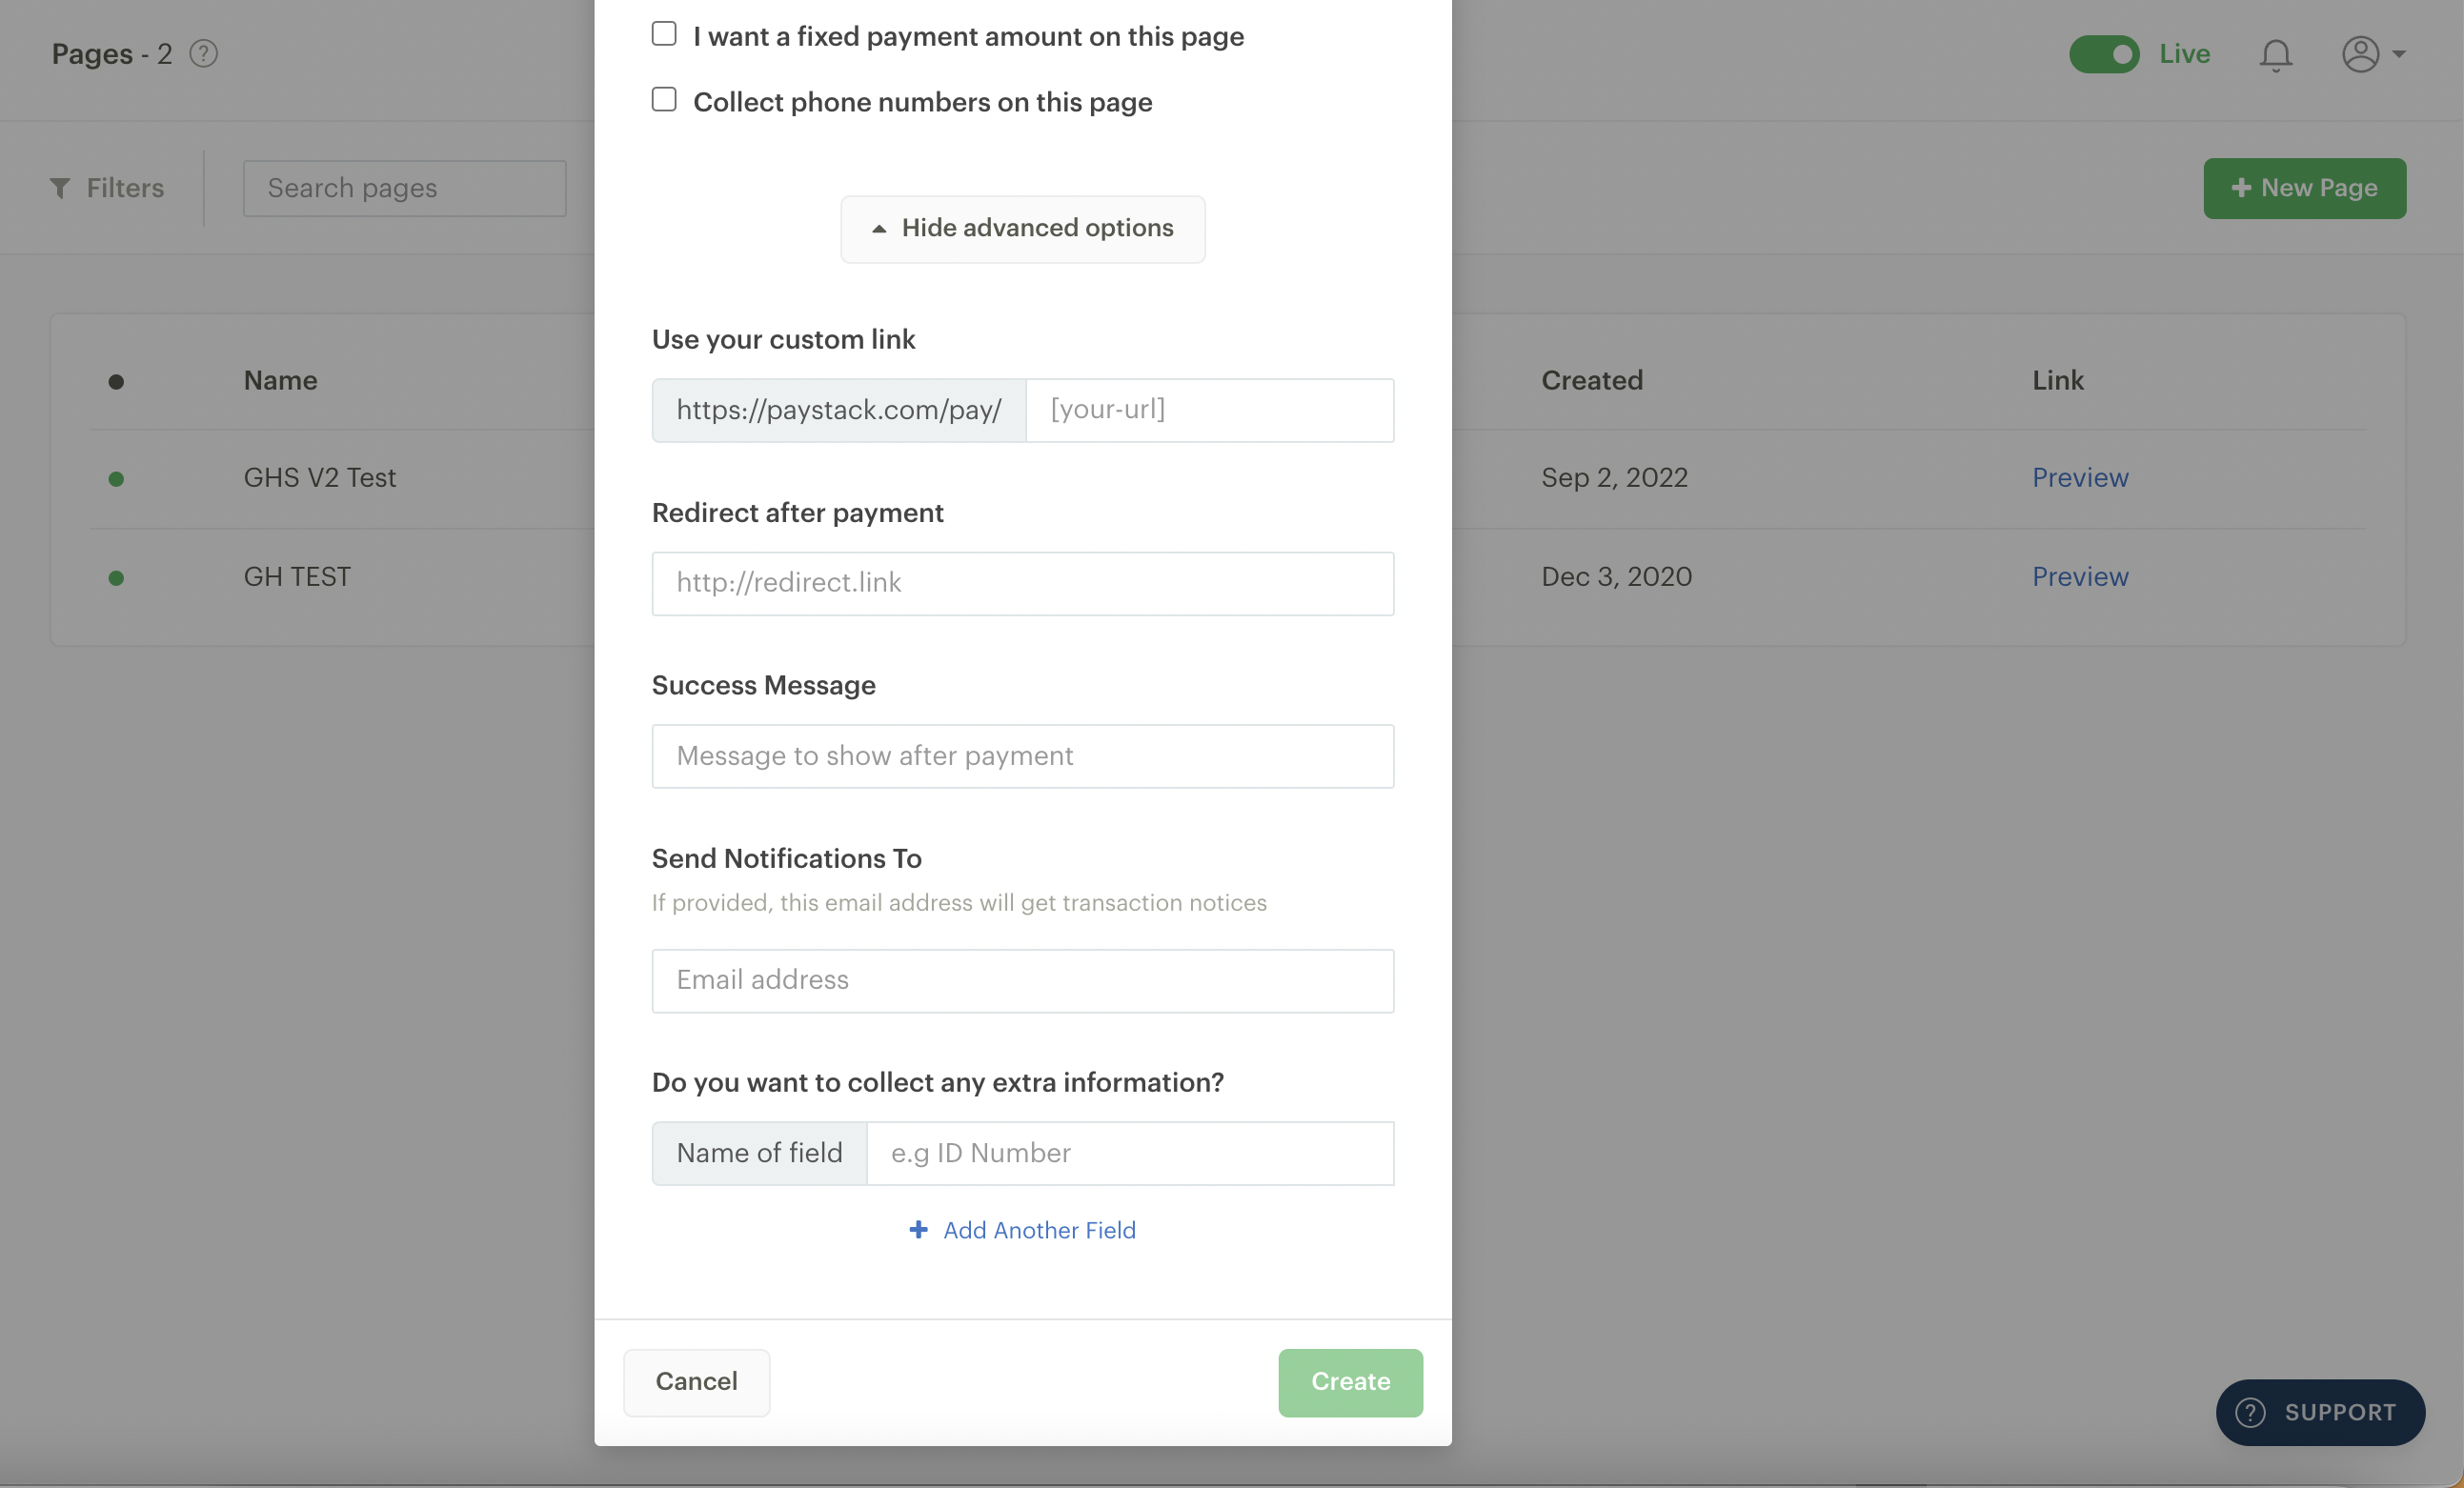
Other than the basic settings of the Payment Page above, there are more advanced features which you can access by clicking the ‘Show advanced options’ button. Please note that including additional fields makes them mandatory, meaning the customer cannot complete the form without entering content into those fields where required.
Use your custom link - Paystack automatically generates a link when you create a Payment Page. However, you can add your branding to the link to make it easier to remember and to make your link look more professional and trustworthy; for example, paystack.com/pay/BellaShoes.
Redirect after payment - By default, after a customer completes a successful transaction, they remain on the post-purchase 'Thank You' page. But if you'd prefer, you could make it so they're taken to a different site right after their purchase. This is useful for things like sending customers to your social media page where they can follow you. If you're selling digital content, you could redirect the customer to an online folder where the customer could download the content or take the customer back to the store page.
Success message - You can customize the message the customer sees after they make a successful payment. You can use this opportunity to say thank you or provide follow-up information.
Send notification to - By default, transaction alerts are sent to the business email (you can change this on the Settings page of your Dashboard), but if you enter an alternate email address here, alerts about payments will go to this email address instead.
Split Payment with a Subaccount or a Split Group: If you use Split Payments or have a Split Group, you can split a portion of every payment with multiple bank accounts. You can learn more about Split Payments here.
Do you want to collect any extra information: You can collect additional information from the customer, such as ID Numbers, Addresses, and more.
You can pre-fill the fields on a Payment Page to make it easier for your customers to pay by following the steps outlined here.
After creating a Payment Page
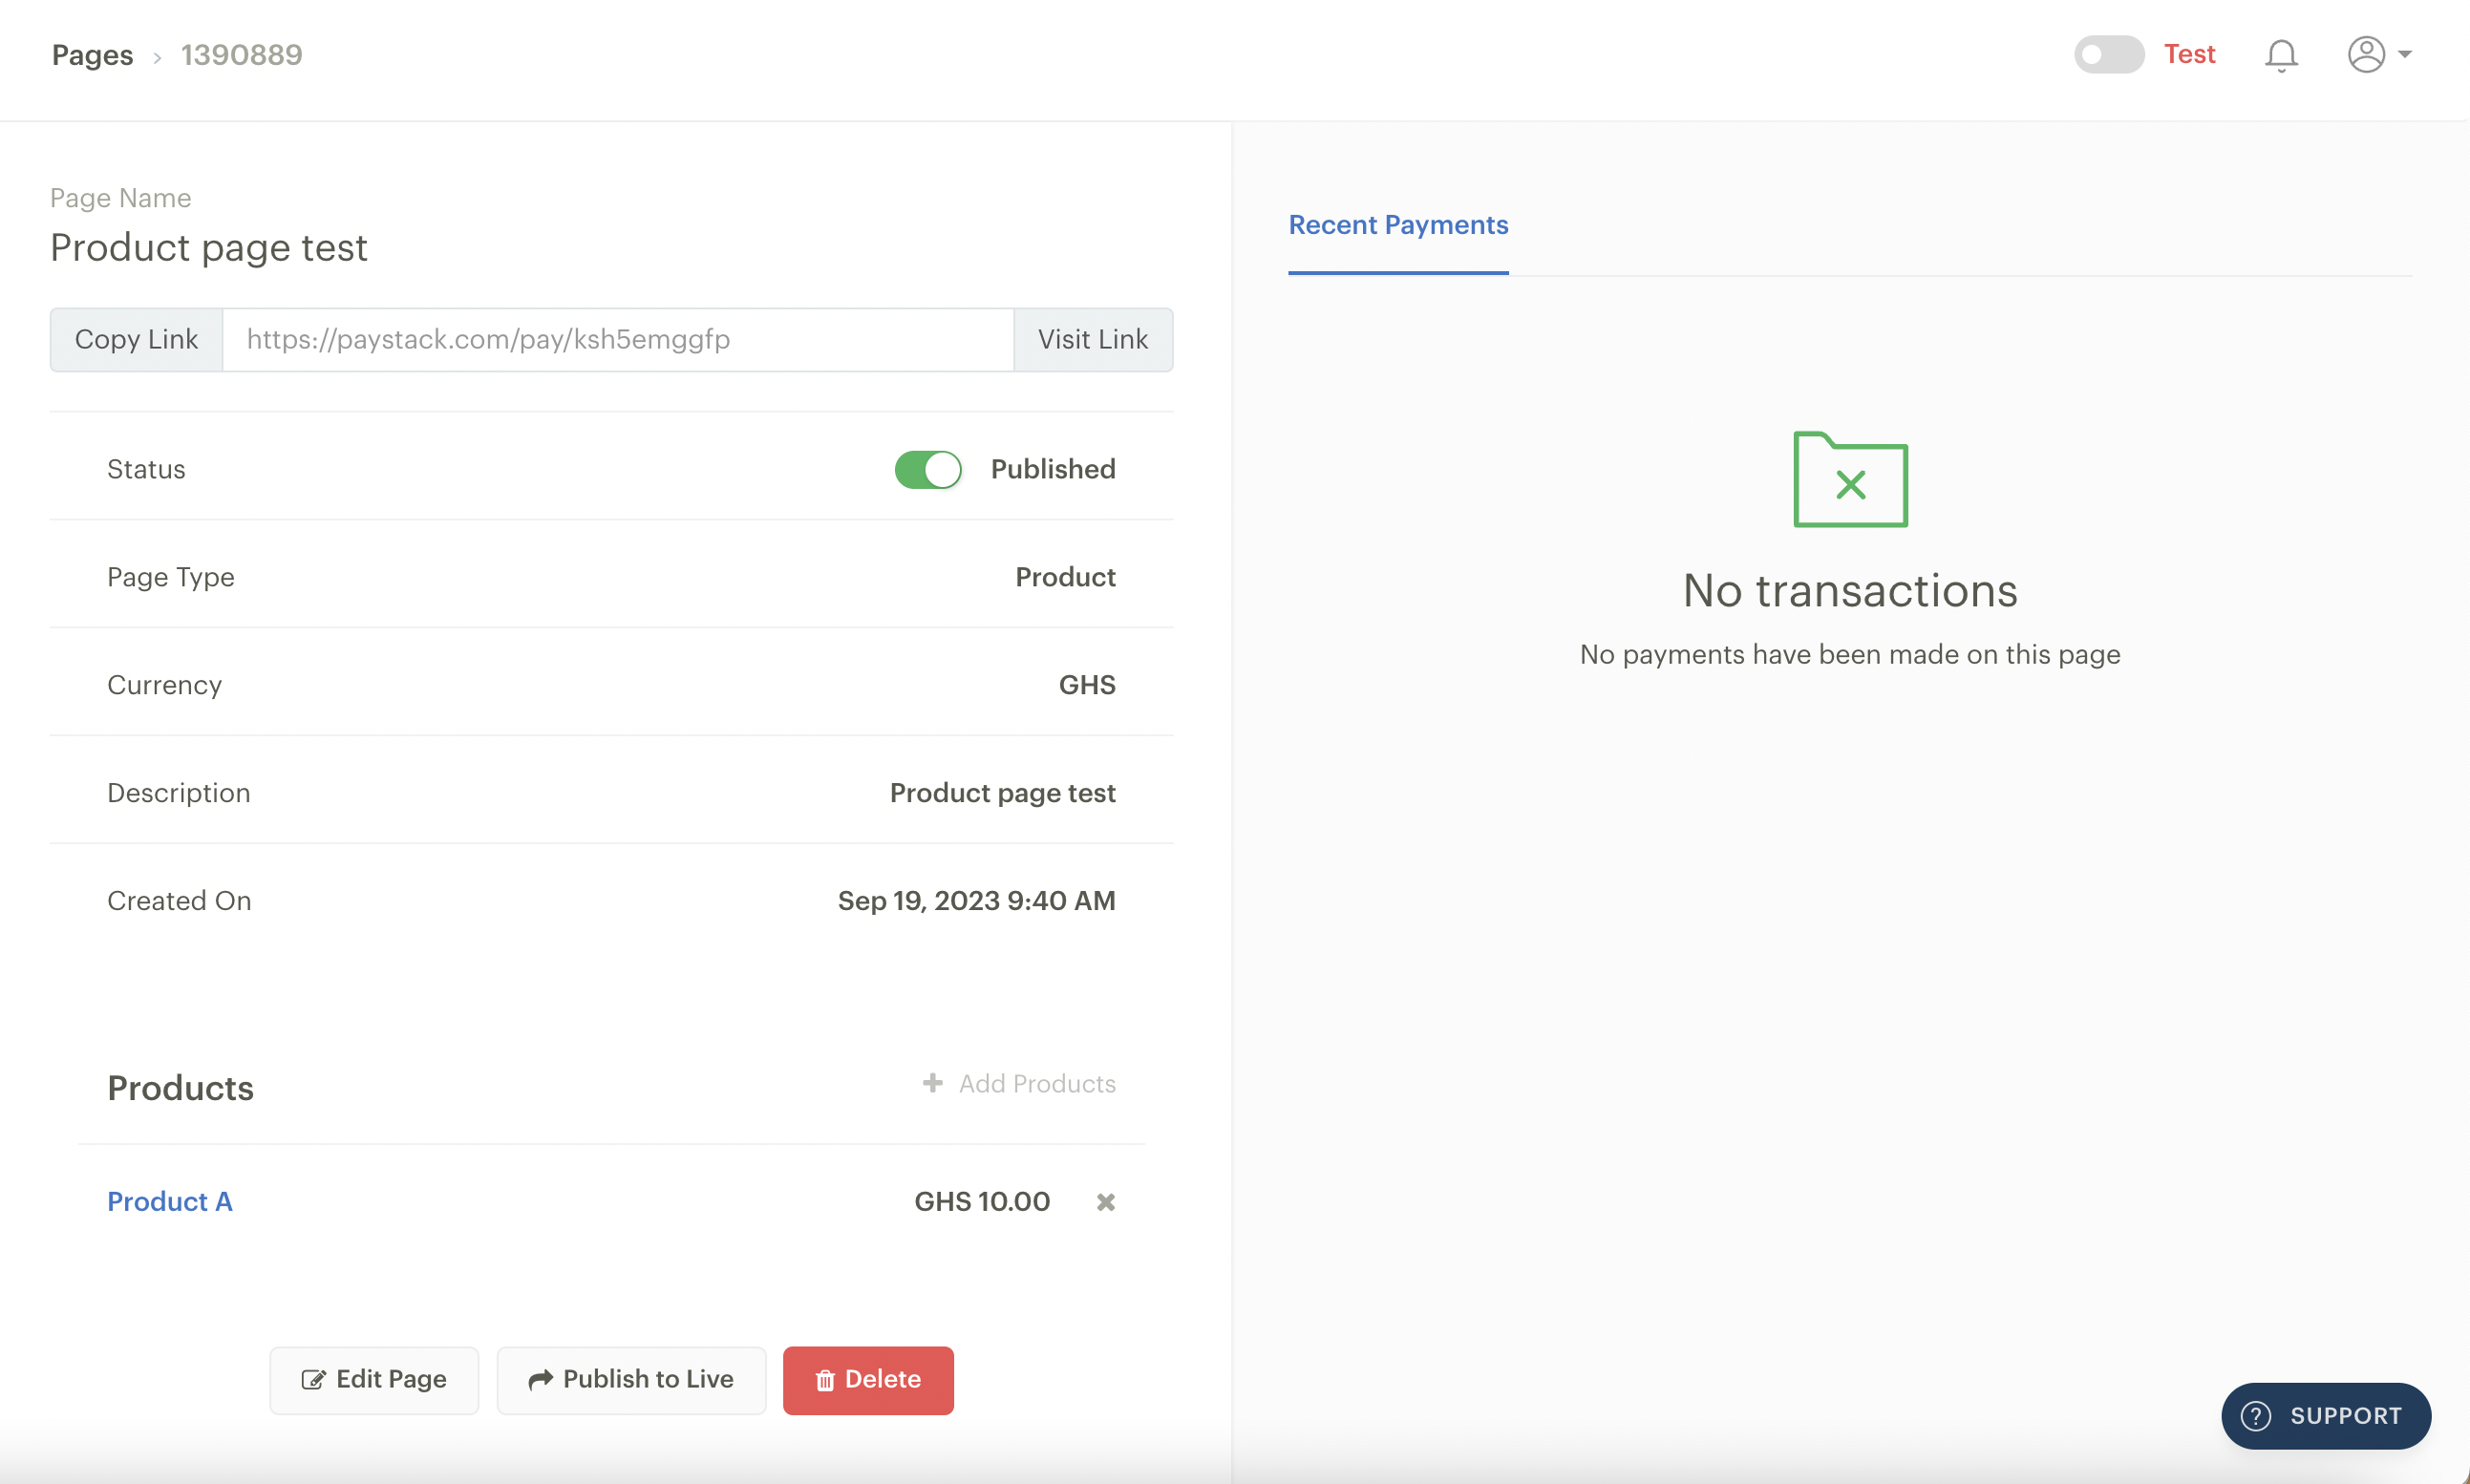
Once a Payment Page is successfully created, you will see an interface like the one below. A link to your Payment Page will be at the top of the left half of the page. You can copy and share this link with your customers via your preferred medium. The right half will show you a list of the transactions made via the Payment Page. You can choose to edit or delete the Payment Page using the options at the bottom of the page. You can also use the ‘Publish to Live’ button to move the Page to Live Mode if it was originally created in Test Mode.
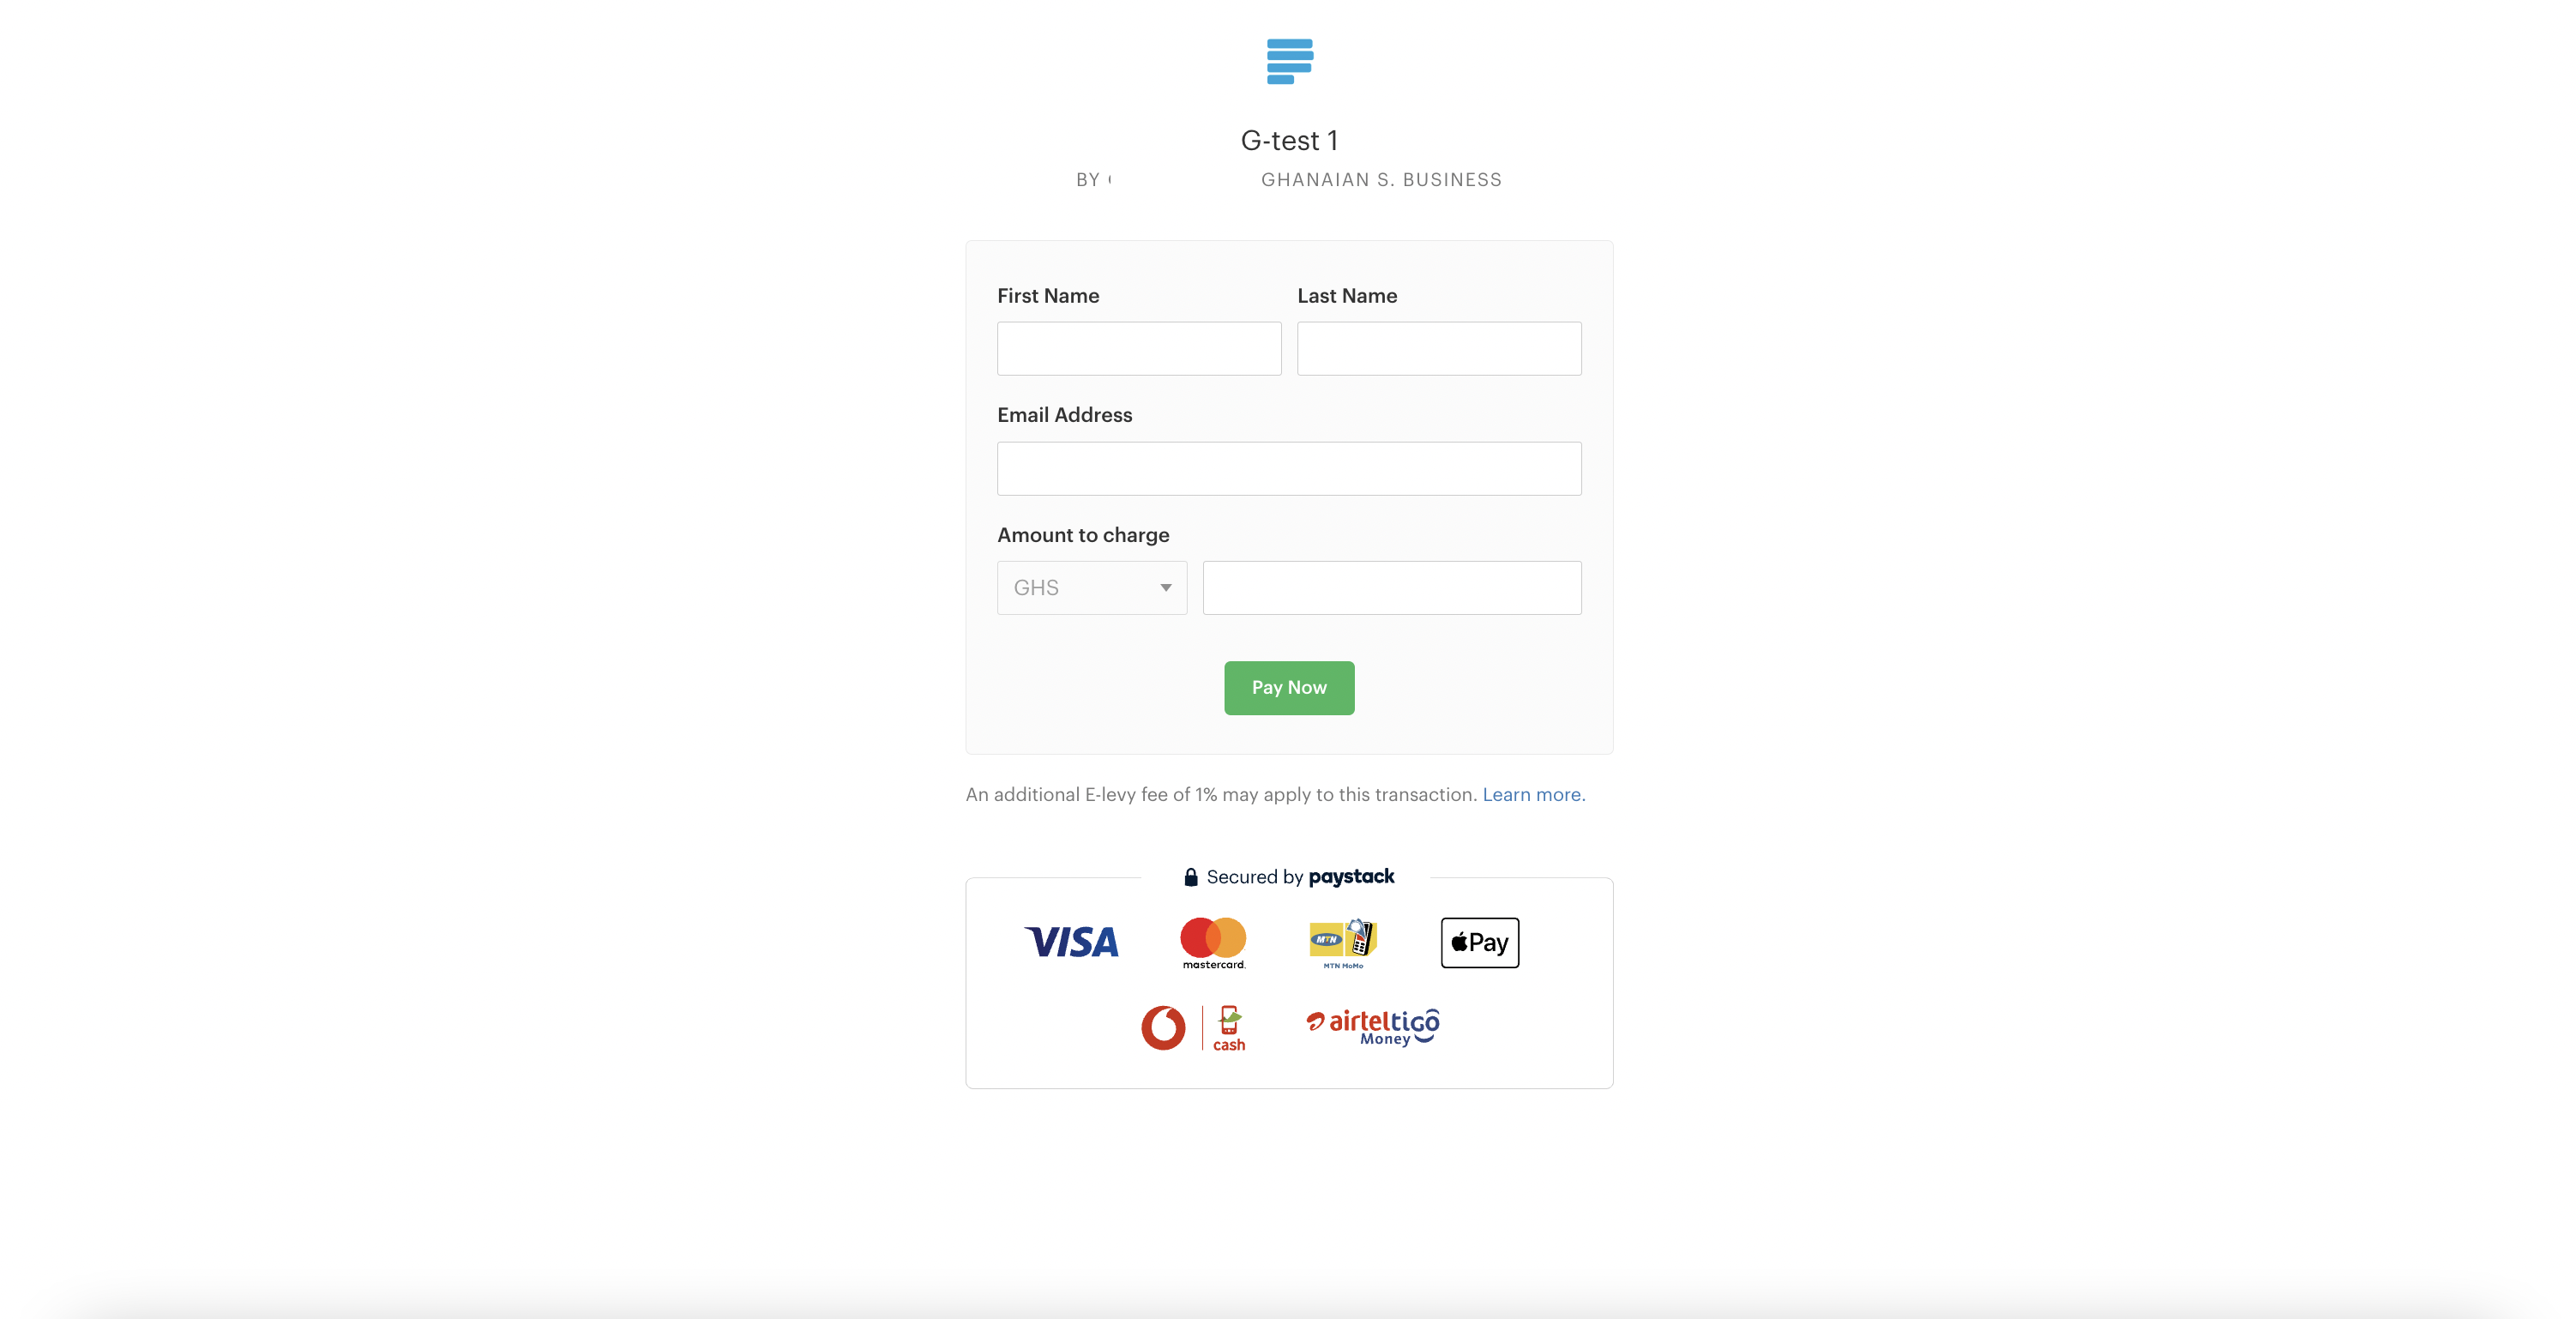
Here’s an example of what a Payment Page will look like to your customer:
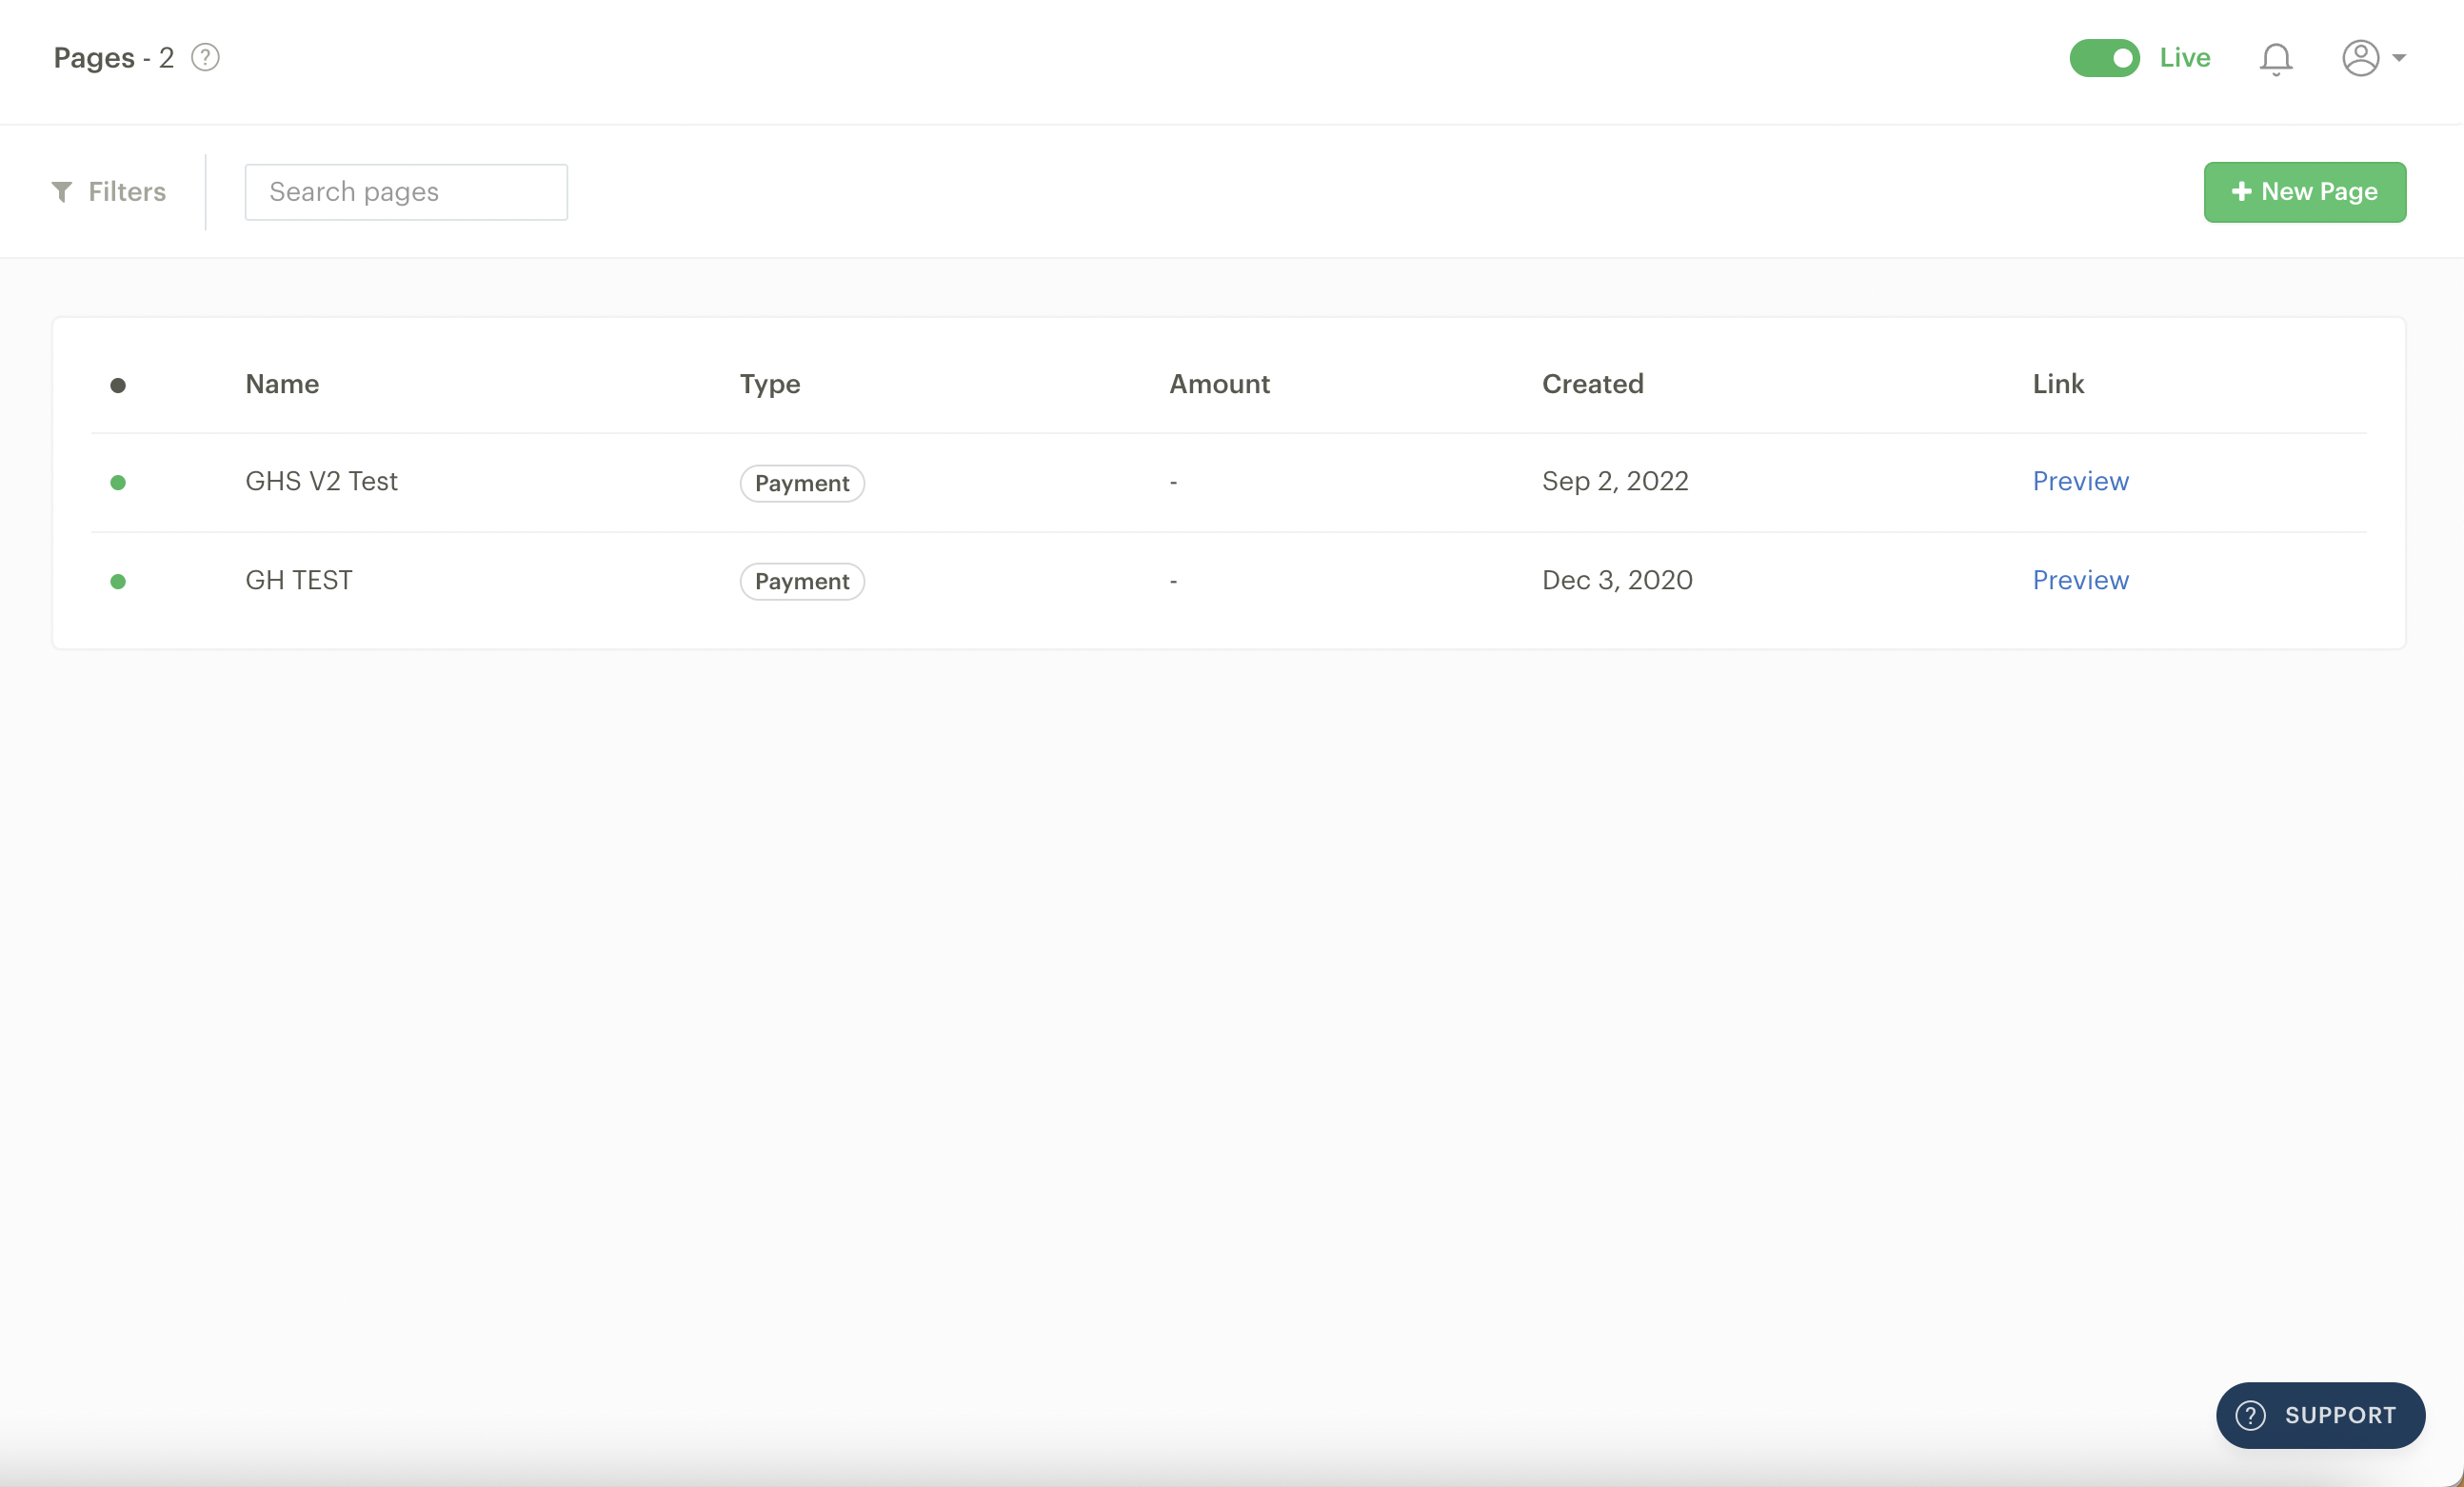
Clicking on the Payment Pages option on the Dashboard will show you a list of all your Payment Pages. You can filter through your Pages by status and creation date on this page. You can also use the search bar at the top to search through the list using the name of the Payment Page.

