Subscriptions and plans
On Paystack, a Subscription is a schedule that deducts a specified amount from your customer at regular intervals, while a Plan refers to the specific schedule set for recurring payments, dictating when your customer should be debited for your product or service.
For example, your business could have a Plan created to charge customers R5,000 monthly for home cleaning; a customer subscribes to that plan and is charged R5,000 monthly.
The Paystack Subscriptions feature allows customers to pay a specific amount every hour, day, week, month, or year, depending on the recurring interval set on a plan. With recurring payments on Paystack, the customer enters their card details once, and they're dutifully debited without them having to input their card details again in future.
A Plan is a specific schedule for recurring payments. With plans, you can set when your customer should be debited for your service. Depending on your preference, plans can be set at various intervals, every hour, day, week, month, or year.
Important to note
The Paystack Subscriptions feature is available to all businesses on Paystack, and subscriptions can only be charged via a bank card.
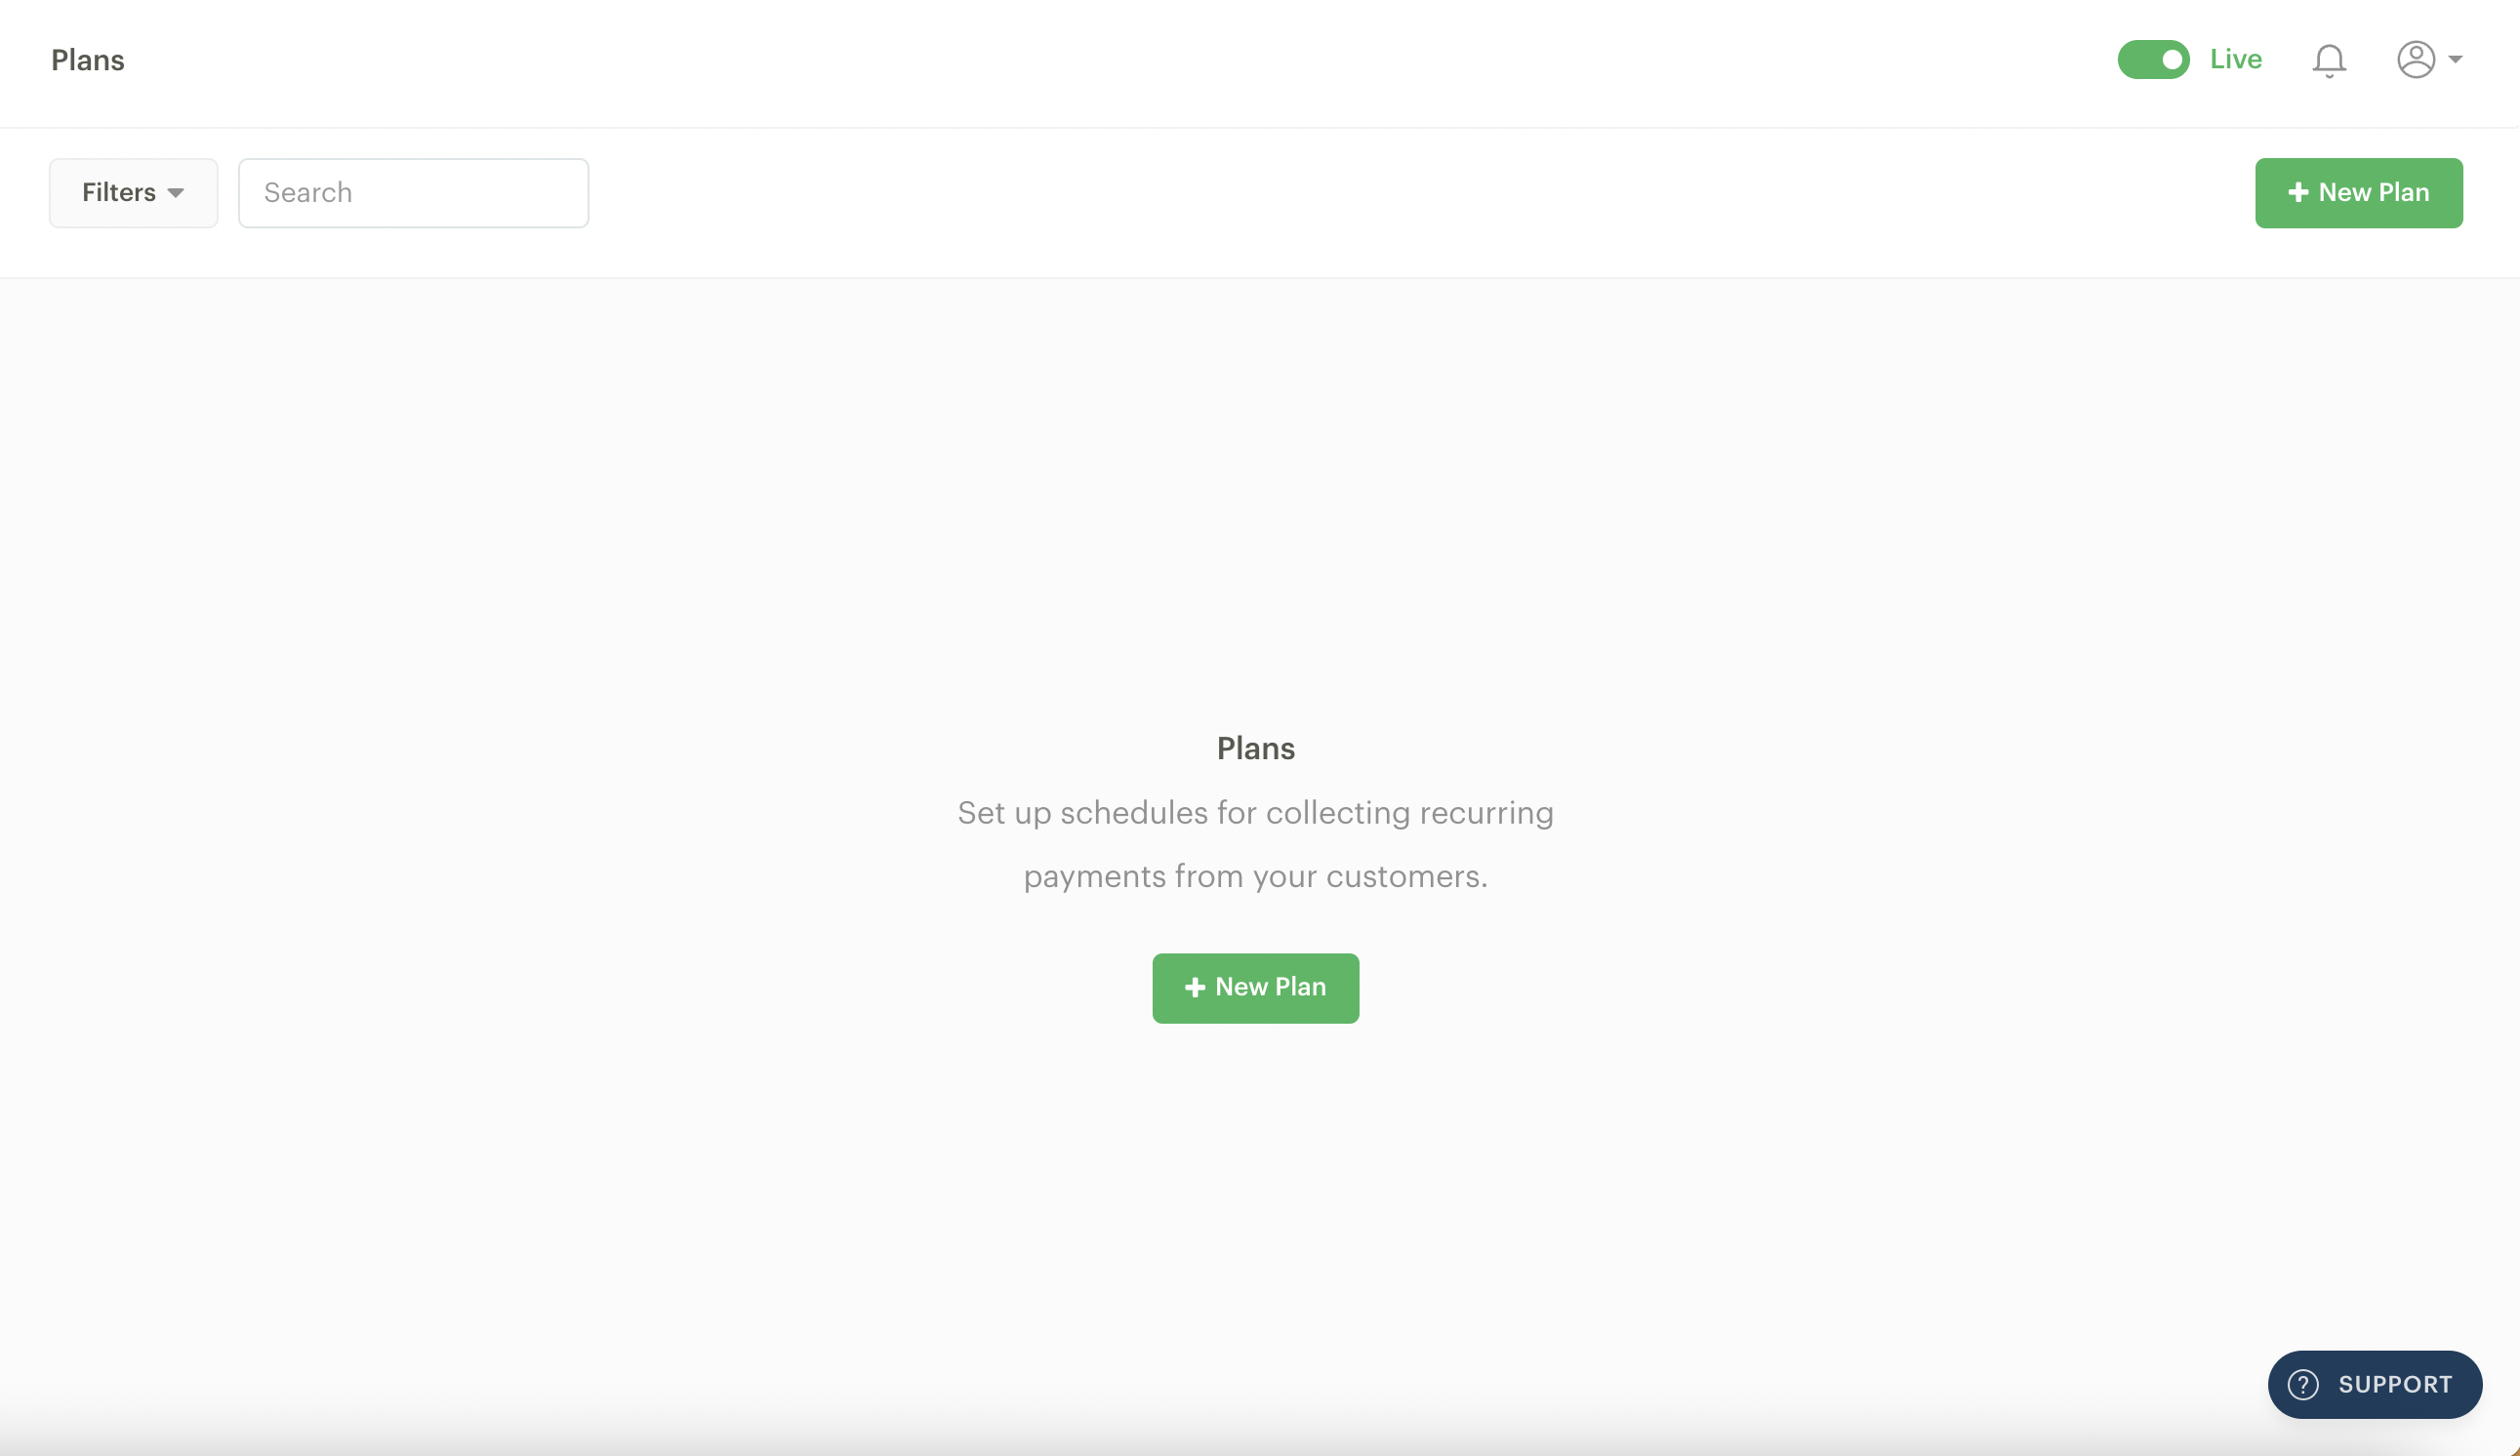
Plans
You can filter the main Plan page by status, interval, number of Subscriptions, amount, total revenue and date created.
Creating a Plan and Subscription
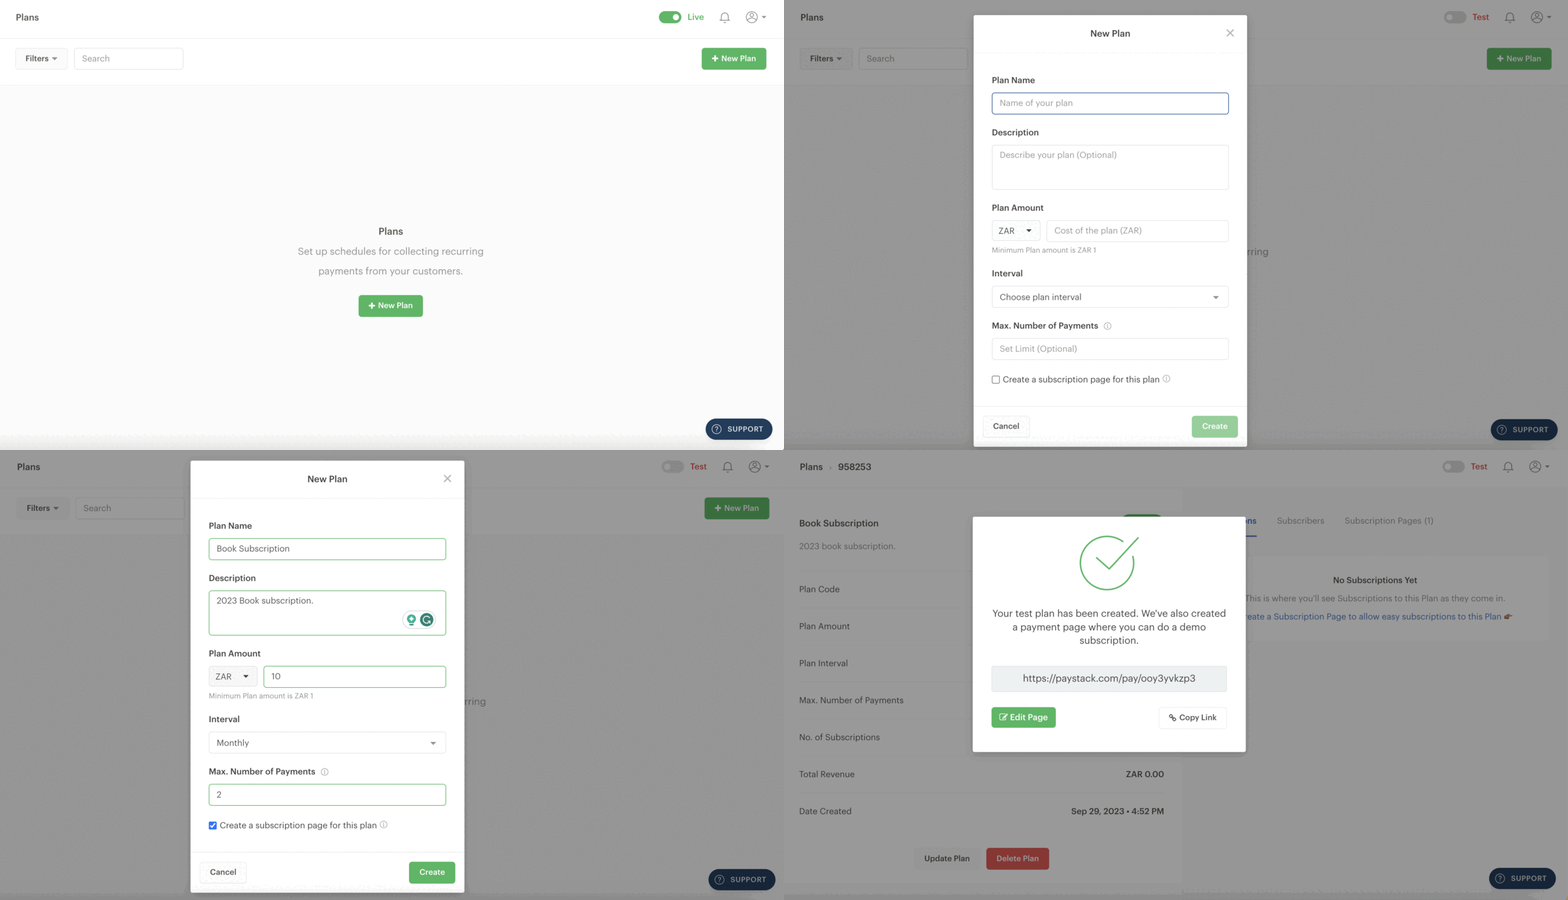
Go to the Plans page on your Dashboard and click ‘New Plan.’
A pop-up will appear with some fields you need to fill in. Complete these fields and click on ‘Create.’
These are the fields you’ll need to complete on the pop-up:
Plan Name: A name for your Plan.
Description (optional): You can briefly describe what the Plan is for.
Plan Amount: This is how much the customer will be charged at the desired interval frequency.
Interval: You can set the following payment interval frequencies: hourly, daily, weekly, monthly, quarterly, biannually and annually.
Max. Number of Payments (optional): Use this to set a fixed number of times you want this Subscription to run.
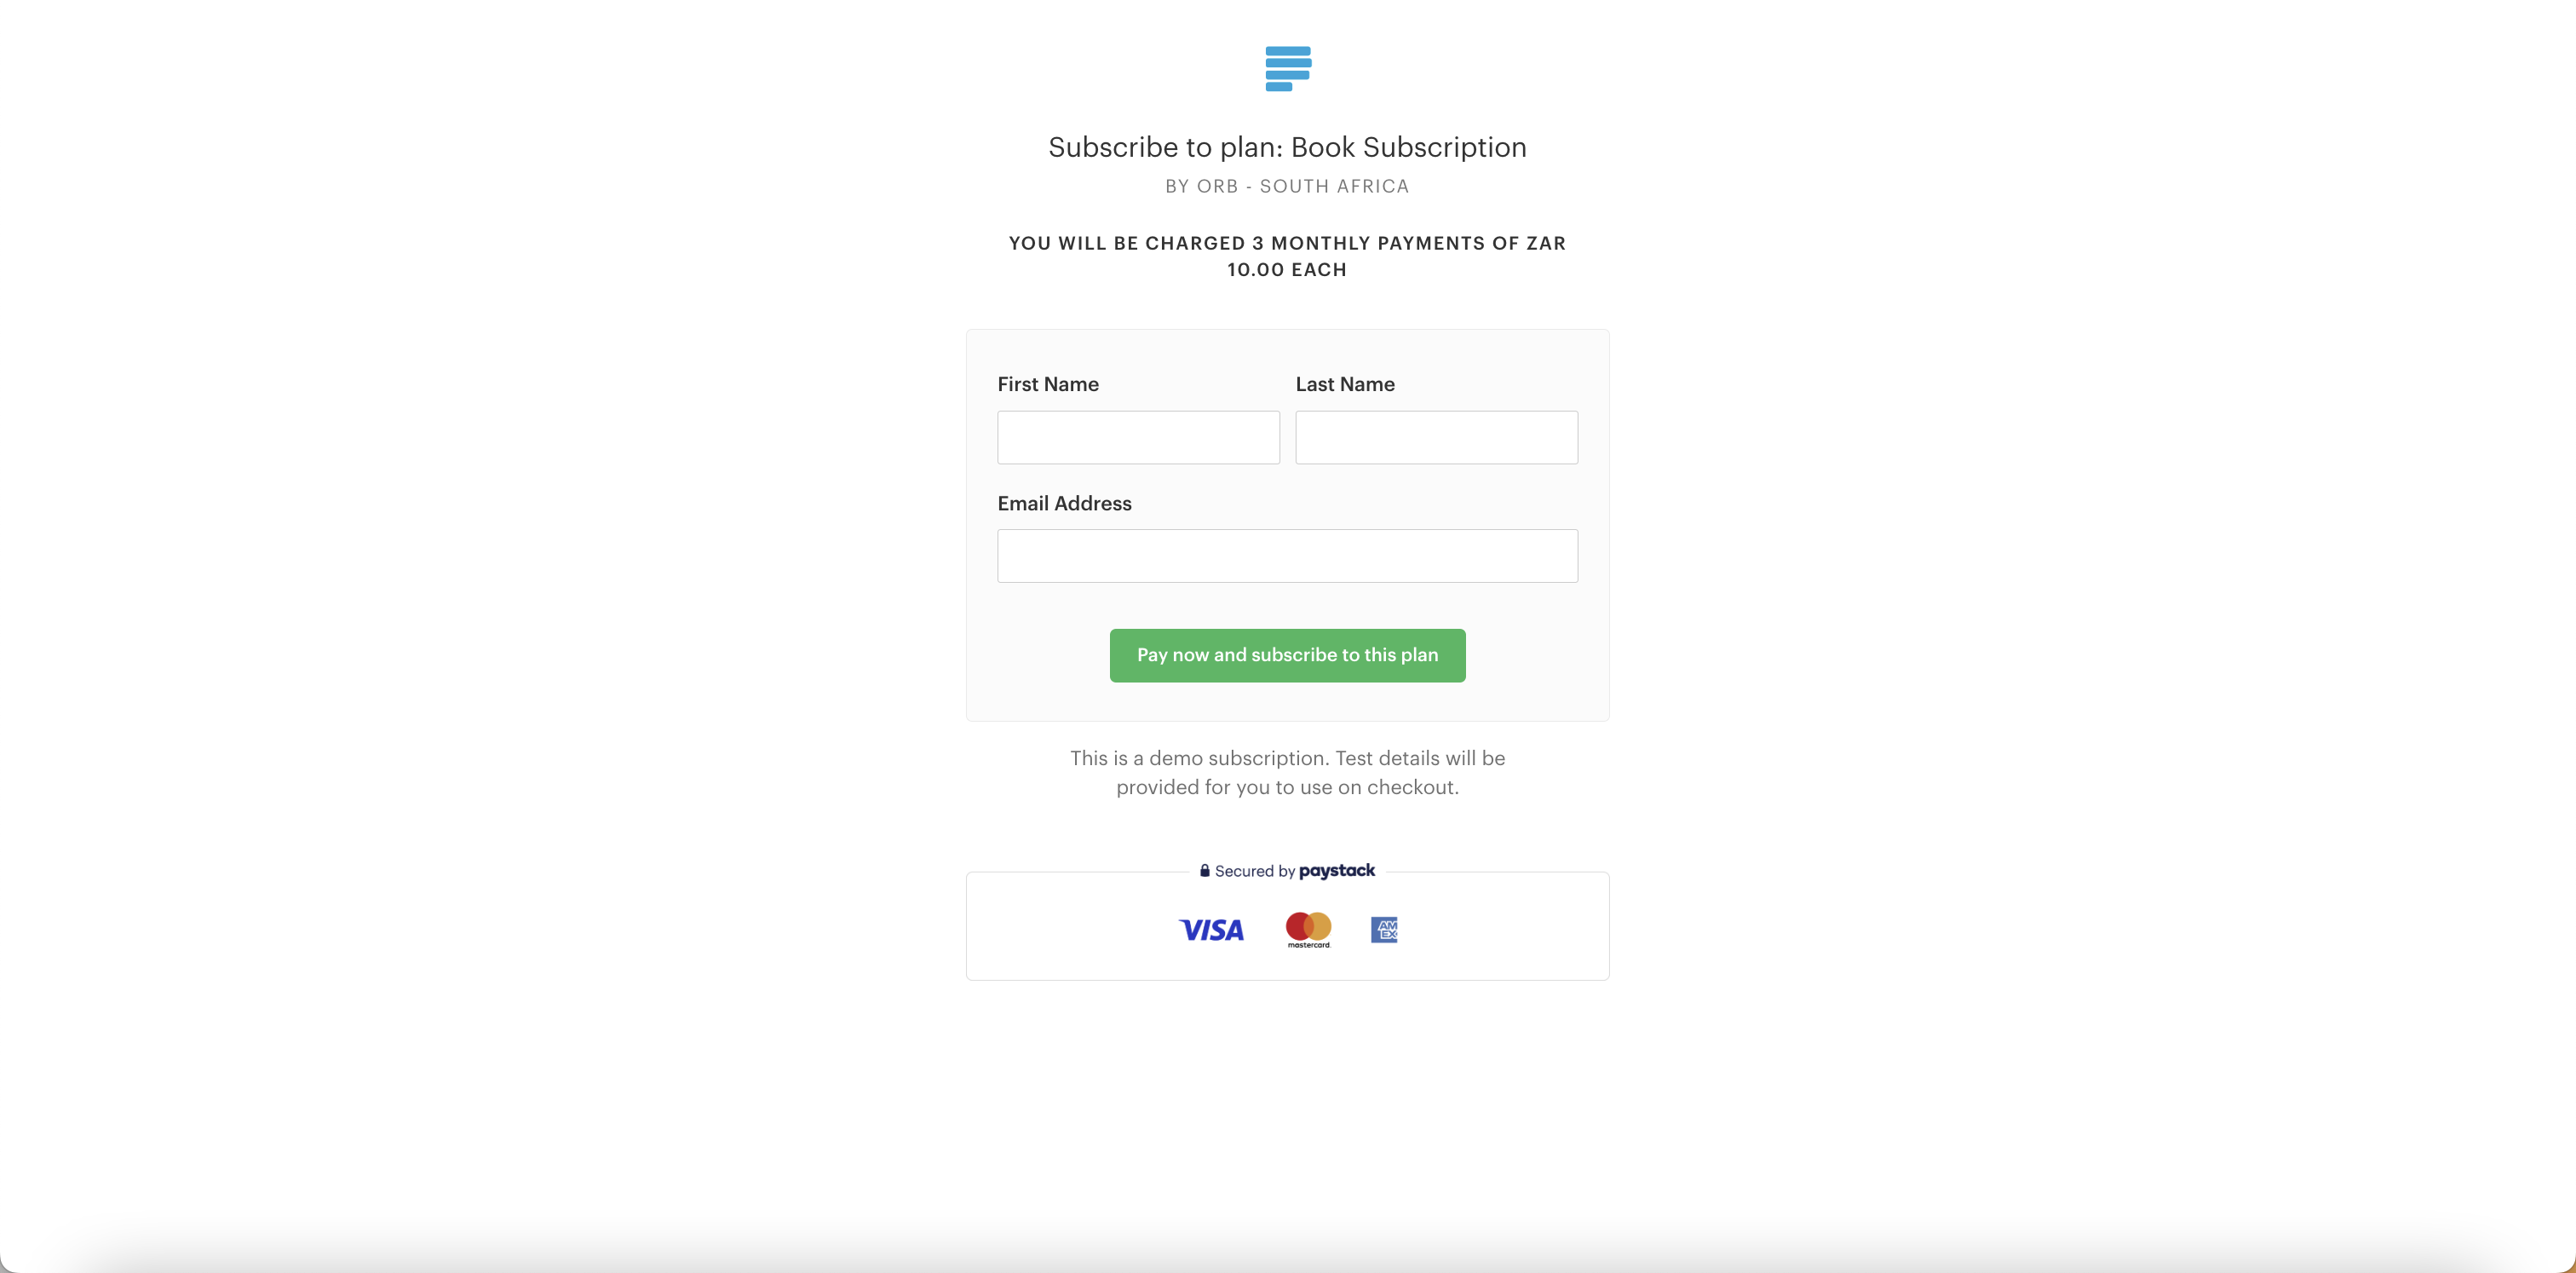
Create a Subscription Page for this Plan (optional): Clicking the checkbox beside this option will automatically create a Subscription Payment Page with this Plan you can share with your customers. A subscription page will look like this to your customers:
Managing your Plan
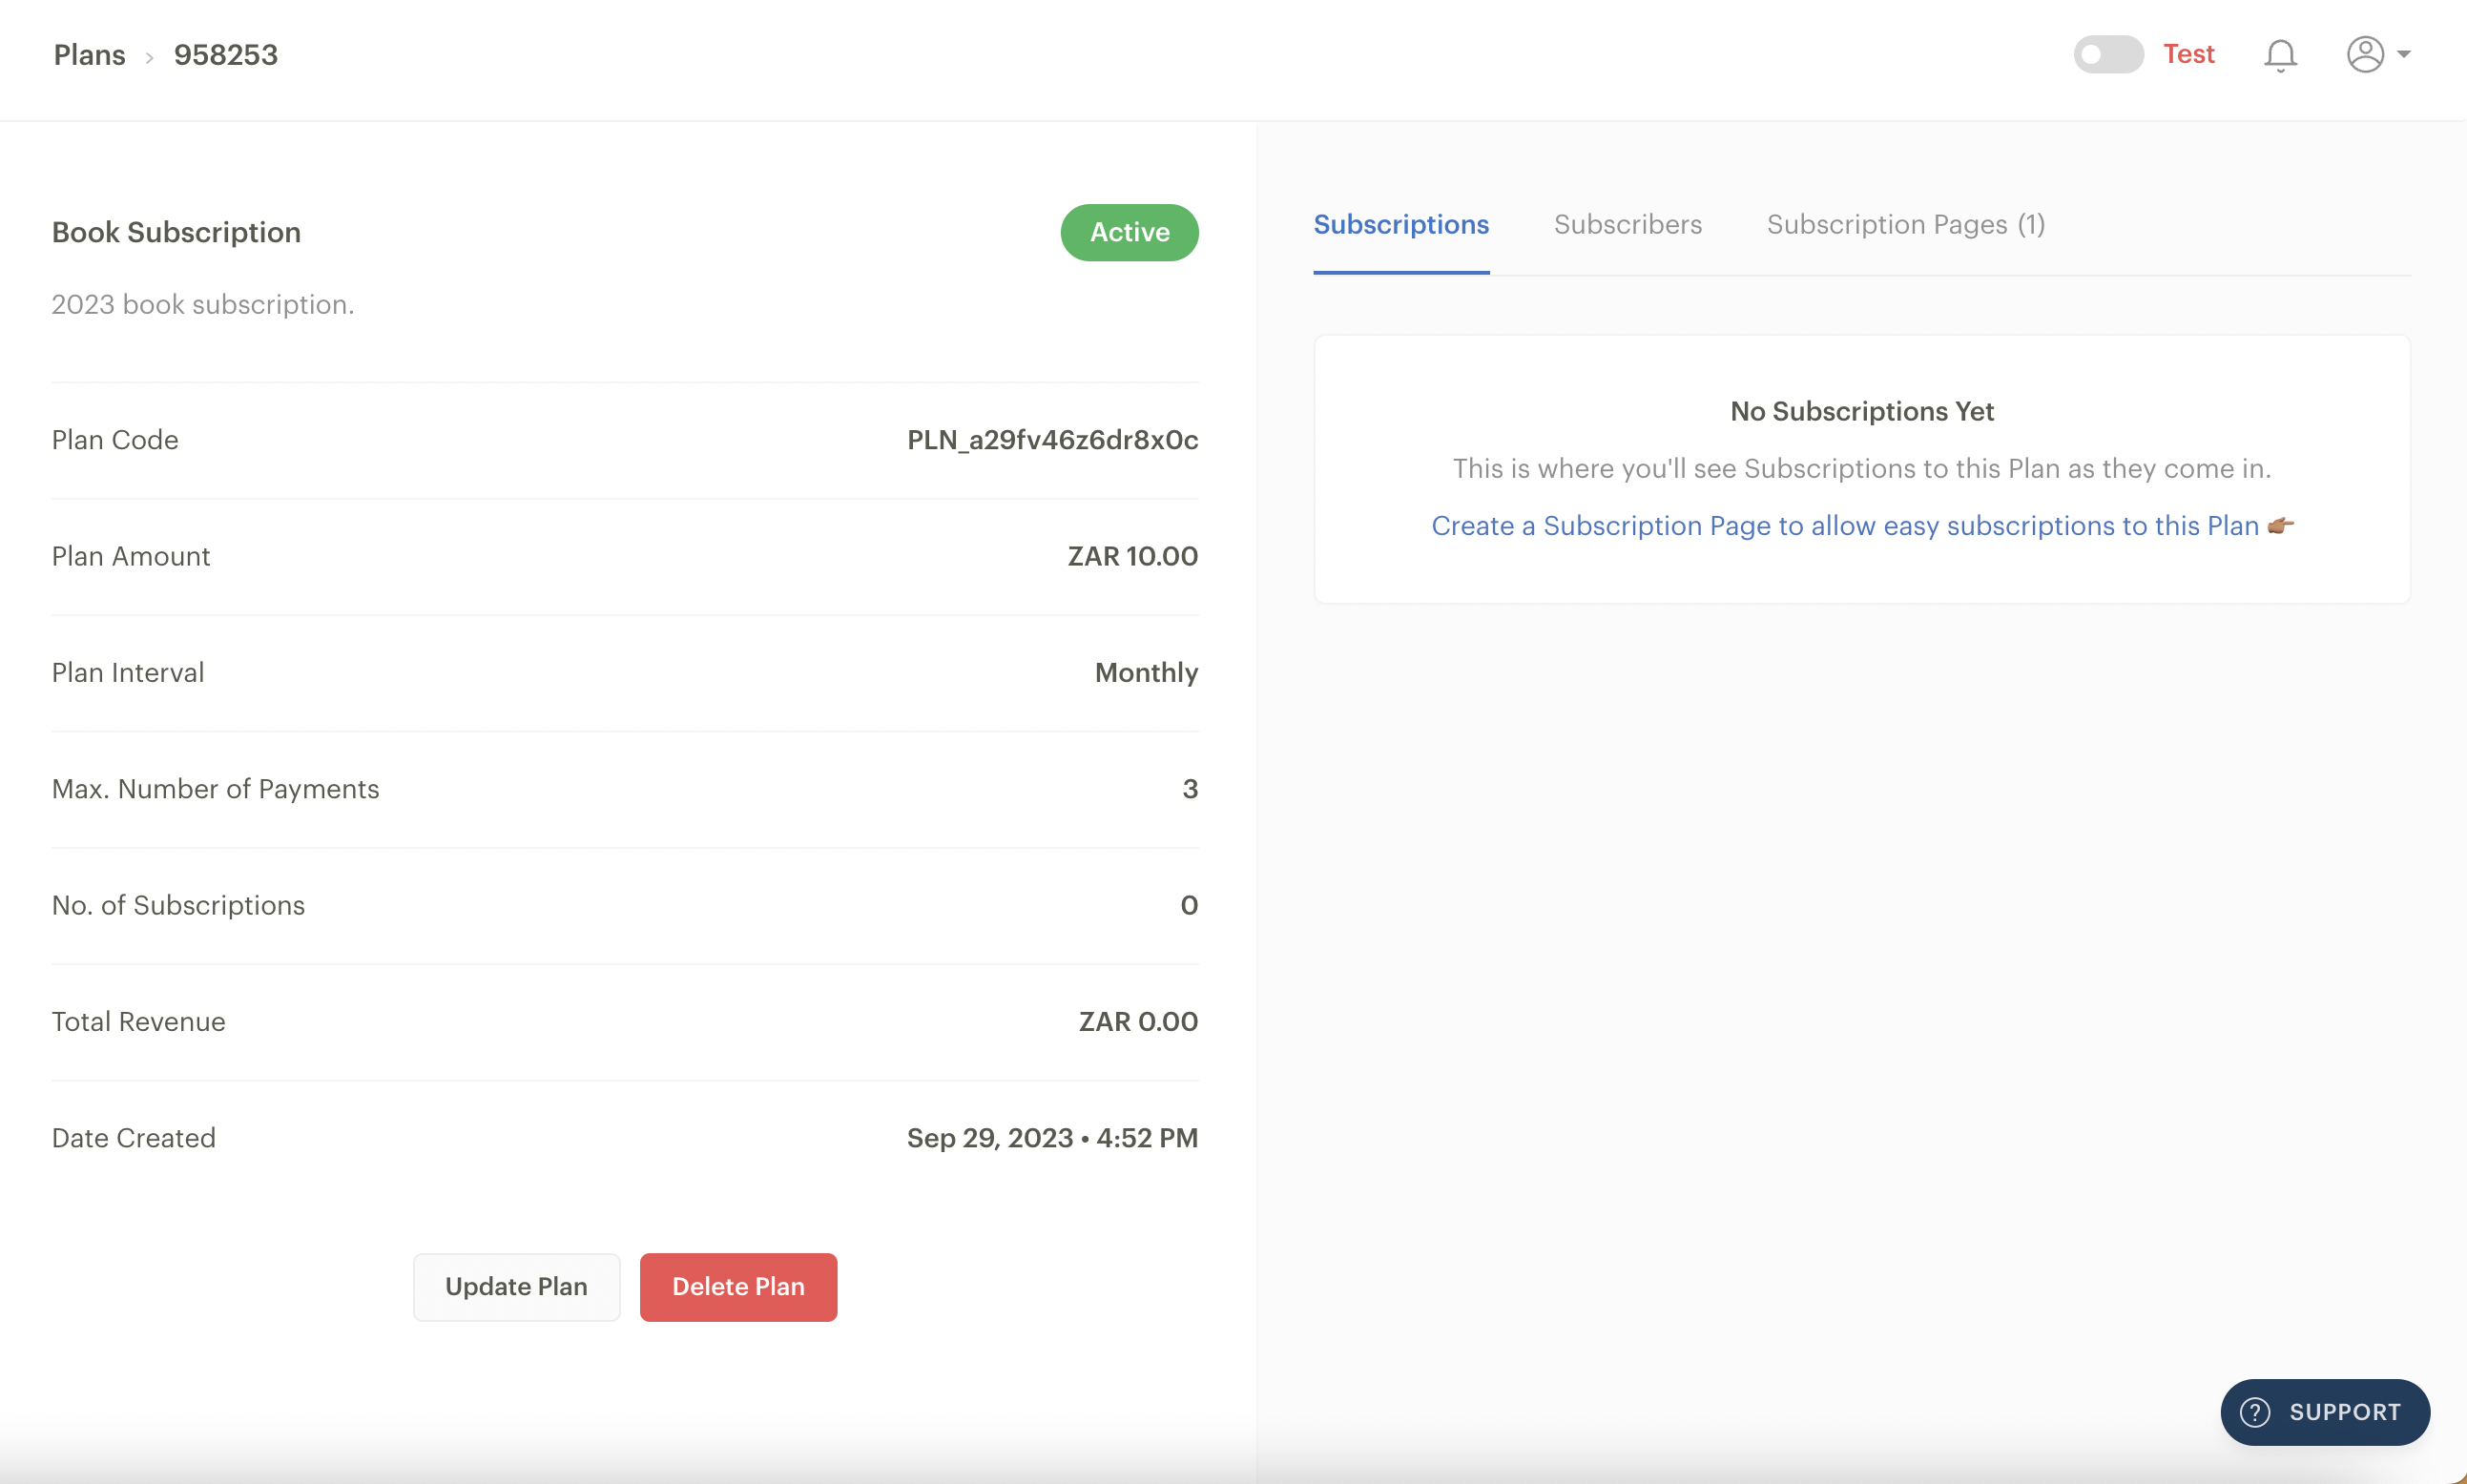
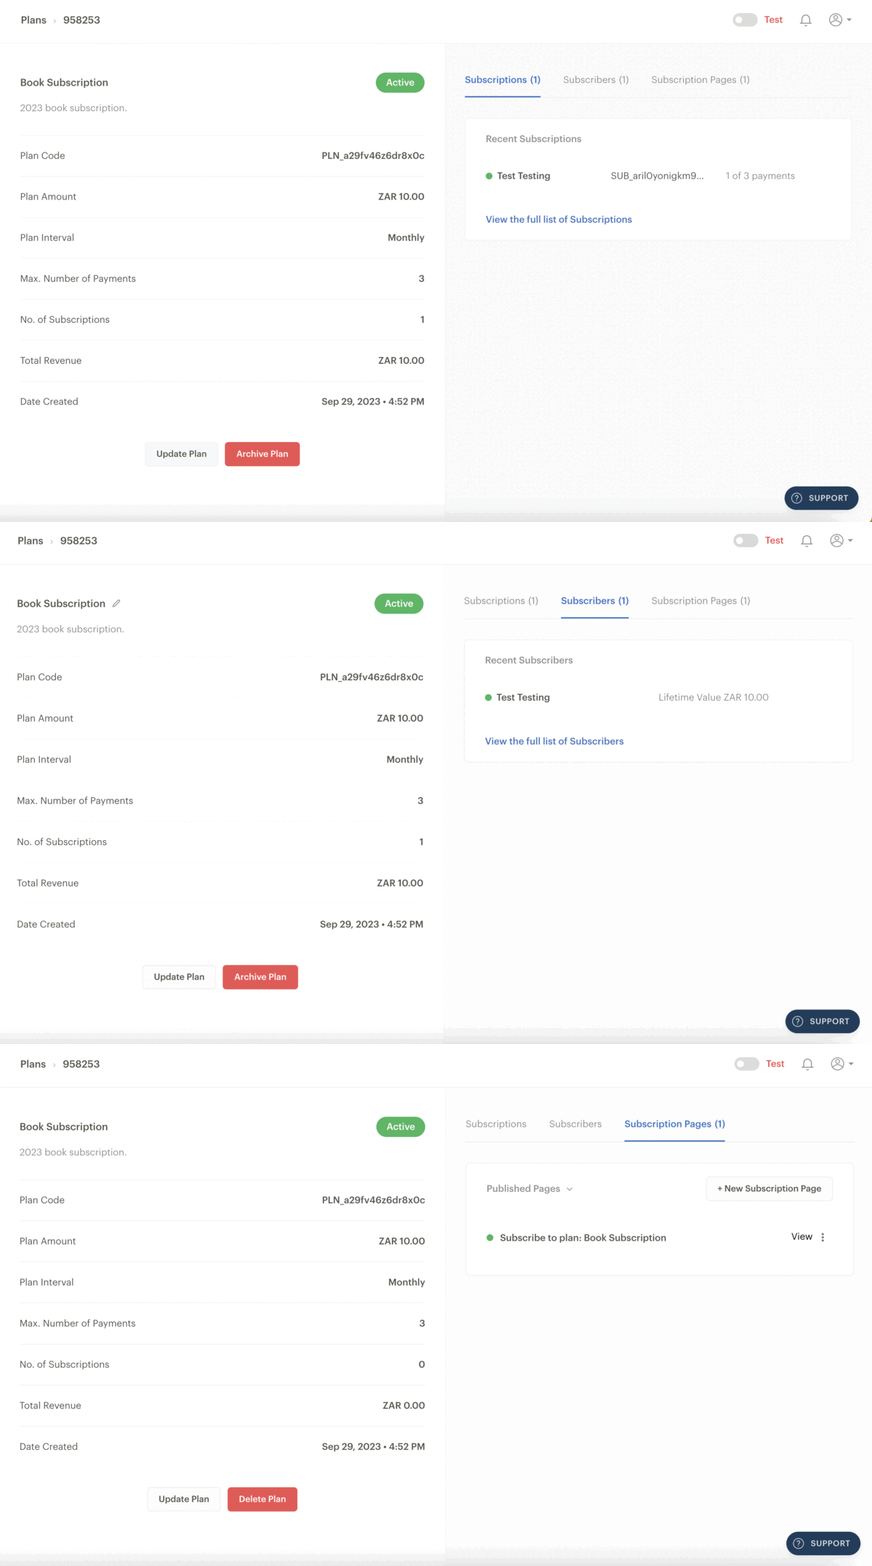
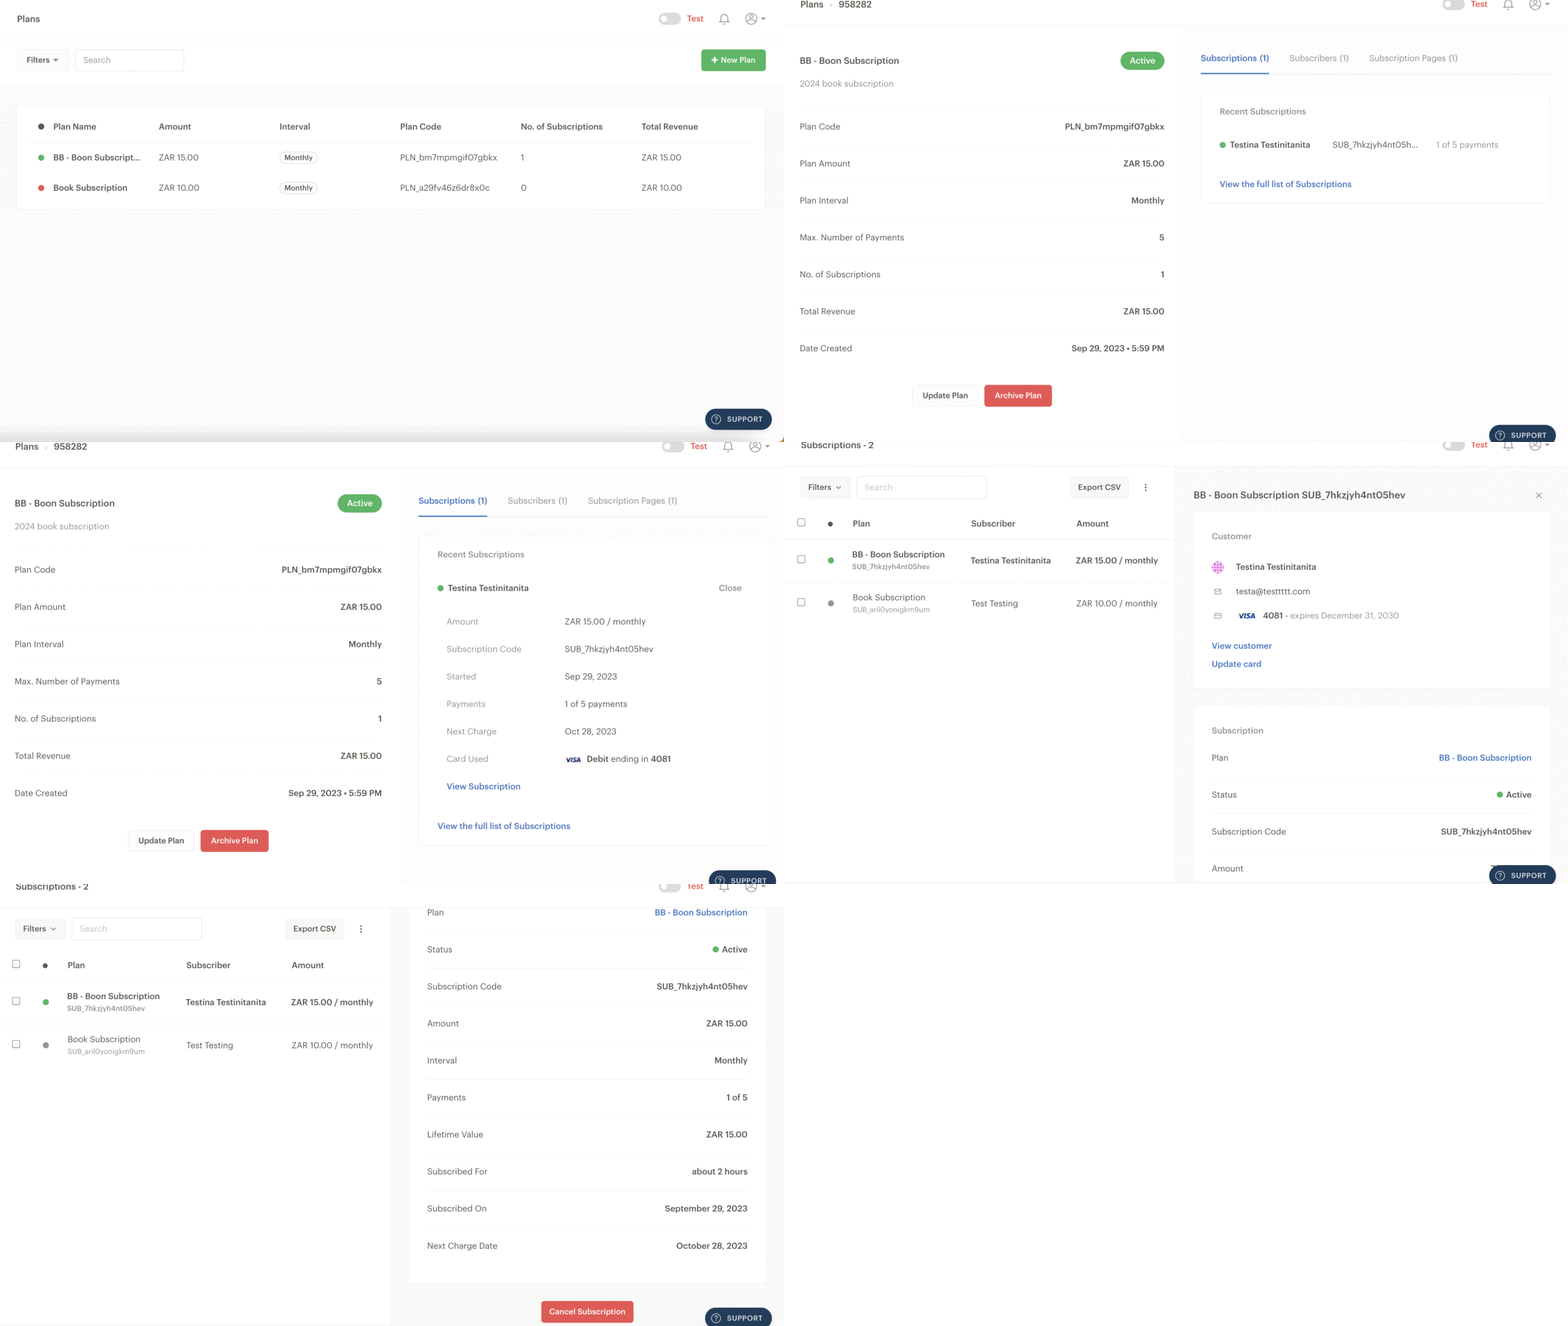
When you successfully create your Plan, you’ll see an interface like the one below that shows the details of the Plan on the left side of the page.
On the right side, you’ll see the following tabs:
Subscriptions tab: Once customers start subscribing to your Plan, their name, subscription code (auto-generated) and number of payments will appear under this tab
Subscribers tab: This will show a list of recent subscribers and the total amount they have paid to your business. There is an option to view a full list of subscribers at the end of the list.
Subscription Pages tab: This tab will list all the Subscription Pages tied to this plan. You can add a new Subscription Page, view a page or toggle between published and unpublished Pages. You can copy a Page link to share with your customers to enable them to subscribe to the Plan or delete it by clicking on the three vertical dots on the right side of the Plan.
Deleting a Plan
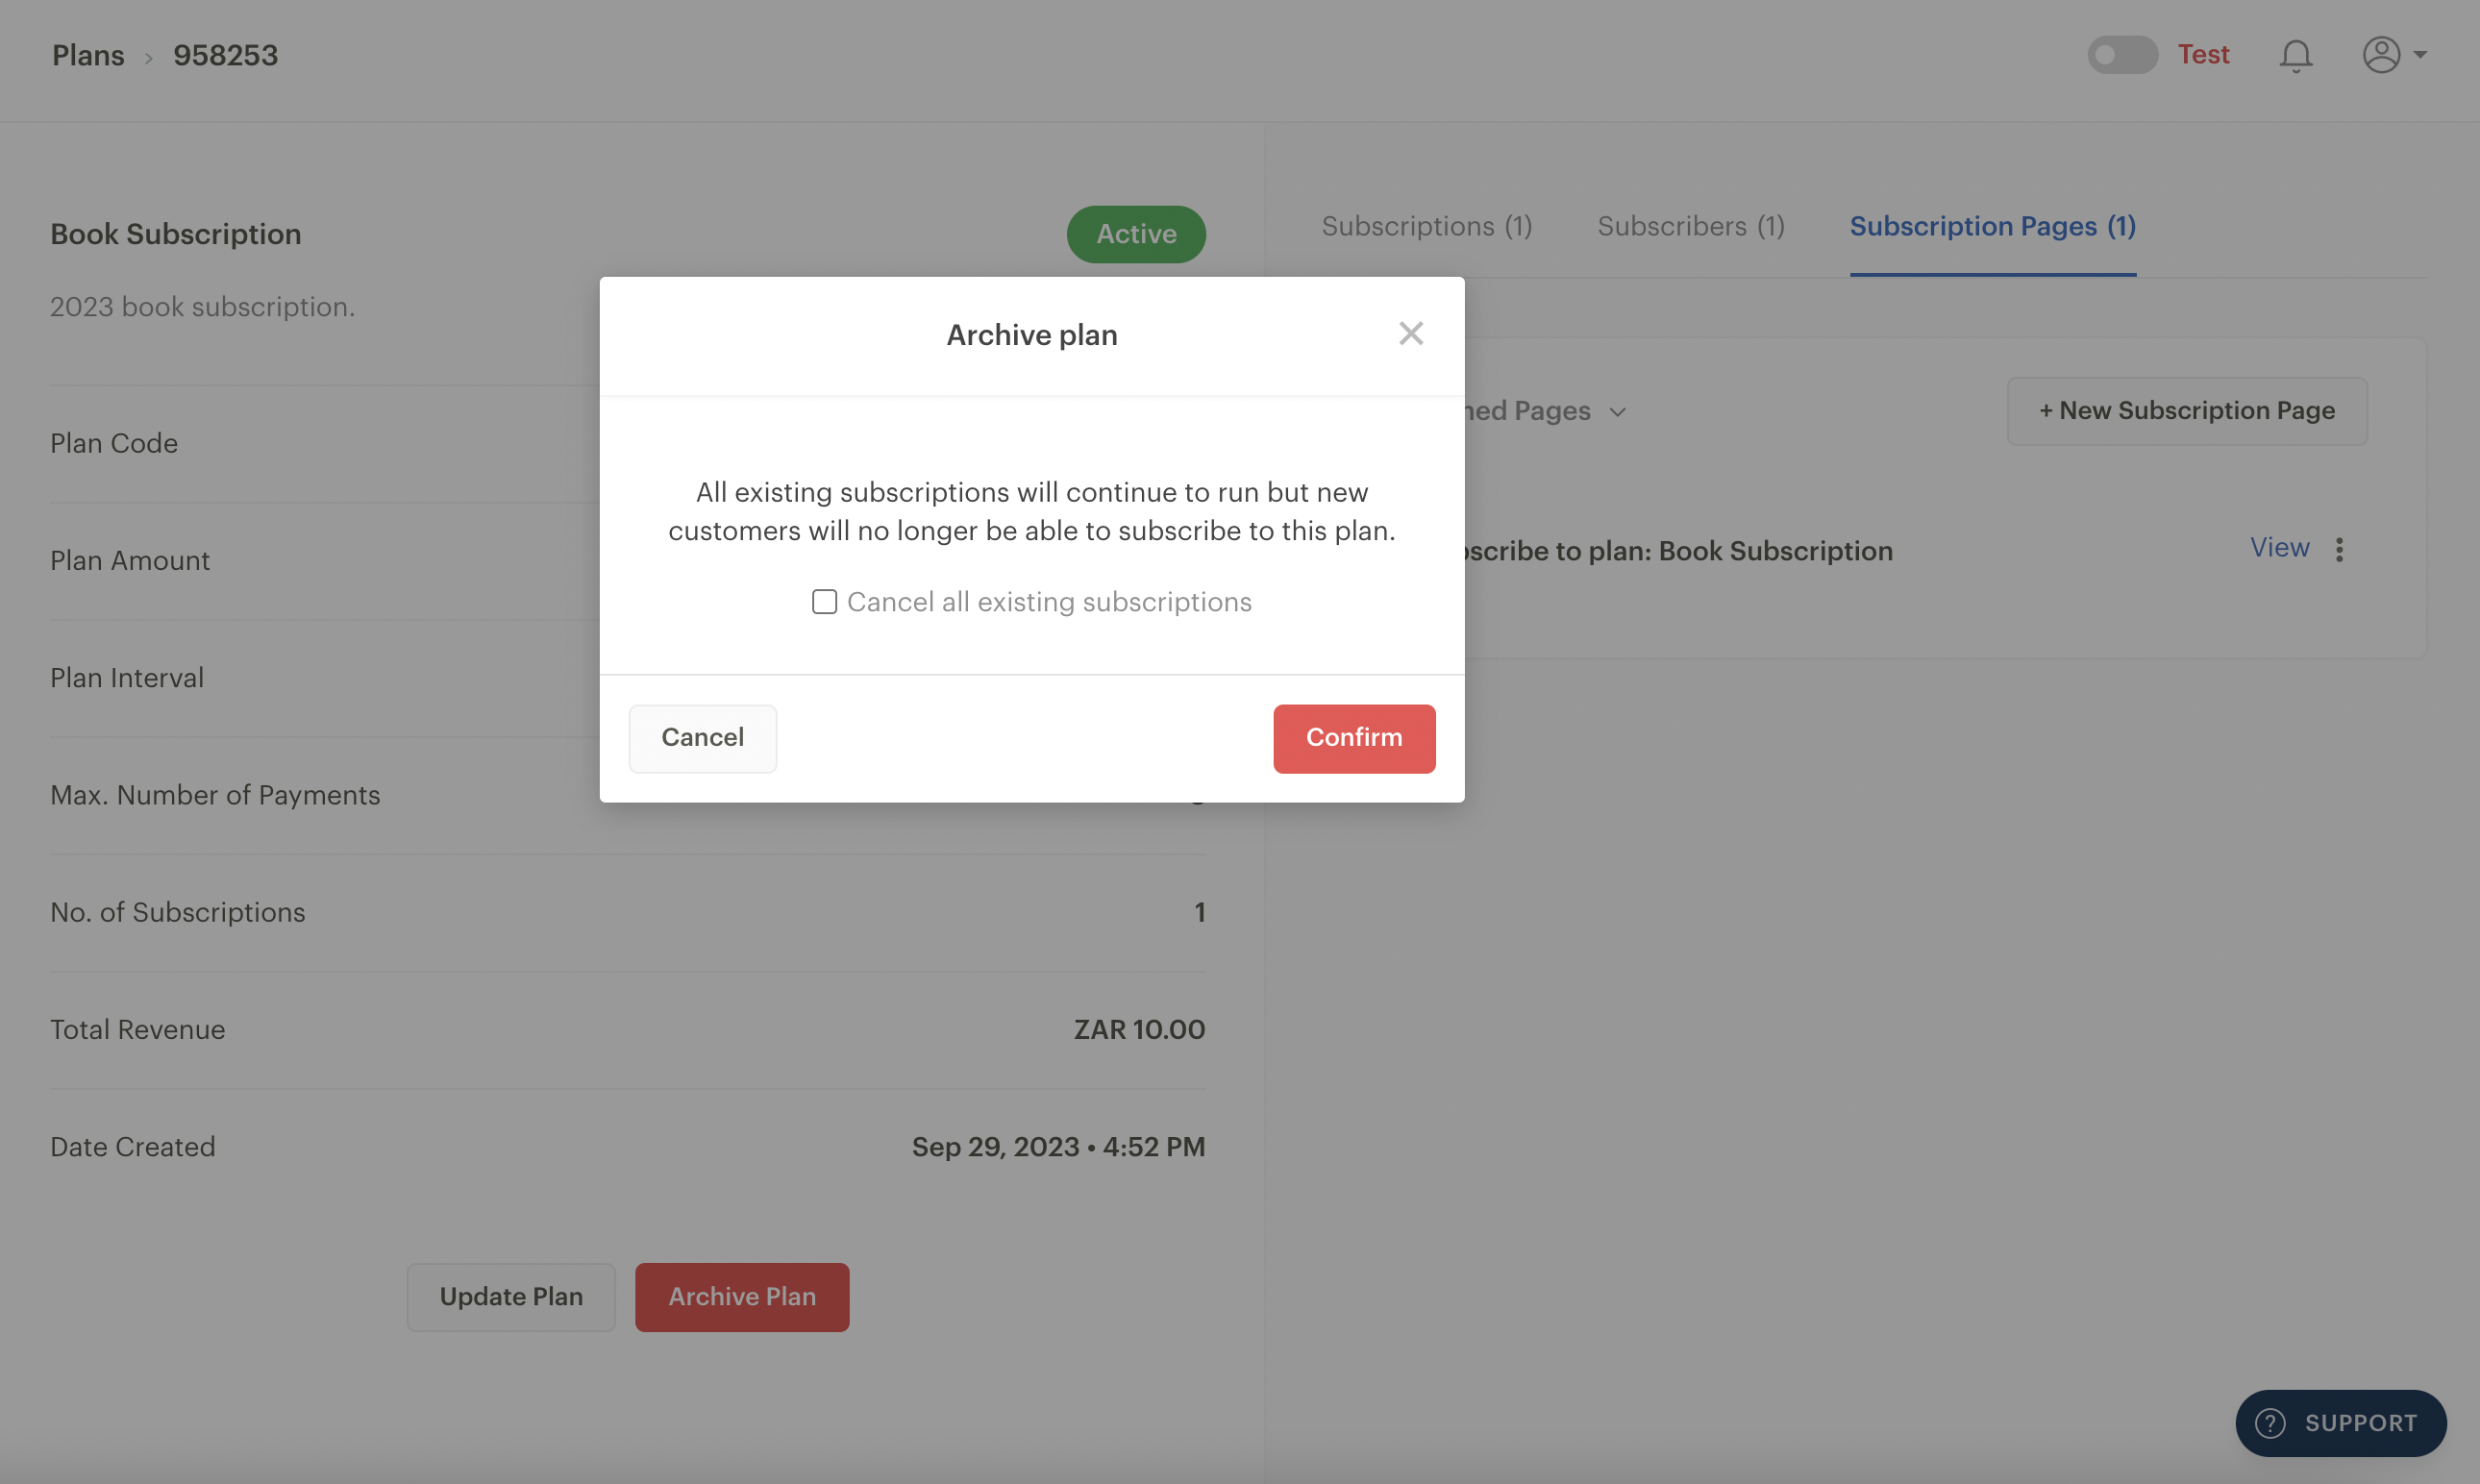
You can update or delete a Plan using the buttons at the bottom of the page. You can only delete a Plan that has no existing subscriptions tied to it. If you delete a Plan, customers can no longer subscribe to it.
If a Plan has existing subscriptions, you will see an option to archive it instead. When you click on the archive button, you can still cancel all existing subscriptions by clicking the checkbox on the prompt that appears. An archived Plan cannot be reactivated, but you can still view it on your Dashboard.
Subscriptions page
Ideally, a Subscription should have been created when creating a Plan as outlined above, but if you created a Plan without including a Subscription, you can follow these steps to create one:
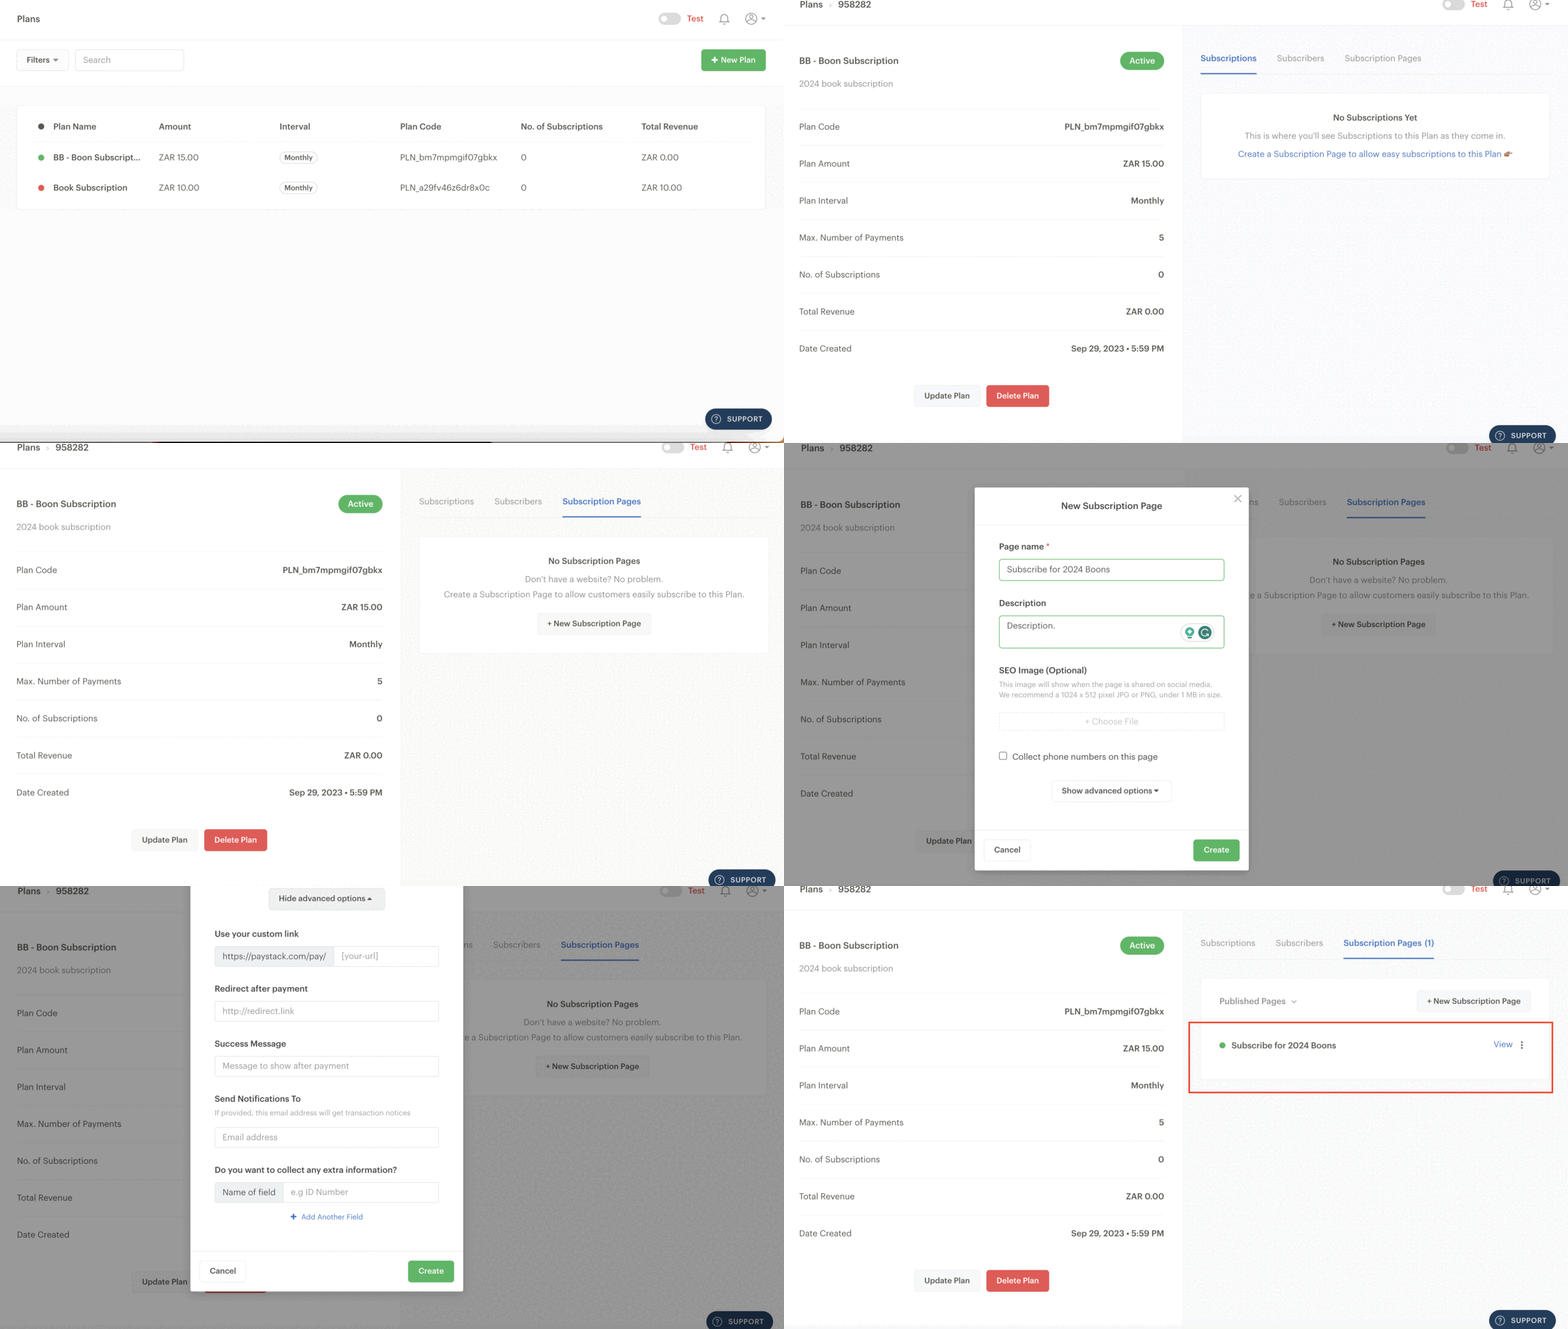
Go to the Plans page on your Dashboard and click a Plan you want your customers to subscribe to (or create a new one by clicking on ‘New Plan’).
Go to the Subscription Pages tab on the Plan and click on ‘New Subscription Page’
Fill in the information on the pop-up page as outlined below and click on ‘Create.’
Page Name: This is the title at the top of your Payment Page. It's public, so it's a good idea to make the name descriptive (e.g. 2024 Book Subscription).
Description: Complete this option to provide more information to your customer. This is an excellent place to give a compelling description of the product or service, explain your return policy, or do anything else that will compel customers to subscribe.
SEO image (optional): An SEO image is a picture you can add to your page to help it rank higher in search engine results.
Collect phone numbers on this page: By default, Paystack collects the email addresses of all customers. Clicking this checkbox will include a mandatory phone number field the customer must fill out.
Other than the basic settings of the form, there are more advanced features which you can access by clicking the ‘Show advanced options’ button:
Use your custom link - Paystack automatically generates a link when you create a Payment Page. However, you can add your branding to the link to make it easier to remember and to make your link look more professional and trustworthy; for example, paystack.com/pay/Bell.
Redirect after payment - By default, after a customer completes a successful transaction, they remain on the post-purchase 'Thank You' page. But if you'd prefer, you could make it so they're taken to a different site right after their purchase. This is useful for things like sending customers to your social media page where they can follow you. If you're selling digital content, you could redirect to an online folder where the customer could download the content or take the customer back to the store page.
Success message - You can customize the message the customer sees after they make a successful payment. You can use this opportunity to say thank you or provide follow-up information.
Send notification to - By default, transaction alerts are sent to the business email (you can change this on the Settings page), but if you enter an alternate email address here, alerts about payments will go to this email address instead.
Split Payment with a Subaccount or a Split Group: If you use Split Payments or have a Split Group, you can split a portion of every payment with multiple bank accounts. You can learn more about Split Payments here.
Do you want to collect any extra information: You can collect additional information from the customer, such as ID Numbers, Addresses, and more.
Managing your Subscriptions
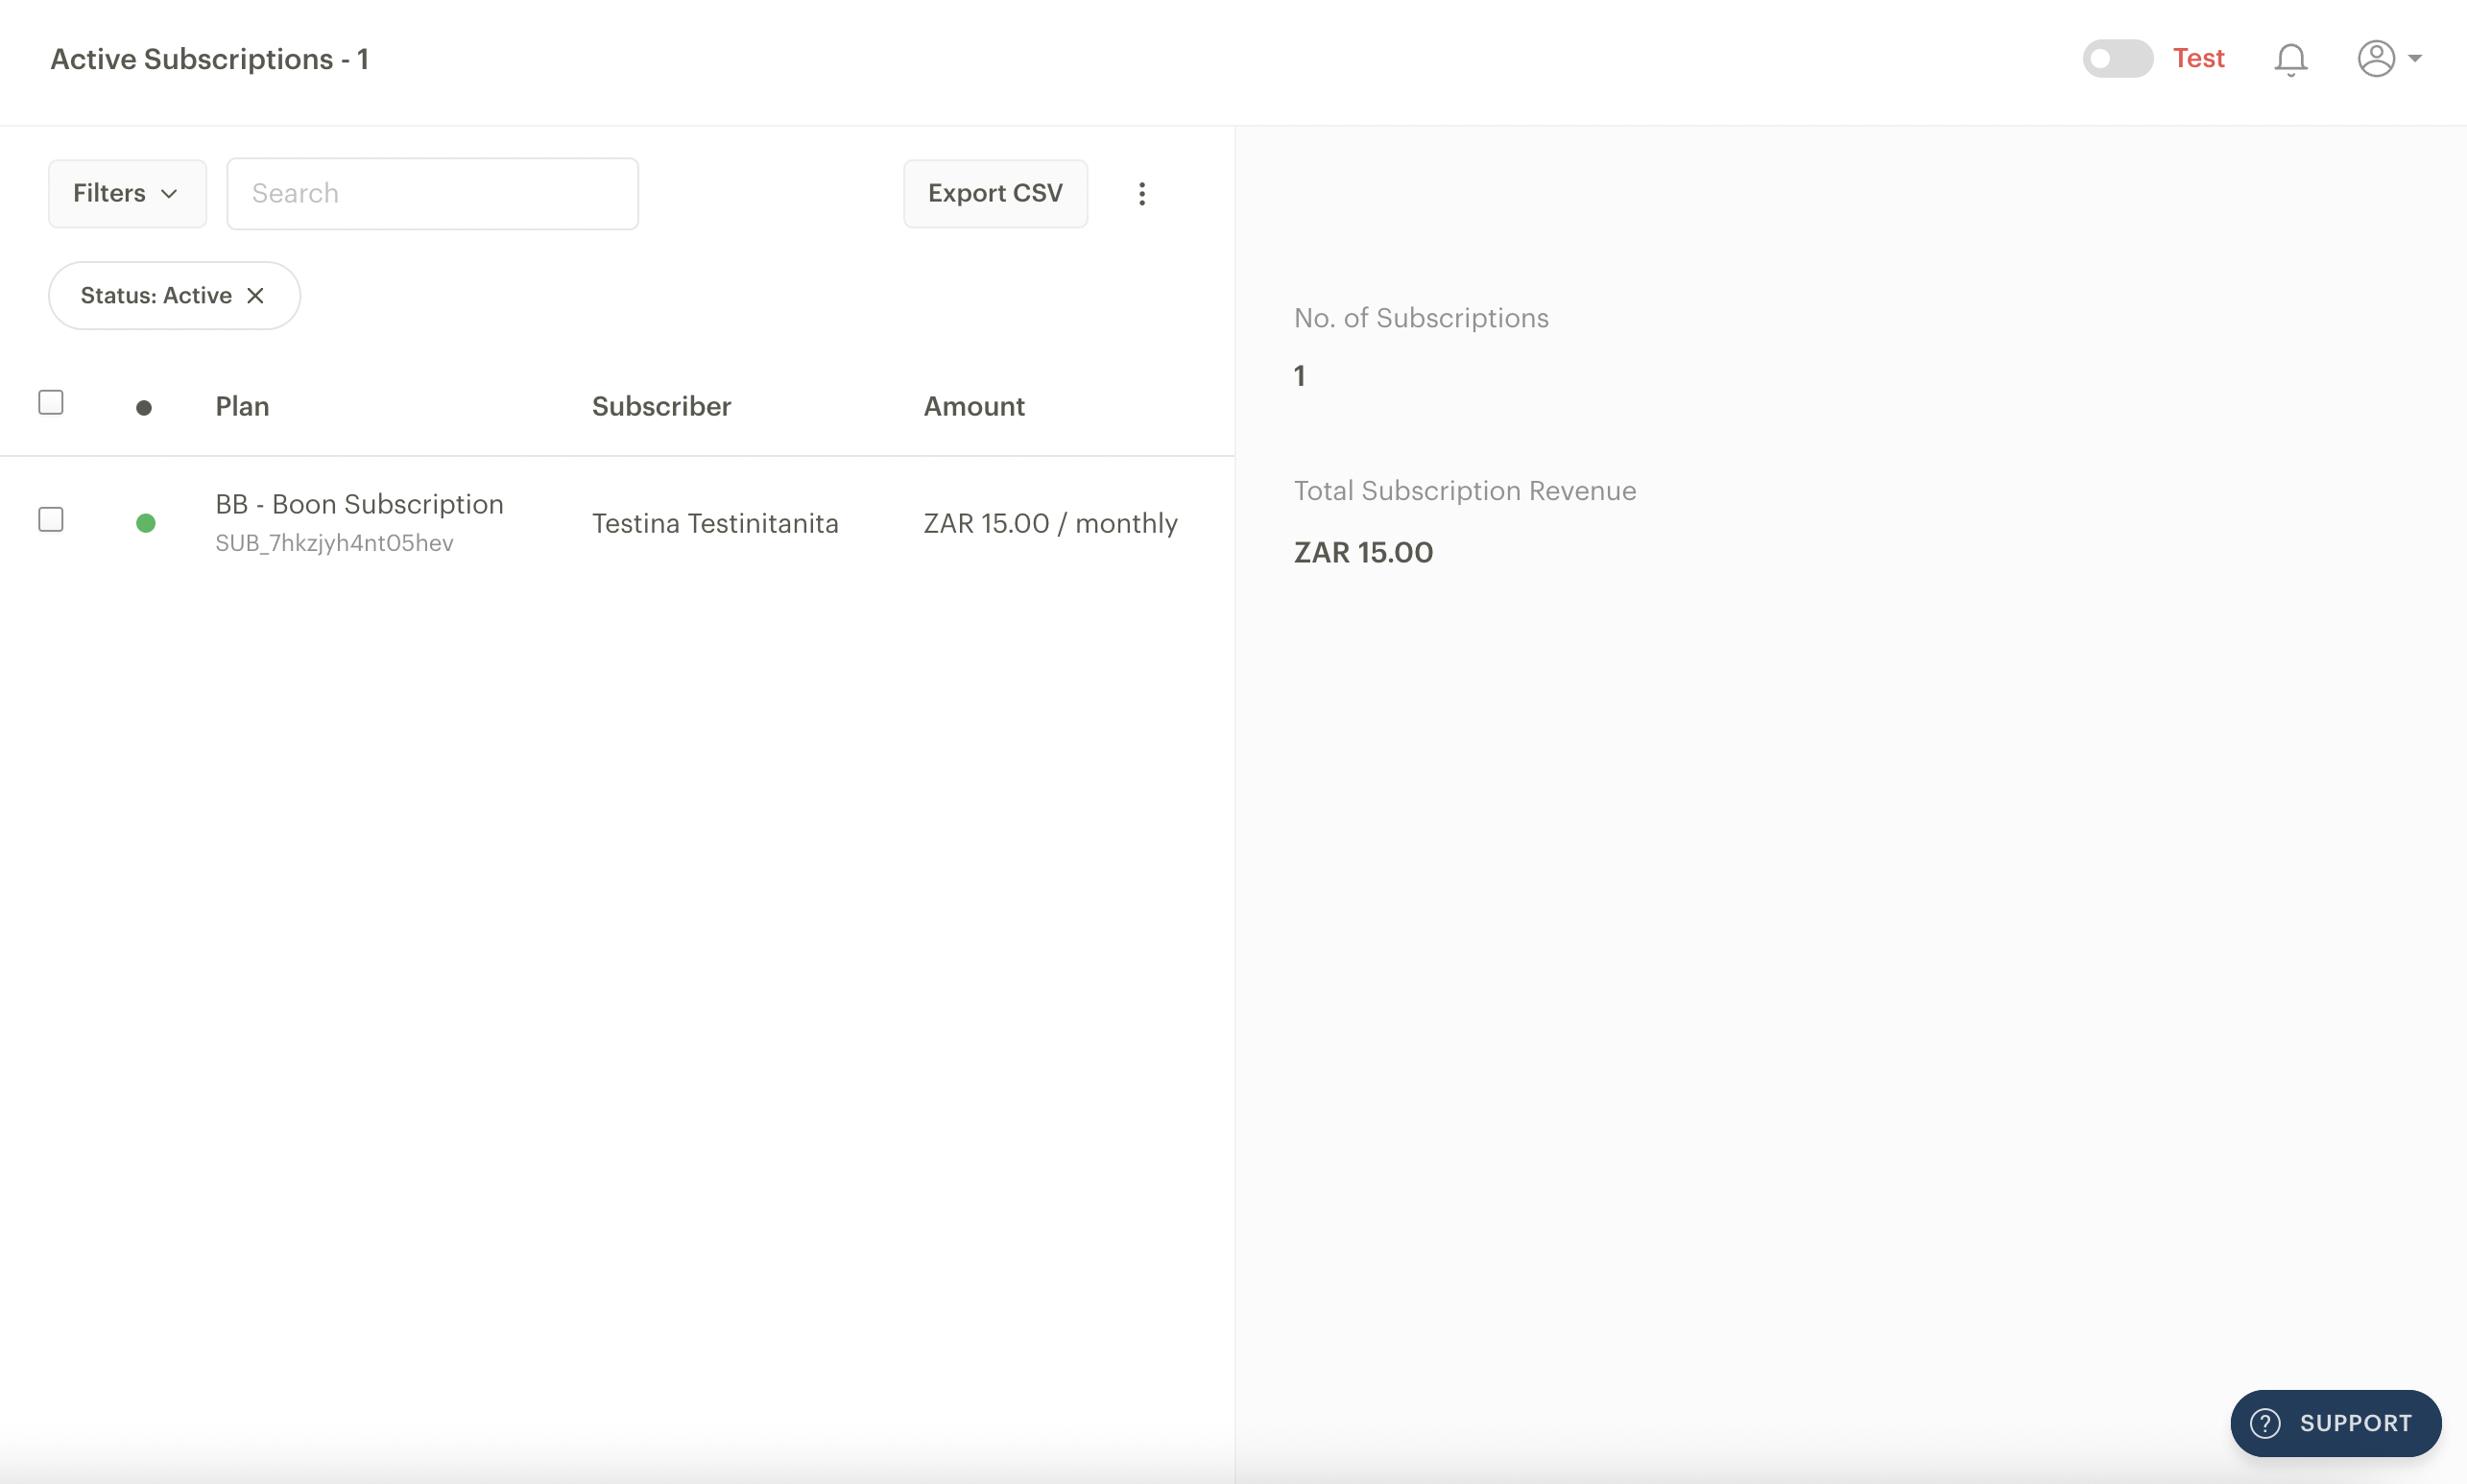
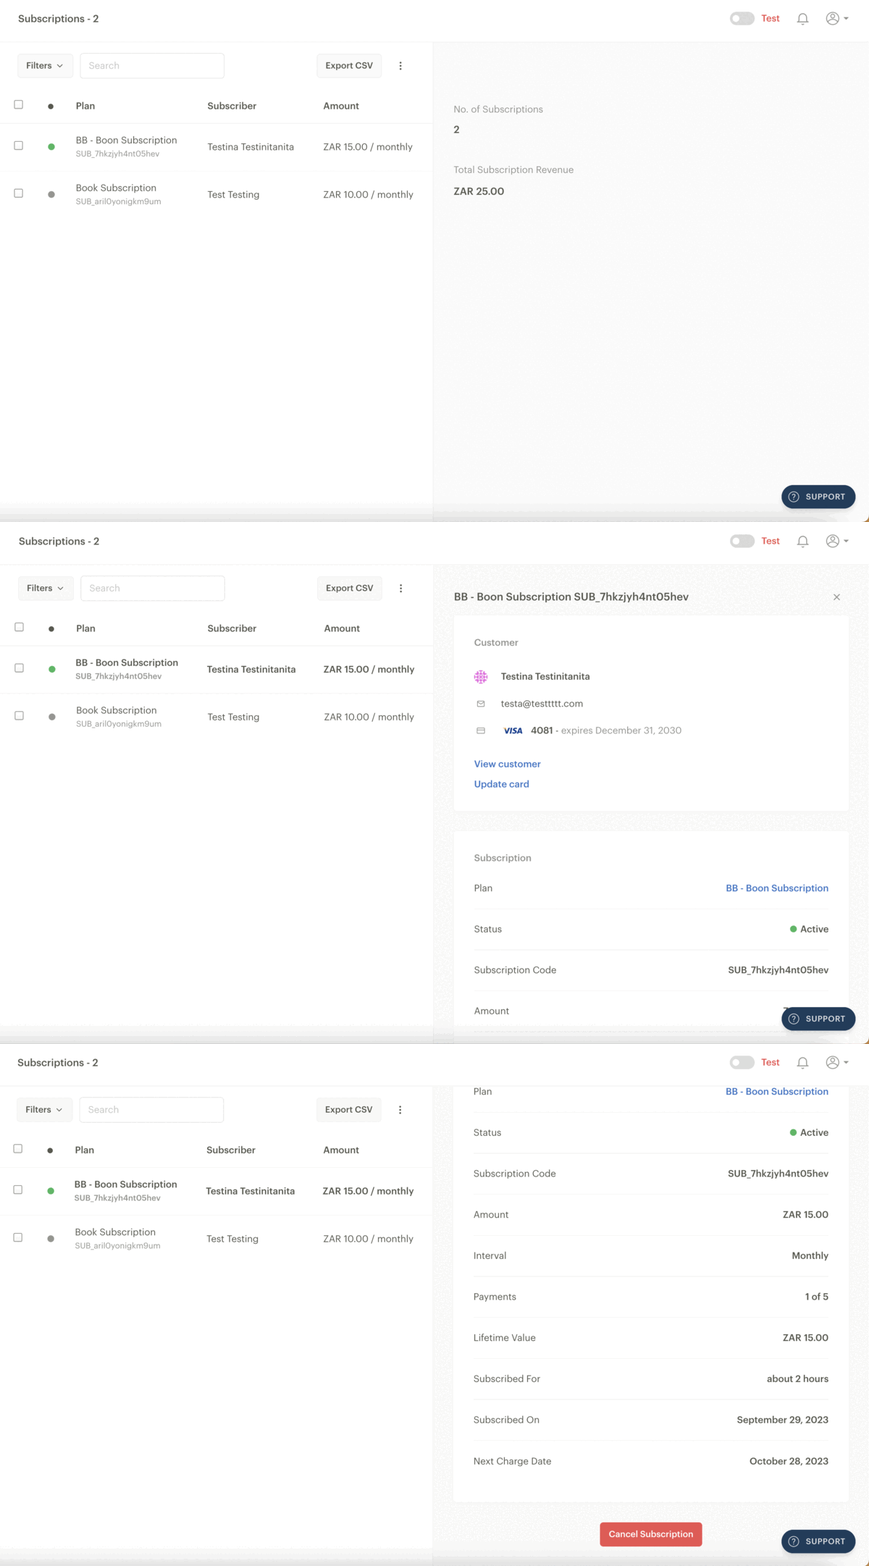
When you click on the Subscriptions page on the Dashboard, you will see a list of all your subscriptions with additional information on each subscription if you click on it. You can filter by Plan, status, amount, expiring cards and creation date at the top left corner of the page.
If you choose to filter by status, you will see the following options:
Active: These are currently active subscriptions (including renewing, non-renewing, and those requiring attention).
Active (non-renewing): These subscriptions have been paid for but are cancelled for renewal e.g. a customer pays for a yearly subscription but chooses not to renew the subscription. So, while the subscription is active, it won't be renewed.
Active (renewing): A list of active subscriptions that will be renewed.
Completed: These are subscriptions that are completed. This is useful when you set the times your customer should be charged.
Cancelled: These inactive subscriptions have been cancelled.
Attention: This status is used for subscriptions that have issues renewing (e.g. expired cards and failed charge attempts).
You can also export a list of your subscriptions by clicking the Export CSV button at the top of the page. You will get the report in CSV format.
Changing or updating a customer’s card tied to a Subscription
If a card tied to a subscription expires, or your customer would like to continue an active subscription with another card, you can help your customer update their card details.
You can prompt your customers to change the card tied to a subscription by generating and sending a link to the subscriber to help them update their subscription card information by following these steps:
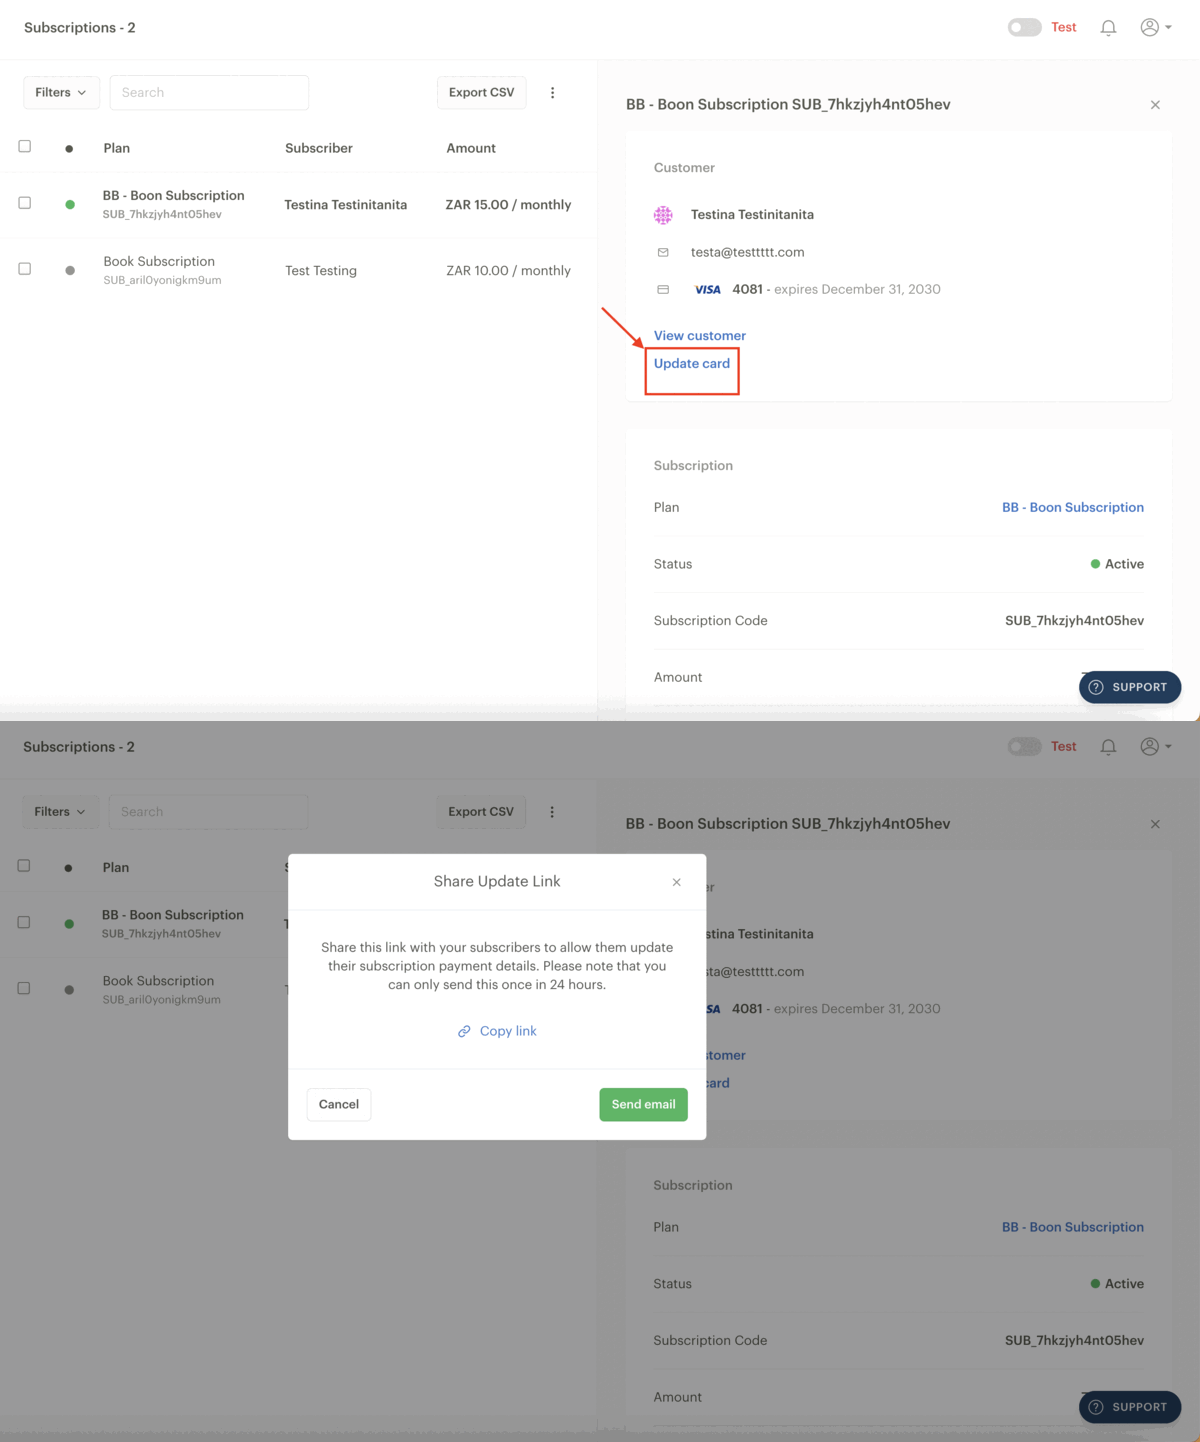
Go to the Subscriptions page on the Dashboard and select the subscription you would like to update to view more details about the Subscription.
When the additional information pops up on the right side of the page, click on the ‘Update card’ button. This will only appear for active subscribers.
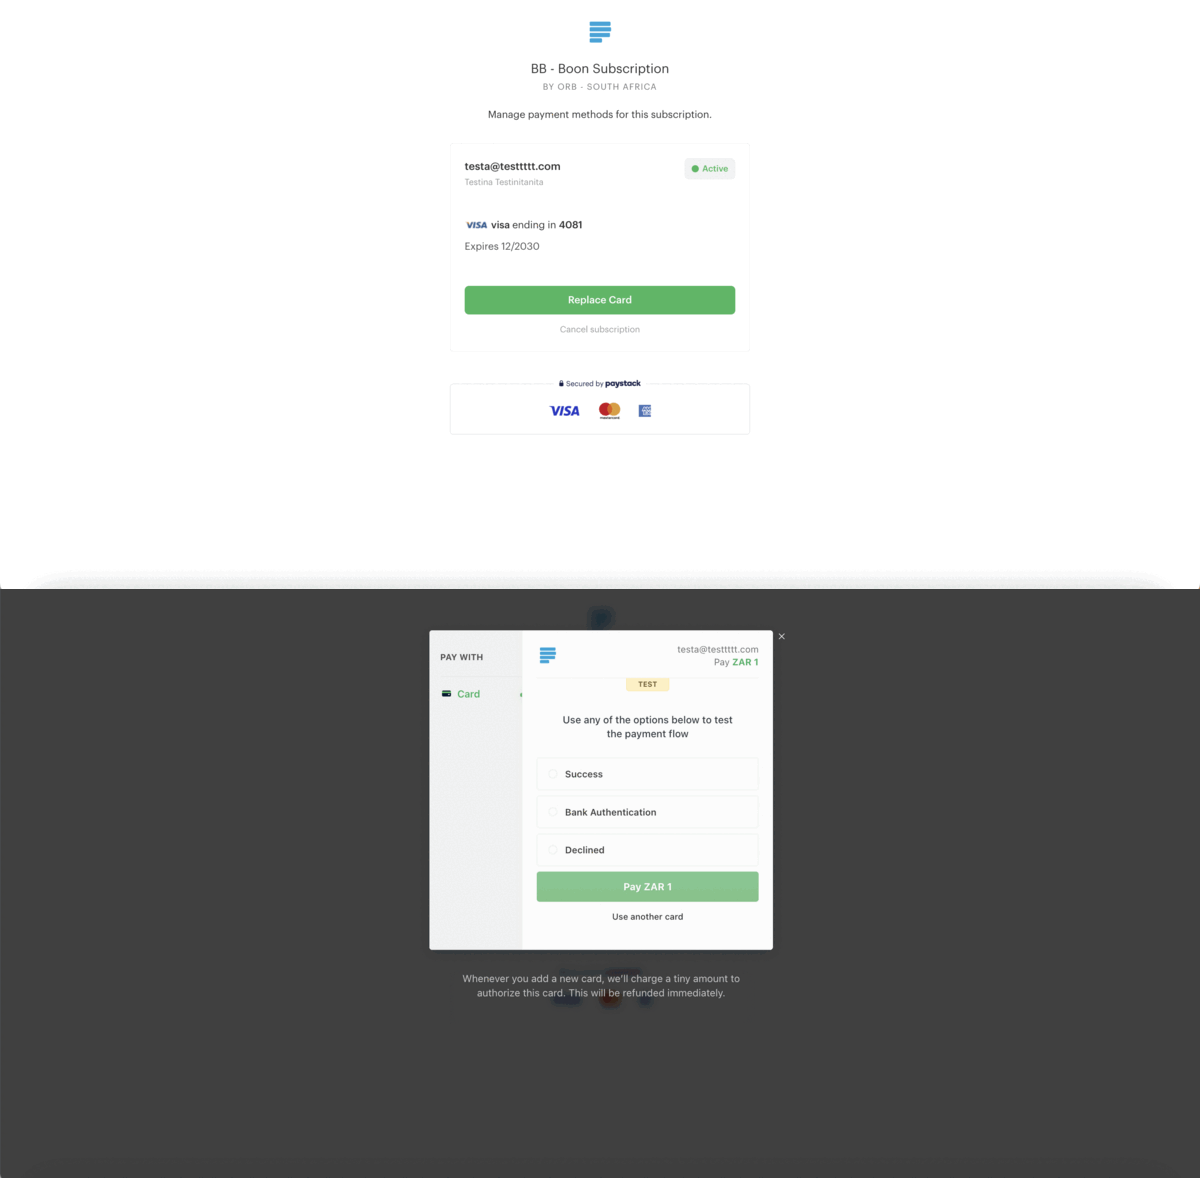
You'll then be able to copy the link or email the customer from your Dashboard. The direct link or the link attached to the email will lead the customer to a Subscriptions Preferences page. On the page, the customer will see the option to 'Replace Card.’
Clicking the 'Replace Card' button will load the Paystack checkout for the customer to share their new card information. The customer will be charged a small amount to authorise the card, and once the authorisation is complete, the amount (NGN 50, USD 1, GHS 1, KES 1 or ZAR 1) will be refunded to the customer.
Important to note
You can only send the email once every 24 hours; however, you can copy the link and share it with the customer anytime.
To add a new card to continue a subscription, a transaction will be initiated for the customer to complete (NGN 50, USD 1, GHS 1, or ZAR 1). This will be automatically refunded to the customer.
Cancelling a customer’s Subscription
You can cancel a customer's subscription from three different places on your dashboard:
From the Plans page
From the Subscribers page
From the Subscriptions page
From the Plans page
Click Plans on your Dashboard.
Click on the Plan the customer is subscribed to. To the right of the page, you'll see a list of all active subscriptions to that Plan under Subscriptions.
Select the subscription you want to cancel and click ’View Subscription.’ You’ll be redirected to the customer’s subscription on the Subscriptions page.
Scroll through the right side of the page and click on the Cancel Subscription button at the bottom of the right side of the page.
From the Subscribers page
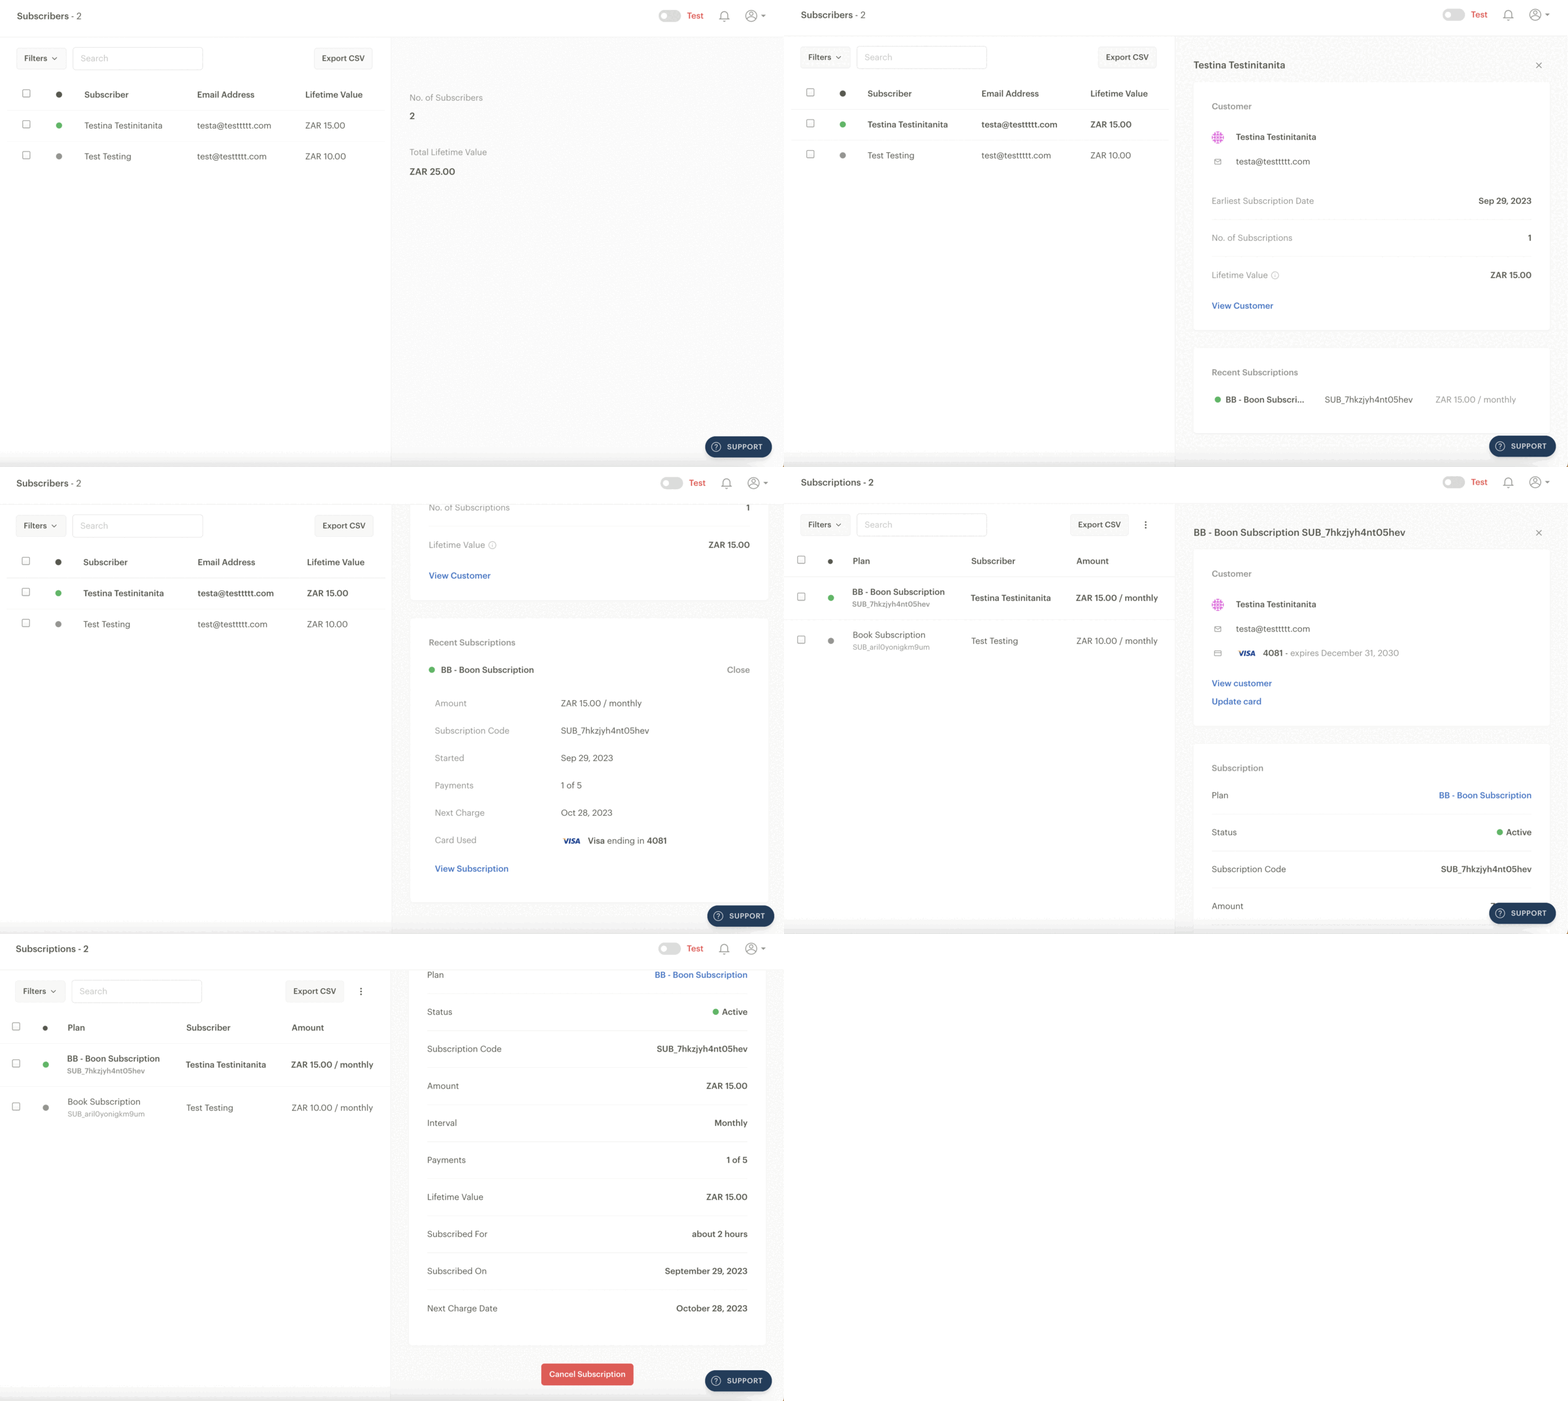
Click on Subscribers on your Dashboard.
Find and click on the customer whose subscription you want to cancel.
On the right side of the page, you will see a Recent Subscriptions section. Click on the subscription you want to cancel to expand the information. Click on View Subscription.
You’ll be redirected to the customer’s subscription on the Subscriptions page. Scroll through the right side of the page and click on the Cancel Subscription button at the bottom of the right side of the page.
From the Subscriptions page
Click on Subscriptions on your Dashboard.
Select or search for the subscription you want to cancel and click on it to reveal more information.
Scroll through the right side of the page and click on the Cancel Subscription button at the bottom of the right side of the page.

