Transfers
Our Transfers feature allows you to send money from your Paystack Balance to bank accounts in your country. This feature is crucial for businesses handling disbursements, payroll, customer withdrawals, vendor payments, etc.
Important to note
This feature is only available to Registered businesses.
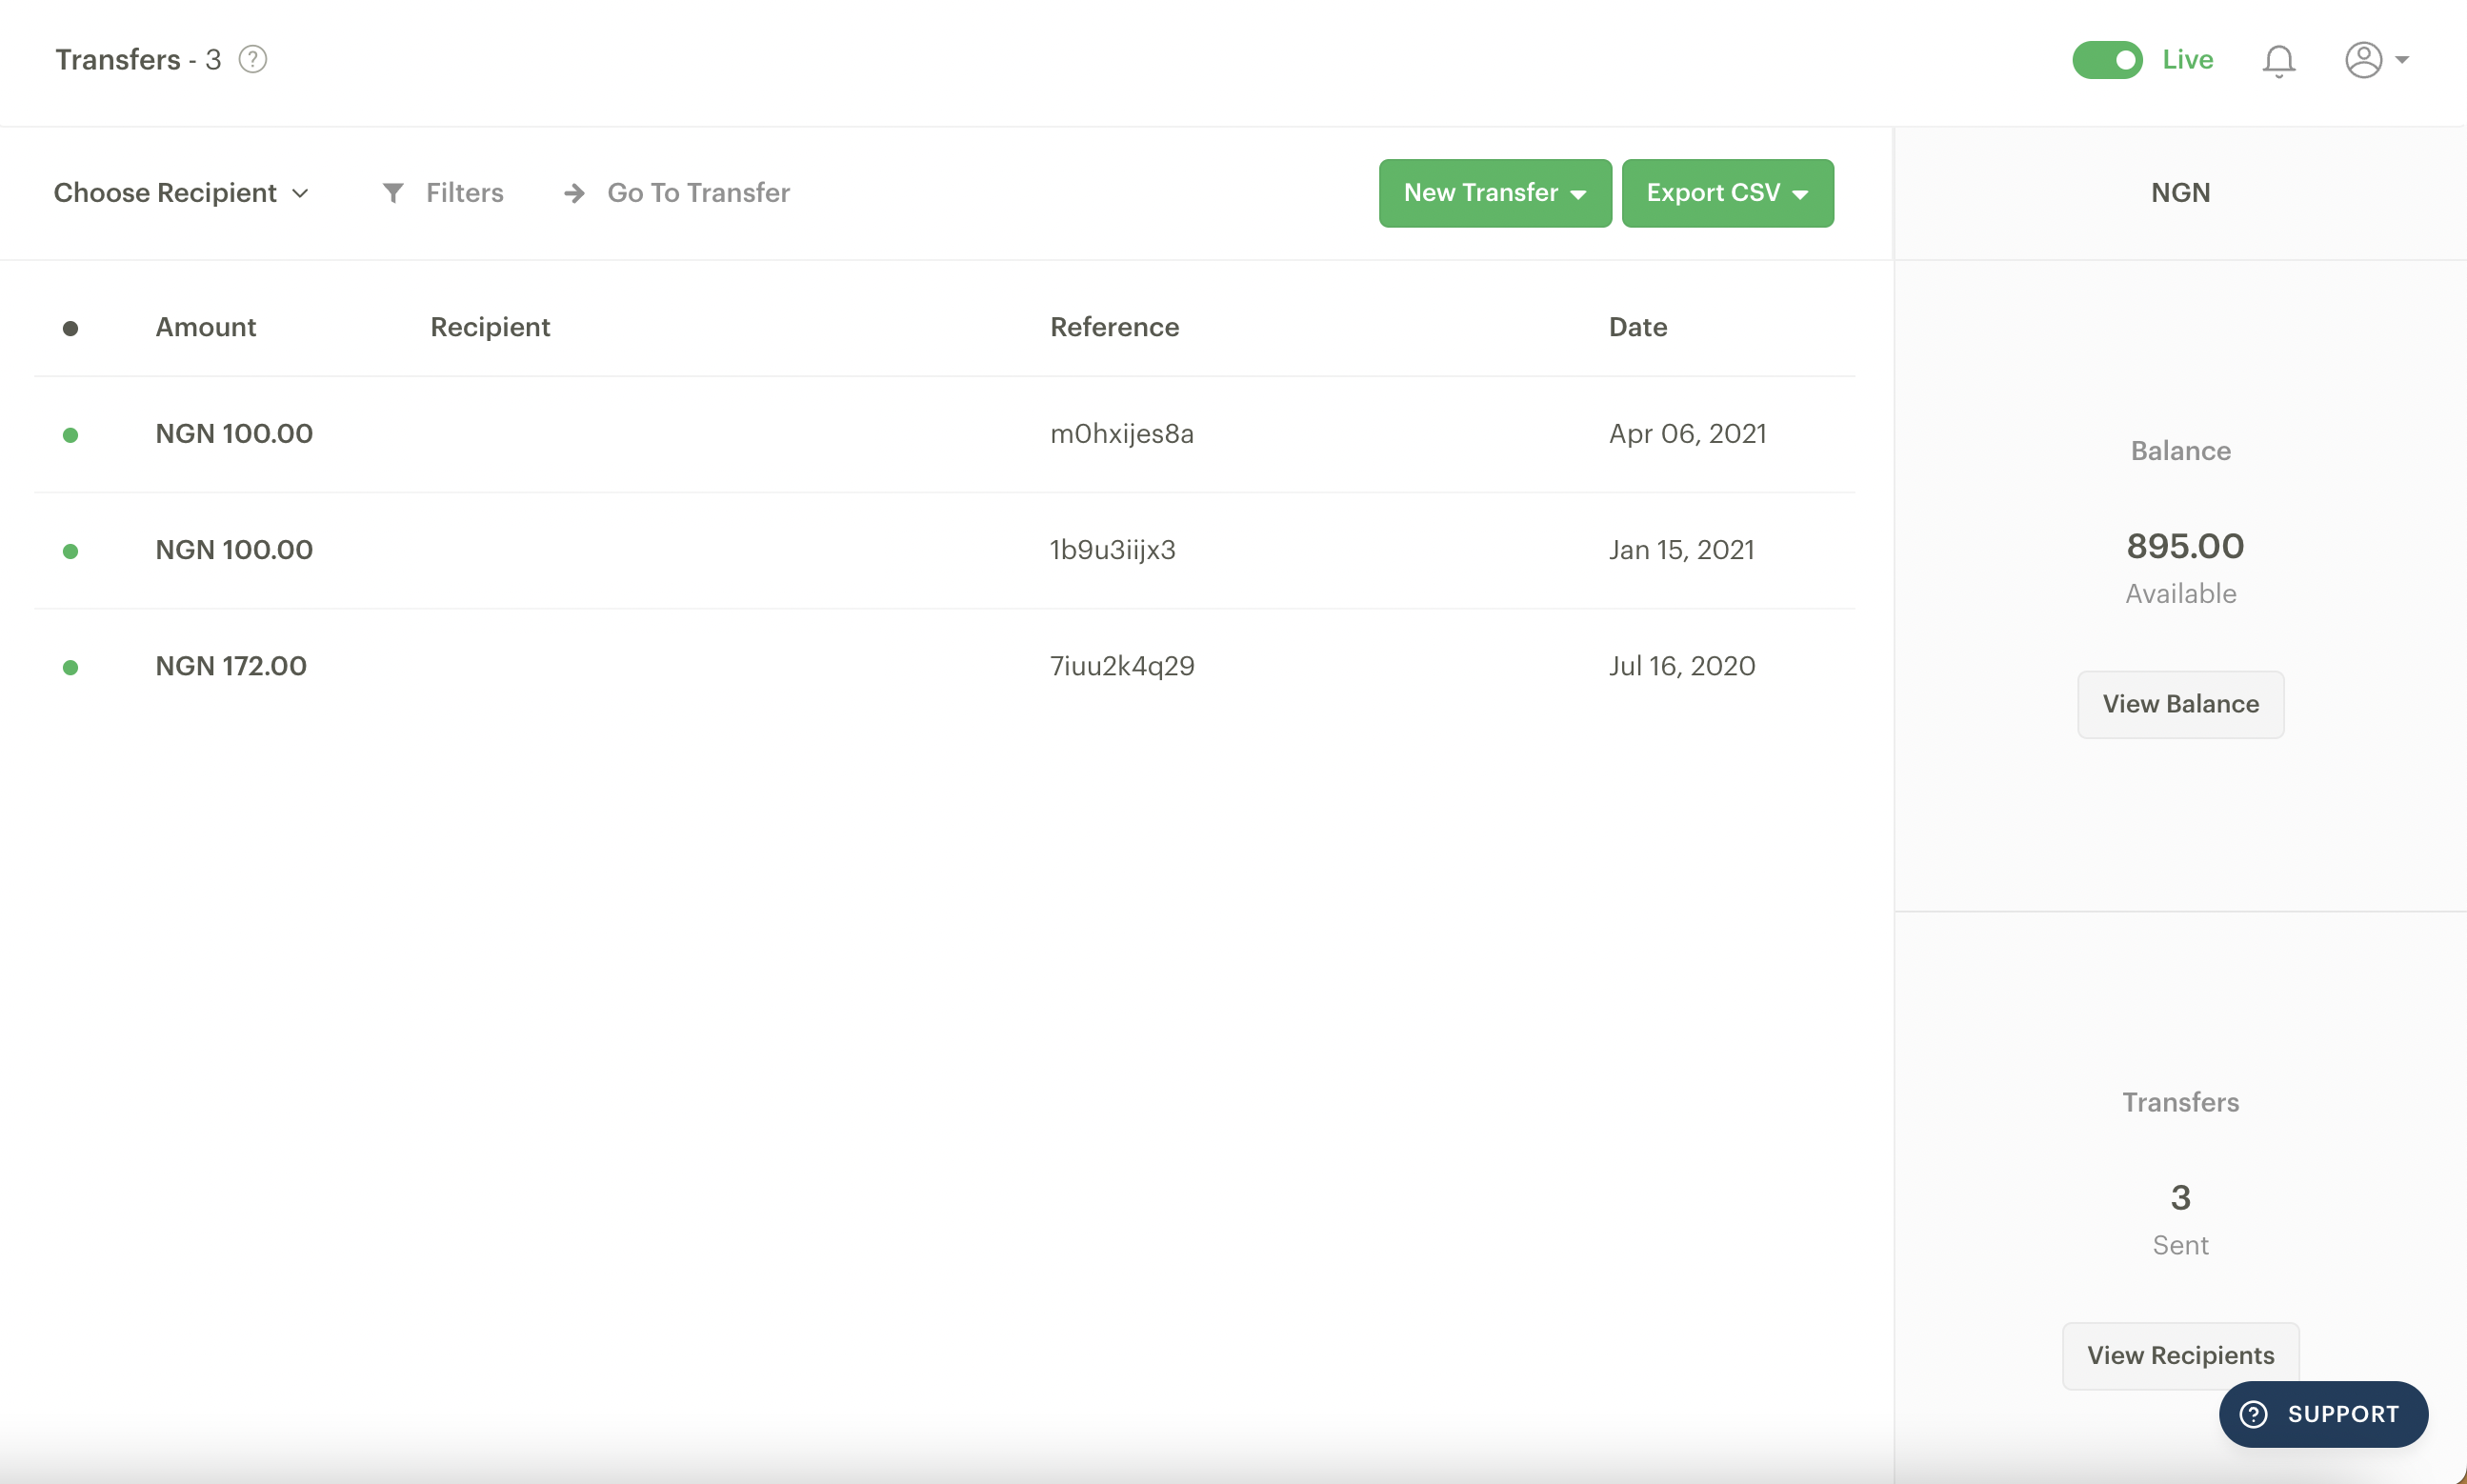
The Transfers page on the Dashboard
The Transfers page records all transfers made from your Paystack business.
Choose Recipient: Here, you can quickly filter for all the transfers you've made to a particular recipient.
Filter: This allows you to further filter by status, date, and transfer reference.
Go to Transfer: Using the search bar here, you can find a specific transfer with the transfer code or transfer reference.
New Transfer: This is where you initiate a new transfer on the Dashboard.
Export CSV: The export CSV function enables you to download a list of transfers you've filtered for.
Balance: This captures your available balance, you can also view your Balance history by clicking on the 'View Balance' button.
It’s free to top up your balance for Nigeria and Ghana-based businesses, but there’s a 1% top-up fee per transaction for South Africa-based businesses.
Transfers: This shows the count of the transfers you've completed.
View Recipients: Here, you can see the number of transfer recipients you have and retrieve recipient codes.
Transfers pricing
Our transfer fees vary by country and sometimes by the amount you are trying to transfer.
Country | Band | Pricing |
Ghana | Transfers to Mobile Money | GHS 1 per transfer |
Transfers to Bank Accounts | GHS 8 per transfer | |
Kenya | M-PESA Customer Transfers (B2C) | |
M-PESA transfers between KES 1 and KES 1,500 | KES 20 per transfer | |
M-PESA transfers between KES 1,501 and KES 20,000 | KES 40 per transfer | |
M-PESA transfers between KES 20,001 and KES 150,000 | KES 60 per transfer | |
Kenya | M-PESA Paybill and Till Transfers (B2B) | |
M-PESA transfers between KES 1,501 and KES 10,000 | KES 40 per transfer | |
M-PESA transfers between KES 1,501 and KES 10,000 | KES 80 per transfer | |
M-PESA transfers between KES 10,001 and KES 40,000 | KES 140 per transfer | |
M-PESA transfers between KES 40,001 and KES 999,000 | KES 180 per transfer | |
M-PESA transfers between KES 1,000,000 and KES 50,000,000 | KES 350 per transfer | |
Kenya (Bank Transfers) | M-PESA transfers between KES 1 and KES 10,000 | KES 80 per transfer |
M-PESA transfers between KES 10,001 and KES 50,000 | KES 120 per transfer | |
M-PESA transfers between KES 50,001 and KES 999,999 | KES 140 per transfer | |
M-PESA transfers between KES 1,000,000 and KES 50,000,000 | KES 350 per transfer | |
Nigeria (Stamp duty of NGN 50 apply for transfers of NGN 10,000 and above) | Transfers of NGN 5,000 and below | NGN 10 per transfer |
Transfers between NGN 5,001 and NGN 50,000 | NGN 25 per transfer | |
| Transfers above NGN 50,000 | NGN 50 per transfer |
South Africa | N/A | ZAR 3 per transfer (failed or successful) |
Important to note
We have an Account Validation API that South Africa-based businesses can use to perform an additional verification check before proceeding with the transfer.
This API allows the business to validate both personal and business accounts and costs ZAR 3 for every successful request. You can check out our developer documentation for more information about this.
Minimum and maximum transfer amounts
This also varies by country.
Country | Minimum transfer amount | Maximum (single) transfer amount |
Ghana | GHS 10 | GHS 50,000 |
Kenya | To M-Pesa customer wallets: KES 1 | KES 150,000 |
To M-Pesa Paybills and Till Numbers: KES 1 | KES 50,000,000 | |
To Bank: KES 1 | KES 50,000,000 | |
Nigeria | NGN 50 | NGN 10,000,000 |
South Africa | ZAR 1 | ZAR 1,000,000 |
Single transfers
The single transfer option is for when you want to make a transfer to just one person. Kindly follow the steps below to make a single transfer.
First, you must ensure that your Paystack Balance is sufficiently funded to complete the transfer and its associated charge. You can learn how to fund your Paystack Balance here.
Go to the Transfers page on your Dashboard and click on the 'New Transfer' button at the top of the page and then 'Single Transfer'.
You will be presented with a transfer instruction page where you will need to input the information required to process the transfer.
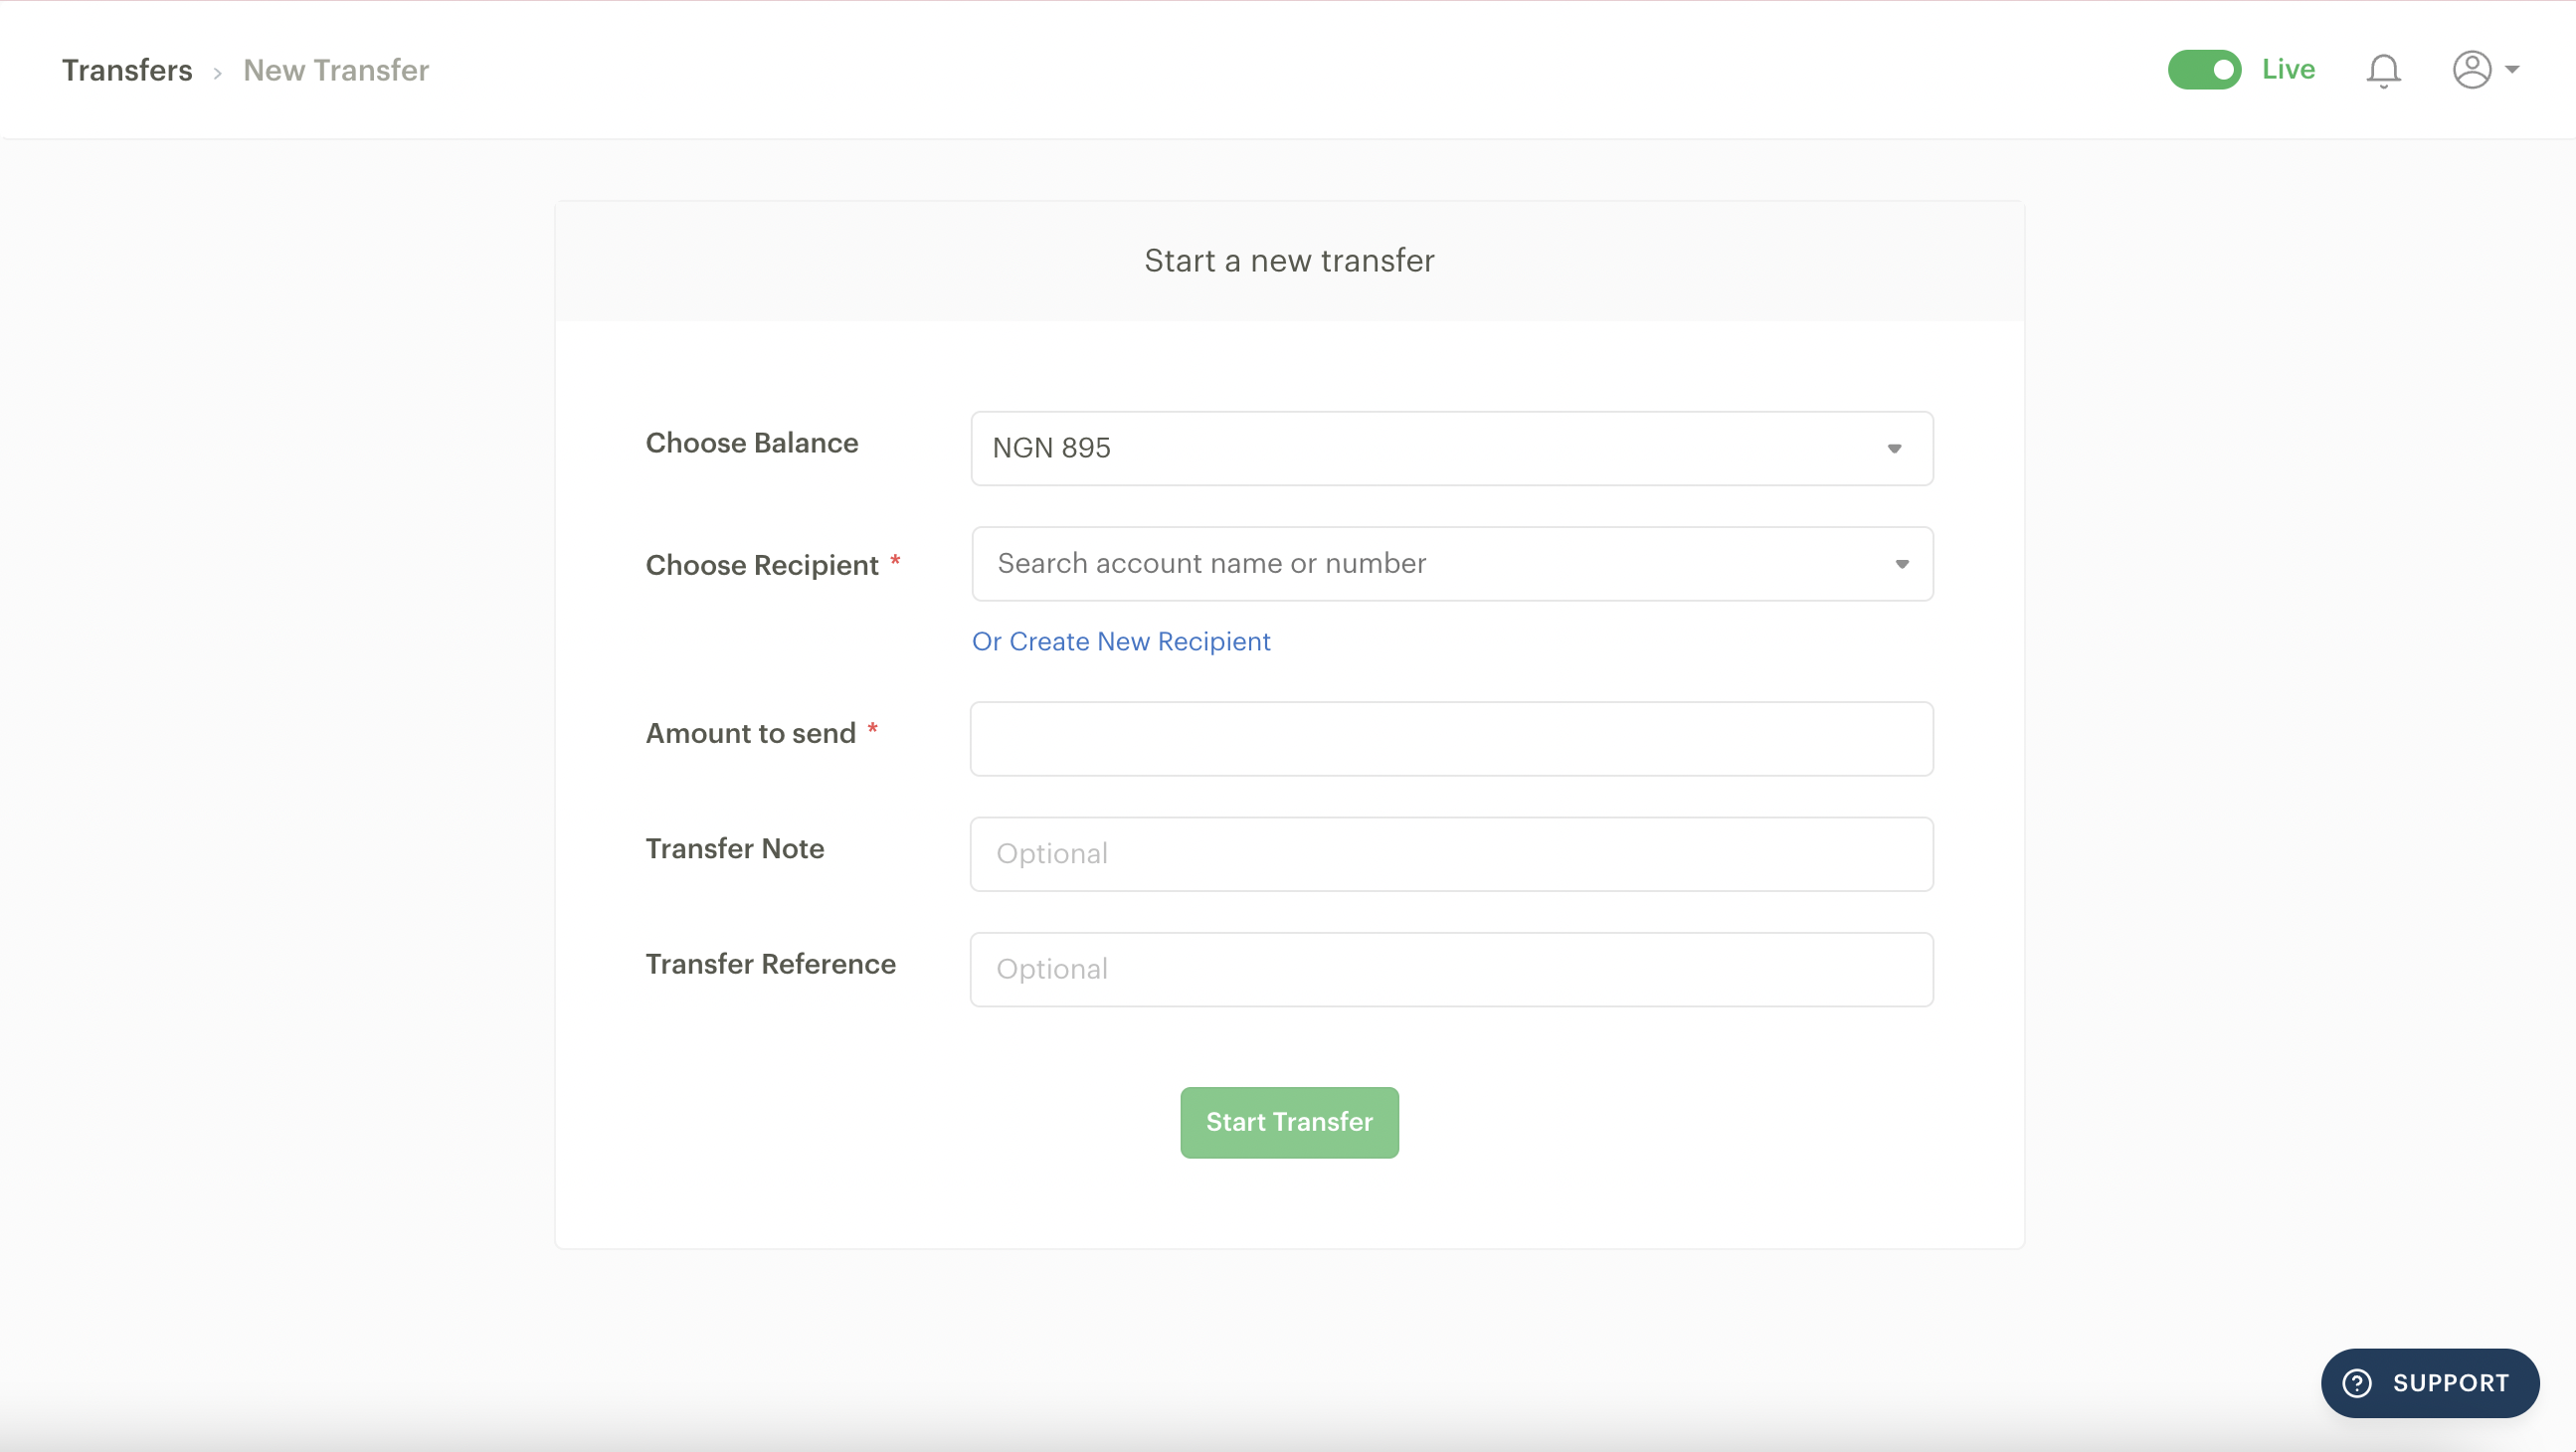
If you are making a transfer to a previous recipient, this is the page you will see with the following information:Choose Balance: This lets you choose which of your Paystack balances you want to transfer from. It also displays the amount in your balance that is available for transfer.
Choose Recipient: If you'd like to send a transfer to a previous recipient, all you need to do is select the dropdown arrow to choose from a list of past recipients.
Amount to Send: This is where you input the amount you would like to transfer.
Transfer Note (optional): You can type in a brief description of the transfer here. This note should appear in the narration of this transaction both in your account statement and the credit alert text message that will be sent to the receiver of the funds.
Transfer Reference (optional): You can type in a personalised reference code here.
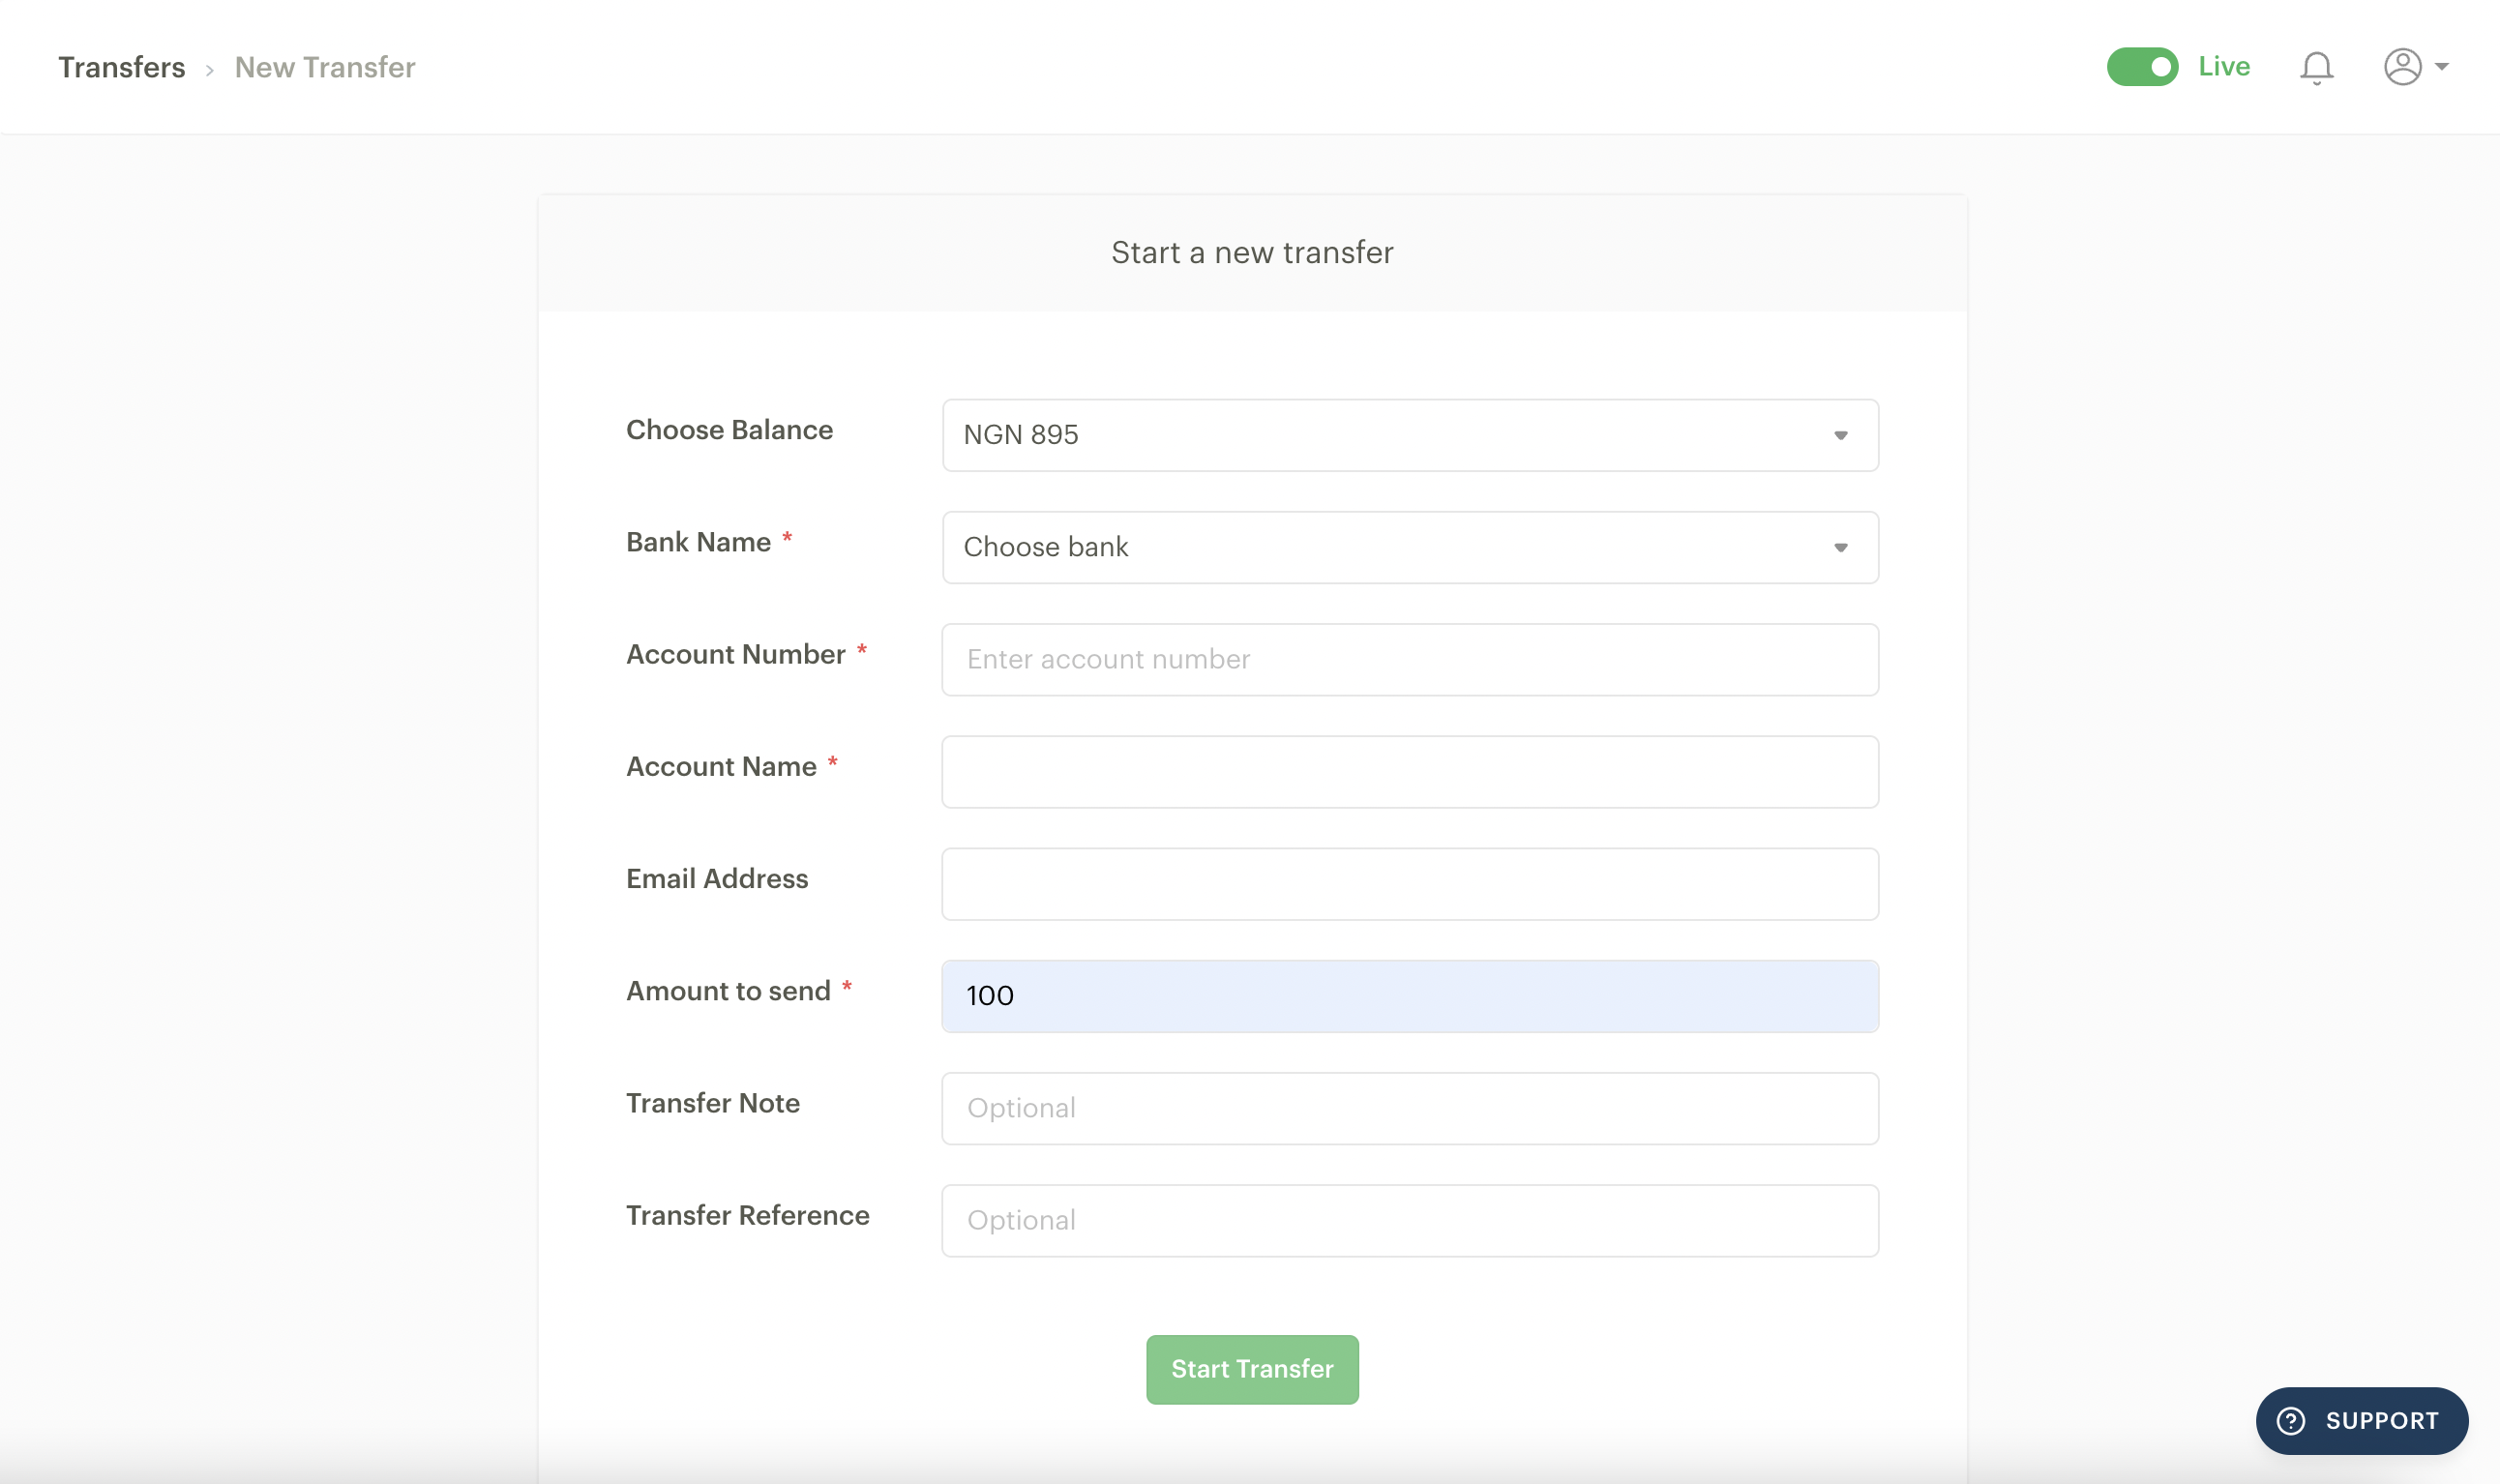
If you are making a transfer for the first time or to a new recipient, this is the page you will see with the following information:
Choose Balance: This lets you choose which of your Paystack balances you want to transfer from. It also displays the amount in your balance that is available for transfer.
Bank Name: Here, a drop-down will show a list of banks you can transfer to.
Account Number: Type in the account number you would like to make the transfer to.
Account Name: After you have typed in the bank name and account number, the account name will appear here after a brief period. If no name appears, it means we could not find the account number in the bank you specified. You can type in the account name by yourself if you are very sure the bank name and account number are correct.
Email Address: This is where you specify the email address of the recipient.
Amount to Send: This is where you input the amount you would like to transfer.
Transfer Note (optional): You can type in a brief description of the transfer here. This note should appear in the narration of this transaction both in your account statement and the credit text message that will be sent to the receiver of the funds.
Transfer Reference (optional): You can type in a personalised reference code here.
Once you're sure you've filled in all the fields correctly, click on 'Start Transfer' to complete the process and send the funds. You can find a list of your recipients on the Recipients page on the Dashboard.
Bulk transfers
If the nature of your business requires you to make multiple transfers at once or in a short period of time, it can be cumbersome to make each of these transfers individually.
With our bulk upload feature, you can upload a CSV file containing all the transfers you want to make and initiate them all at once, directly from your Paystack Dashboard.
How to make bulk transfers
First, you must ensure that your Paystack Balance is sufficiently funded to complete the transfers and their associated charges. You can learn how to fund your Paystack Balance here.
Go to the Transfers page on your Dashboard, click on the 'New Transfer' button at the top of the page and then 'Bulk Upload'.
For Nigerian businesses, select the Bulk Transfers tab and select "New Transfer"
The Bulk Transfers tab also contains a detailed list of all your past bulk transfers, if you have any. Each batch is displayed with the following information
Batch: The name of the batch you uploaded.
Successful Transfers: The number of successful transfers in that batch.
Date: The date the transfer was initiated.
In Progress: A progress bar for any transfers that are currently being processed.
You can also use the Filters to sort and view transfer batches by their status, such as "Successful," "Failed," or "Partial Success."
You will be redirected to a page that will show you a 'sample CSV' that contains the right format for your transfers. Click to download this file. This is the file you will complete and upload to initiate a bulk transfer. As a Nigerian Paystack business owner, if you accidentally select the wrong file, you can easily change it at this stage. This is what the sample CSV looks like:
Once you have completed your transfer list, save the file in CSV format and then upload it by clicking the 'Choose File' button
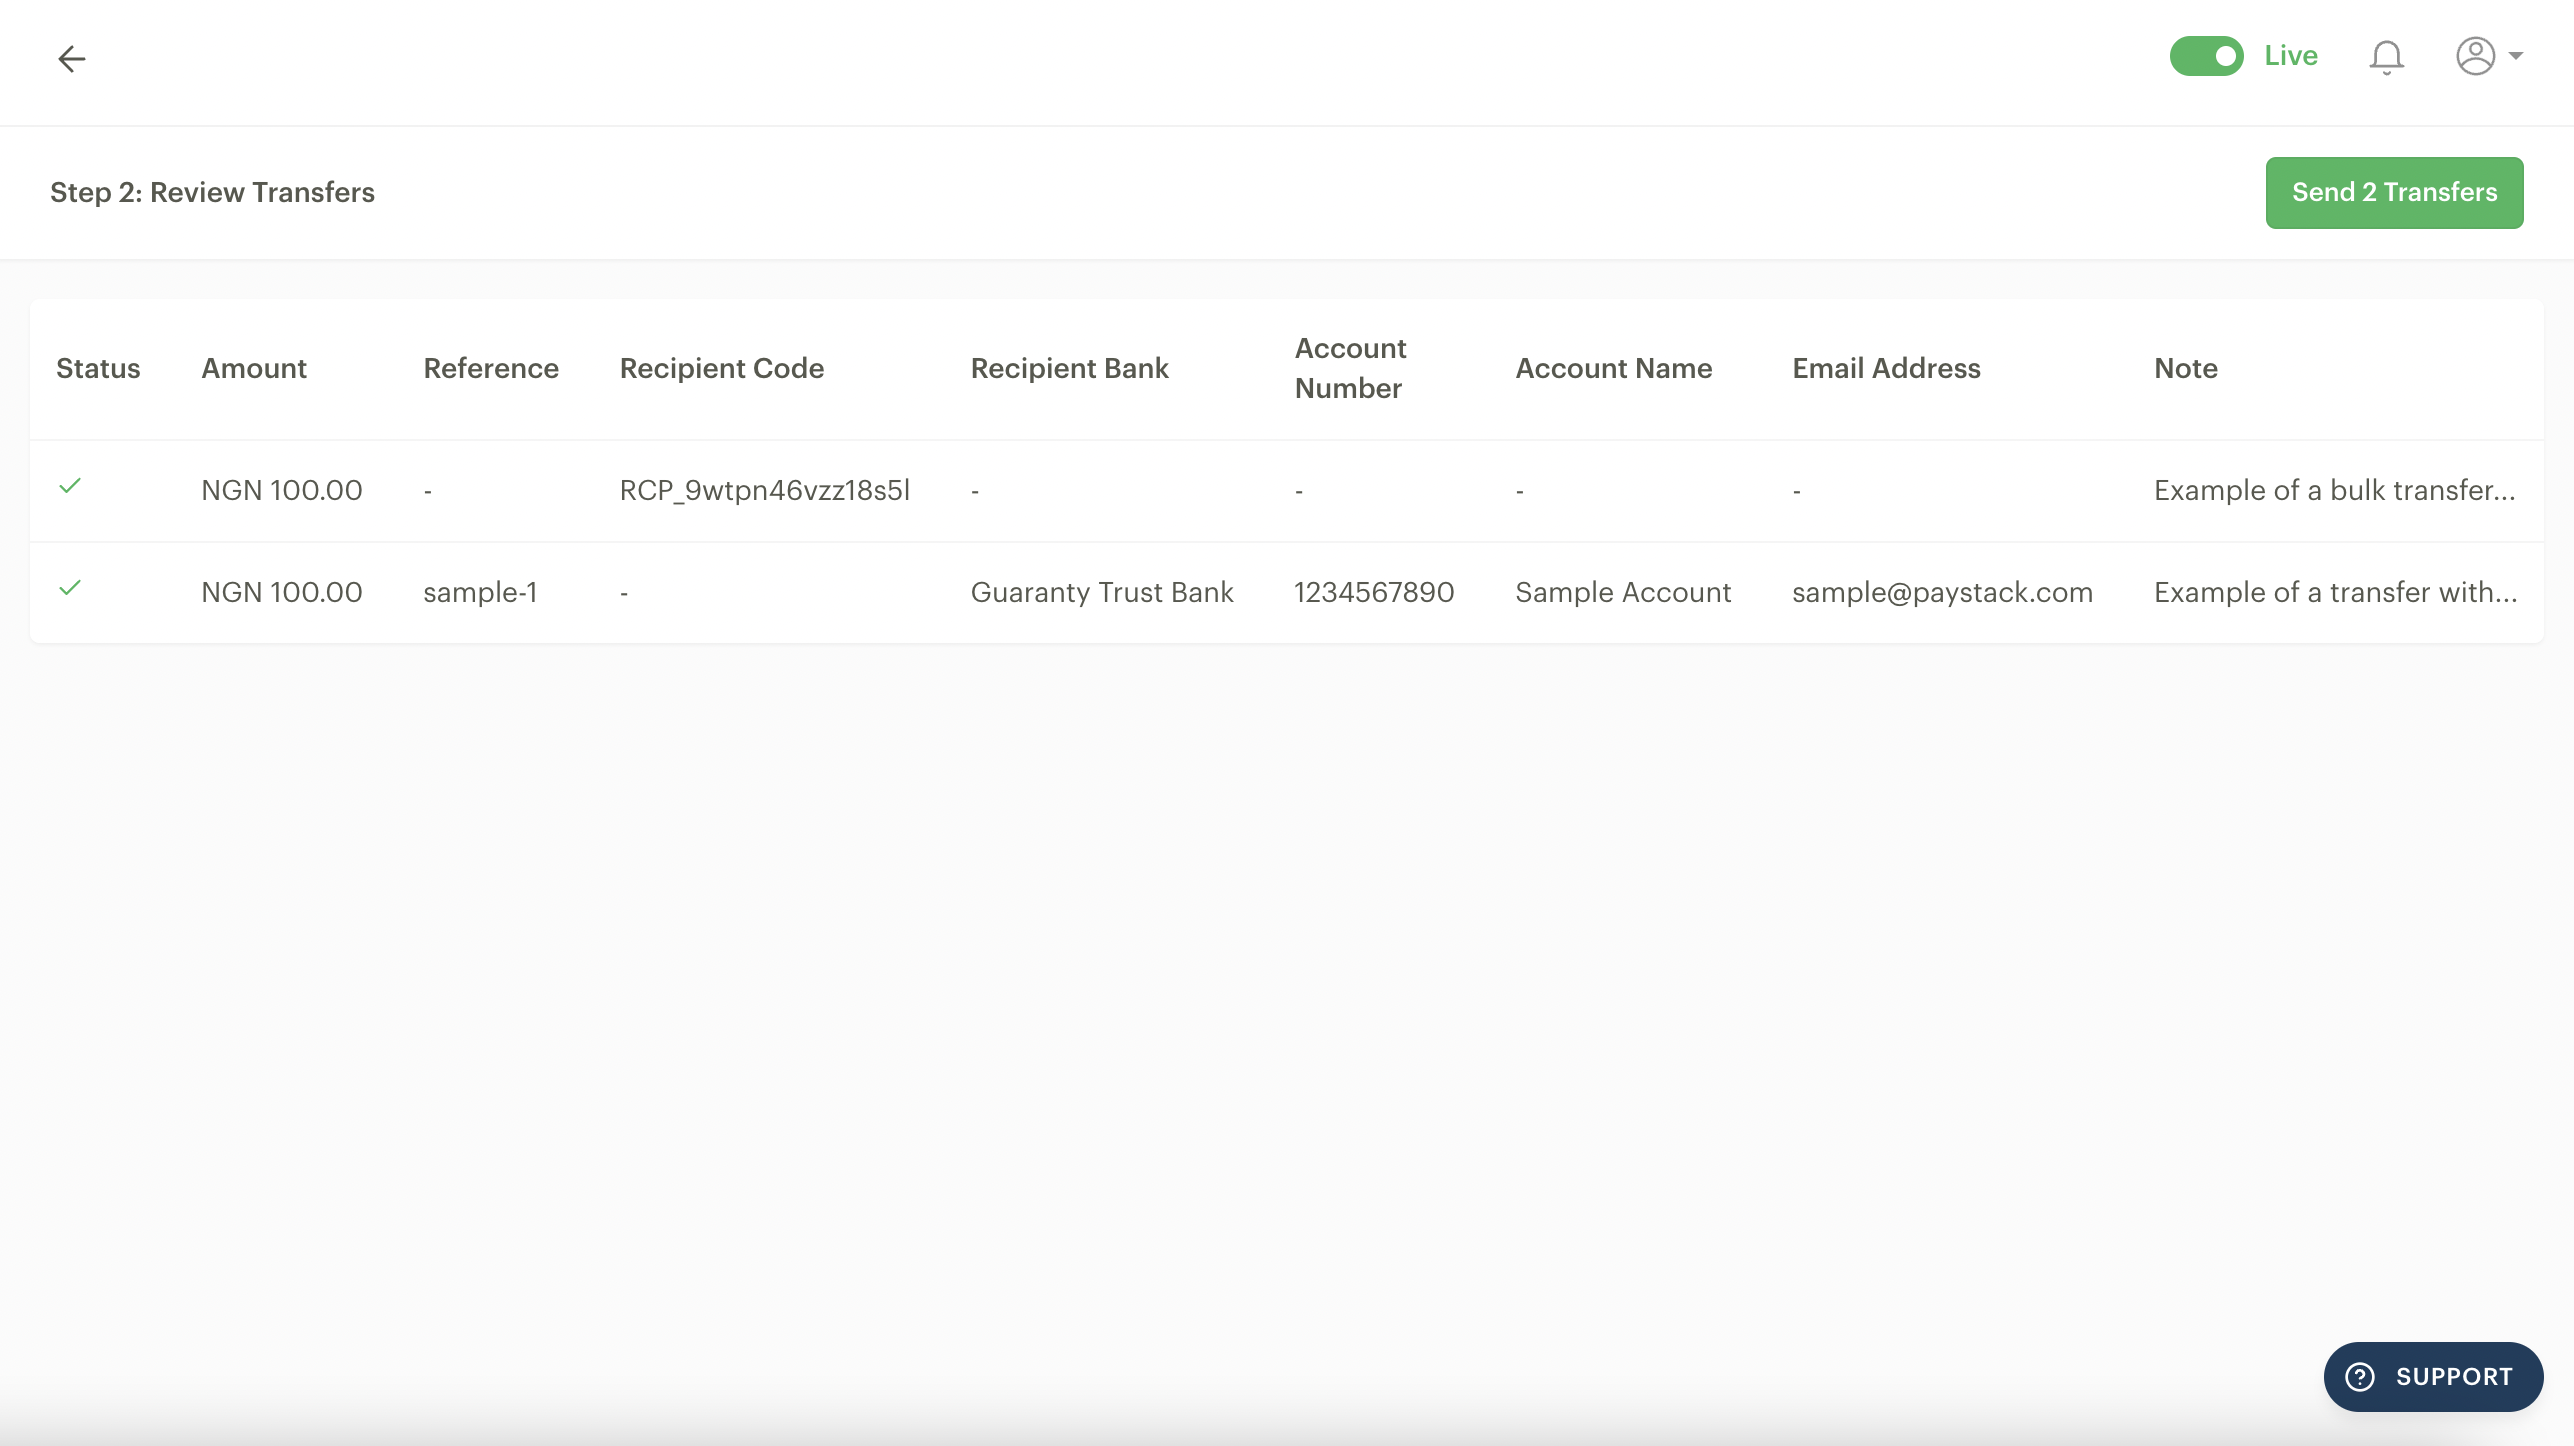
After uploading, a table will display all the data from your CSV file. This gives you a final opportunity to review and verify the transfer details. If everything looks correct, click the Send Transfers button to process all the payments in the file.
Two compulsory columns must be filled depending on the transfer recipient information you want to provide. If these columns are not filled, the transfer will not be initiated:
Recipient code
A recipient code is a unique reference automatically generated for every customer you have previously sent a transfer. It contains all the customer's details, such as their name and bank account information, for the purpose of making transfers easier. The recipient code will override any other information you provide, such as bank code, account number etc.
You can find a list of your recipients on the Recipients page on the Dashboard.
Bank code or slug
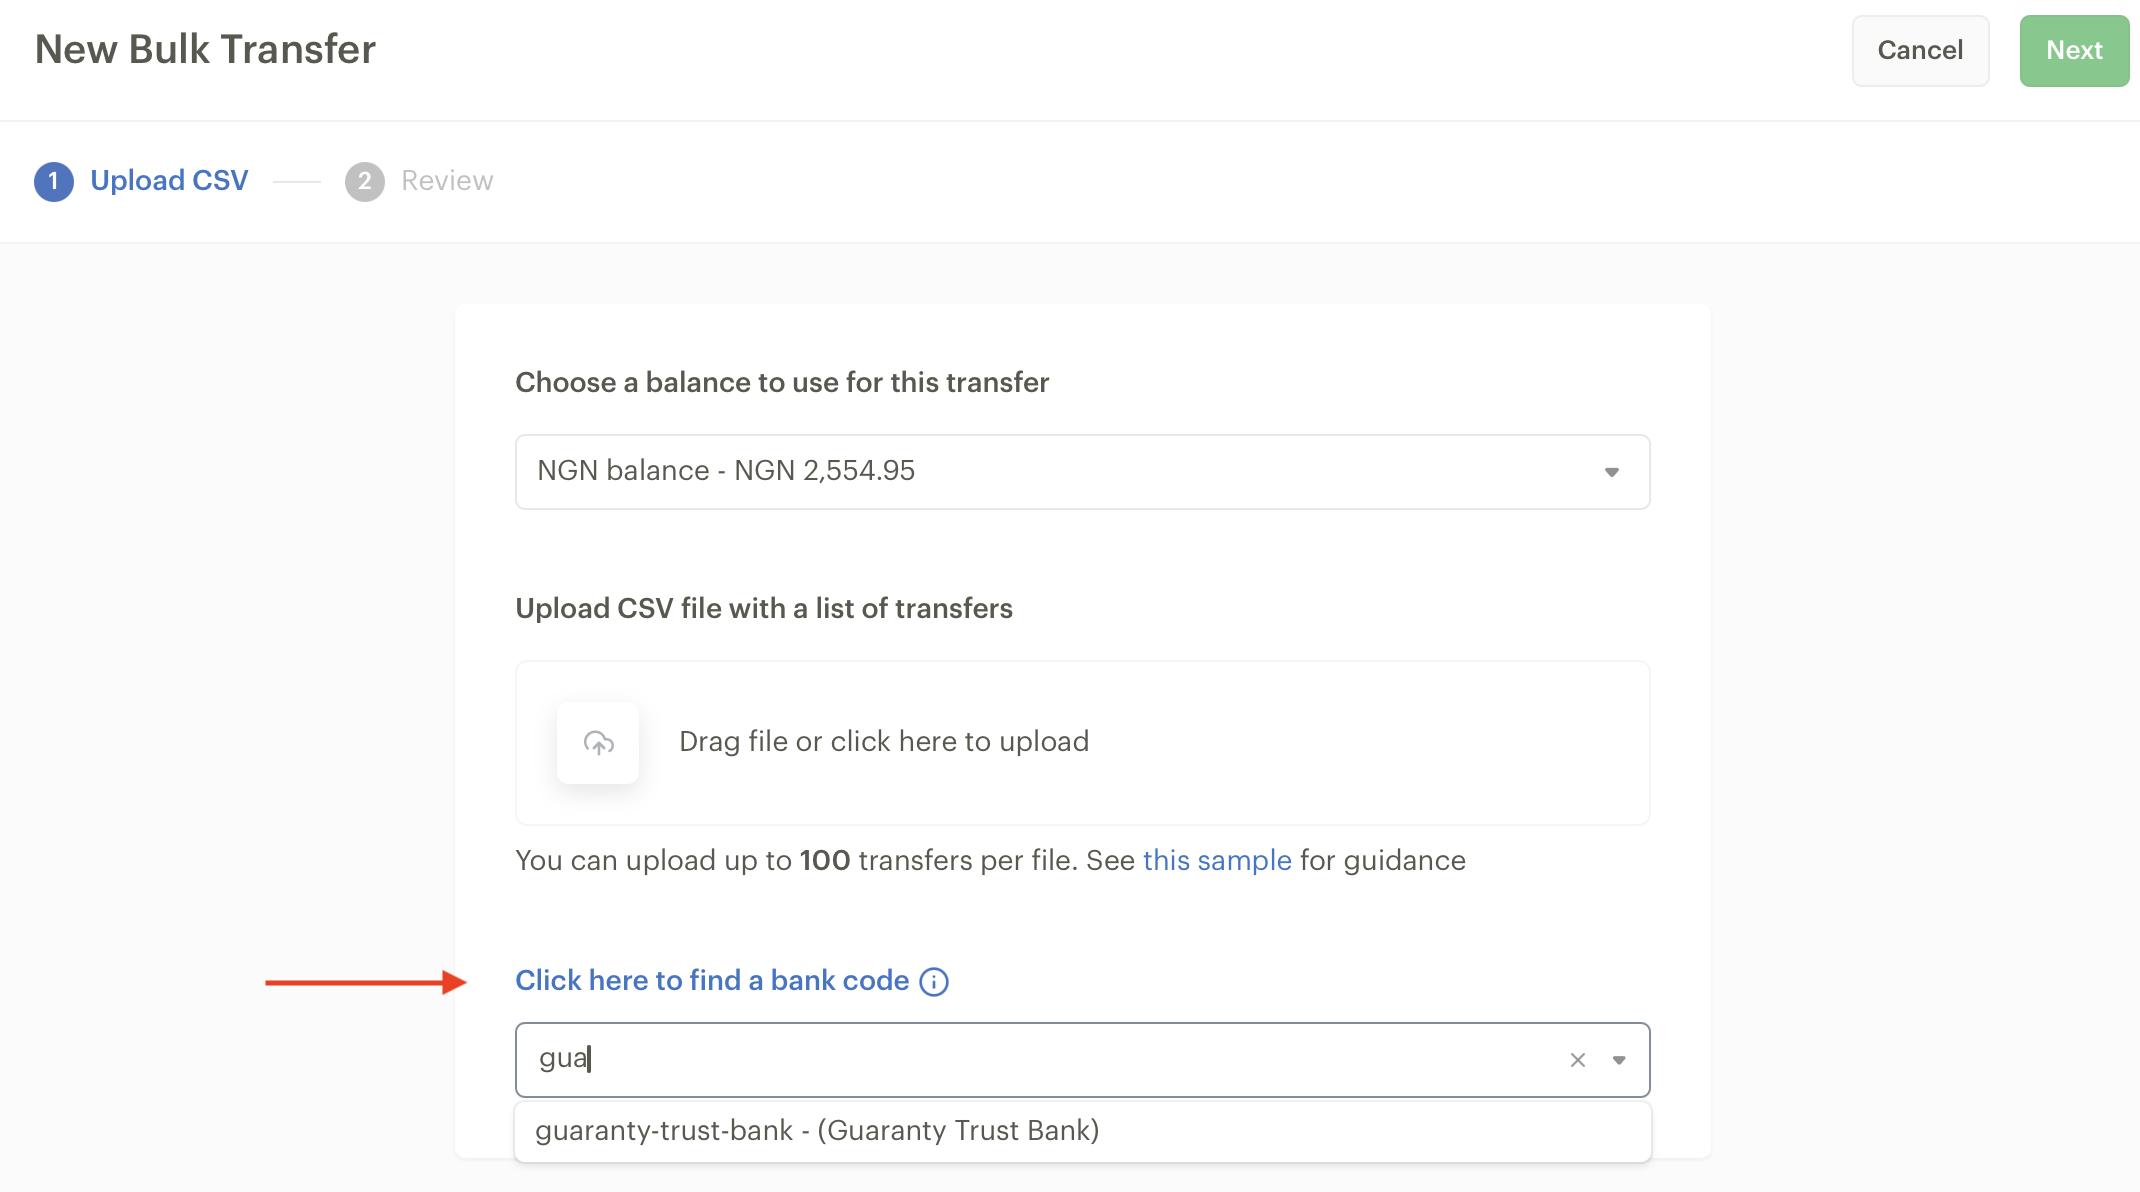
You can get a list of bank codes or slugs here or on the bulk transfer page of your dashboard as shown below
Other compulsory fields are the transfer amount and account number. All other fields are optional and will not prevent the transfer from being successful.
Please note that the account reference field is mandatory for Kenya-based businesses when transferring to an M-PESA Paybill.
Important to note for Nigerian Paystack business owners
To ensure smooth processing, we now limit bulk transfer batches to a maximum of 100 transfers per file.
You can verify that you've uploaded the correct CSV file before initiating the transfers. This helps prevent errors and ensures you're paying the right people.
You no longer need to stay on the transfers page while your batch is processing. You can navigate to other tasks, and the processing will continue in the background.
For easier reference and issue resolution, we now list all your previously uploaded batches on the Dashboard.
Transfers via the API
We have a robust guide on our developer documentation to help you create and manage transfers via the API.
Transfer statuses
A transfer on Paystack can have one of four different statuses:
Pending: This is the initial status of a transfer immediately after it is made. It is a temporary status that usually changes within seconds to 'Successful' or sometimes 'Failed'.
Successful: This is the status of the transfer that has been completed successfully. Most transfers on Paystack become successful within seconds.
Failed: This is the status of a transfer that could not be completed for one reason or another. This could be an issue with the recipient's bank account or an error while processing the transfer.
Reversed: This is the transfer status that was previously successful but had to be reversed to your balance because it could not be applied to the recipient's bank account. This occurs when there is an issue with a recipient's bank account. For example, if the account is closed or cannot receive up to the amount transferred, the transfer must be reversed.
Transfers on Paystack are typically successful within seconds. On some occasions, however, a transfer might remain pending for more than a few minutes because there is an issue communicating with the recipient's bank.
In this case, rather than setting the transfer to fail, our systems will continue retrying the transfer through different channels till we've exhausted all options and the transfer fails.
Please note that the 'Pending' status is not final, and the transfer status will eventually be updated to either Successful or Failed.
Transfer confirmation
One-time password (OTP) authorisation
You can authorise transfers from your Paystack Dashboard using a one-time password (OTP). This optional feature can be used as an added layer of security for your business. The way it works is that for a transfer to be completed, an OTP will be sent to the email and phone number of the user who initiated the transfer. Once the OTP is provided, the transfer will be completed.
Kindly follow these steps to enable this on your Dashboard:
Go to the Preferences tab on the Settings page of your Dashboard.
Scroll down to the Transfer section and tick the box beside 'Confirm transfers before sending'. Your Dashboard will automatically update itself, and the change will be saved.
Important to note
If you're initiating a transfer from the Dashboard, the OTP will be sent to the email address of the user who initiated it. However, If you initiate a Transfer via the Paystack API, the OTP will be sent to the general contact email address.
Transfer approval
To automate transfers for your business, you would need to disable the OTP transfer confirmation feature. However, once this requirement is turned off, there's a risk of bad actors gaining access to your secret key to initiate transfers from your balance. This setup could also potentially lead to unauthorized transactions, especially if a test version of your application is running and making requests with the secret key, resulting in unintended payments.
To address this security concern, we've introduced a feature aimed at providing an added layer of protection for your transactions. The Transfers Approval feature allows you to confirm that the transfer requests we receive indeed originate from your system before we process them. This verification step empowers you with the ability to deny any transfer that appears unexpected or unauthorized, ensuring that you have full control and visibility over the transfer process.
We have a robust guide on our developer documentation to help you implement this for your business.
Deleting or blacklisting a transfer recipient
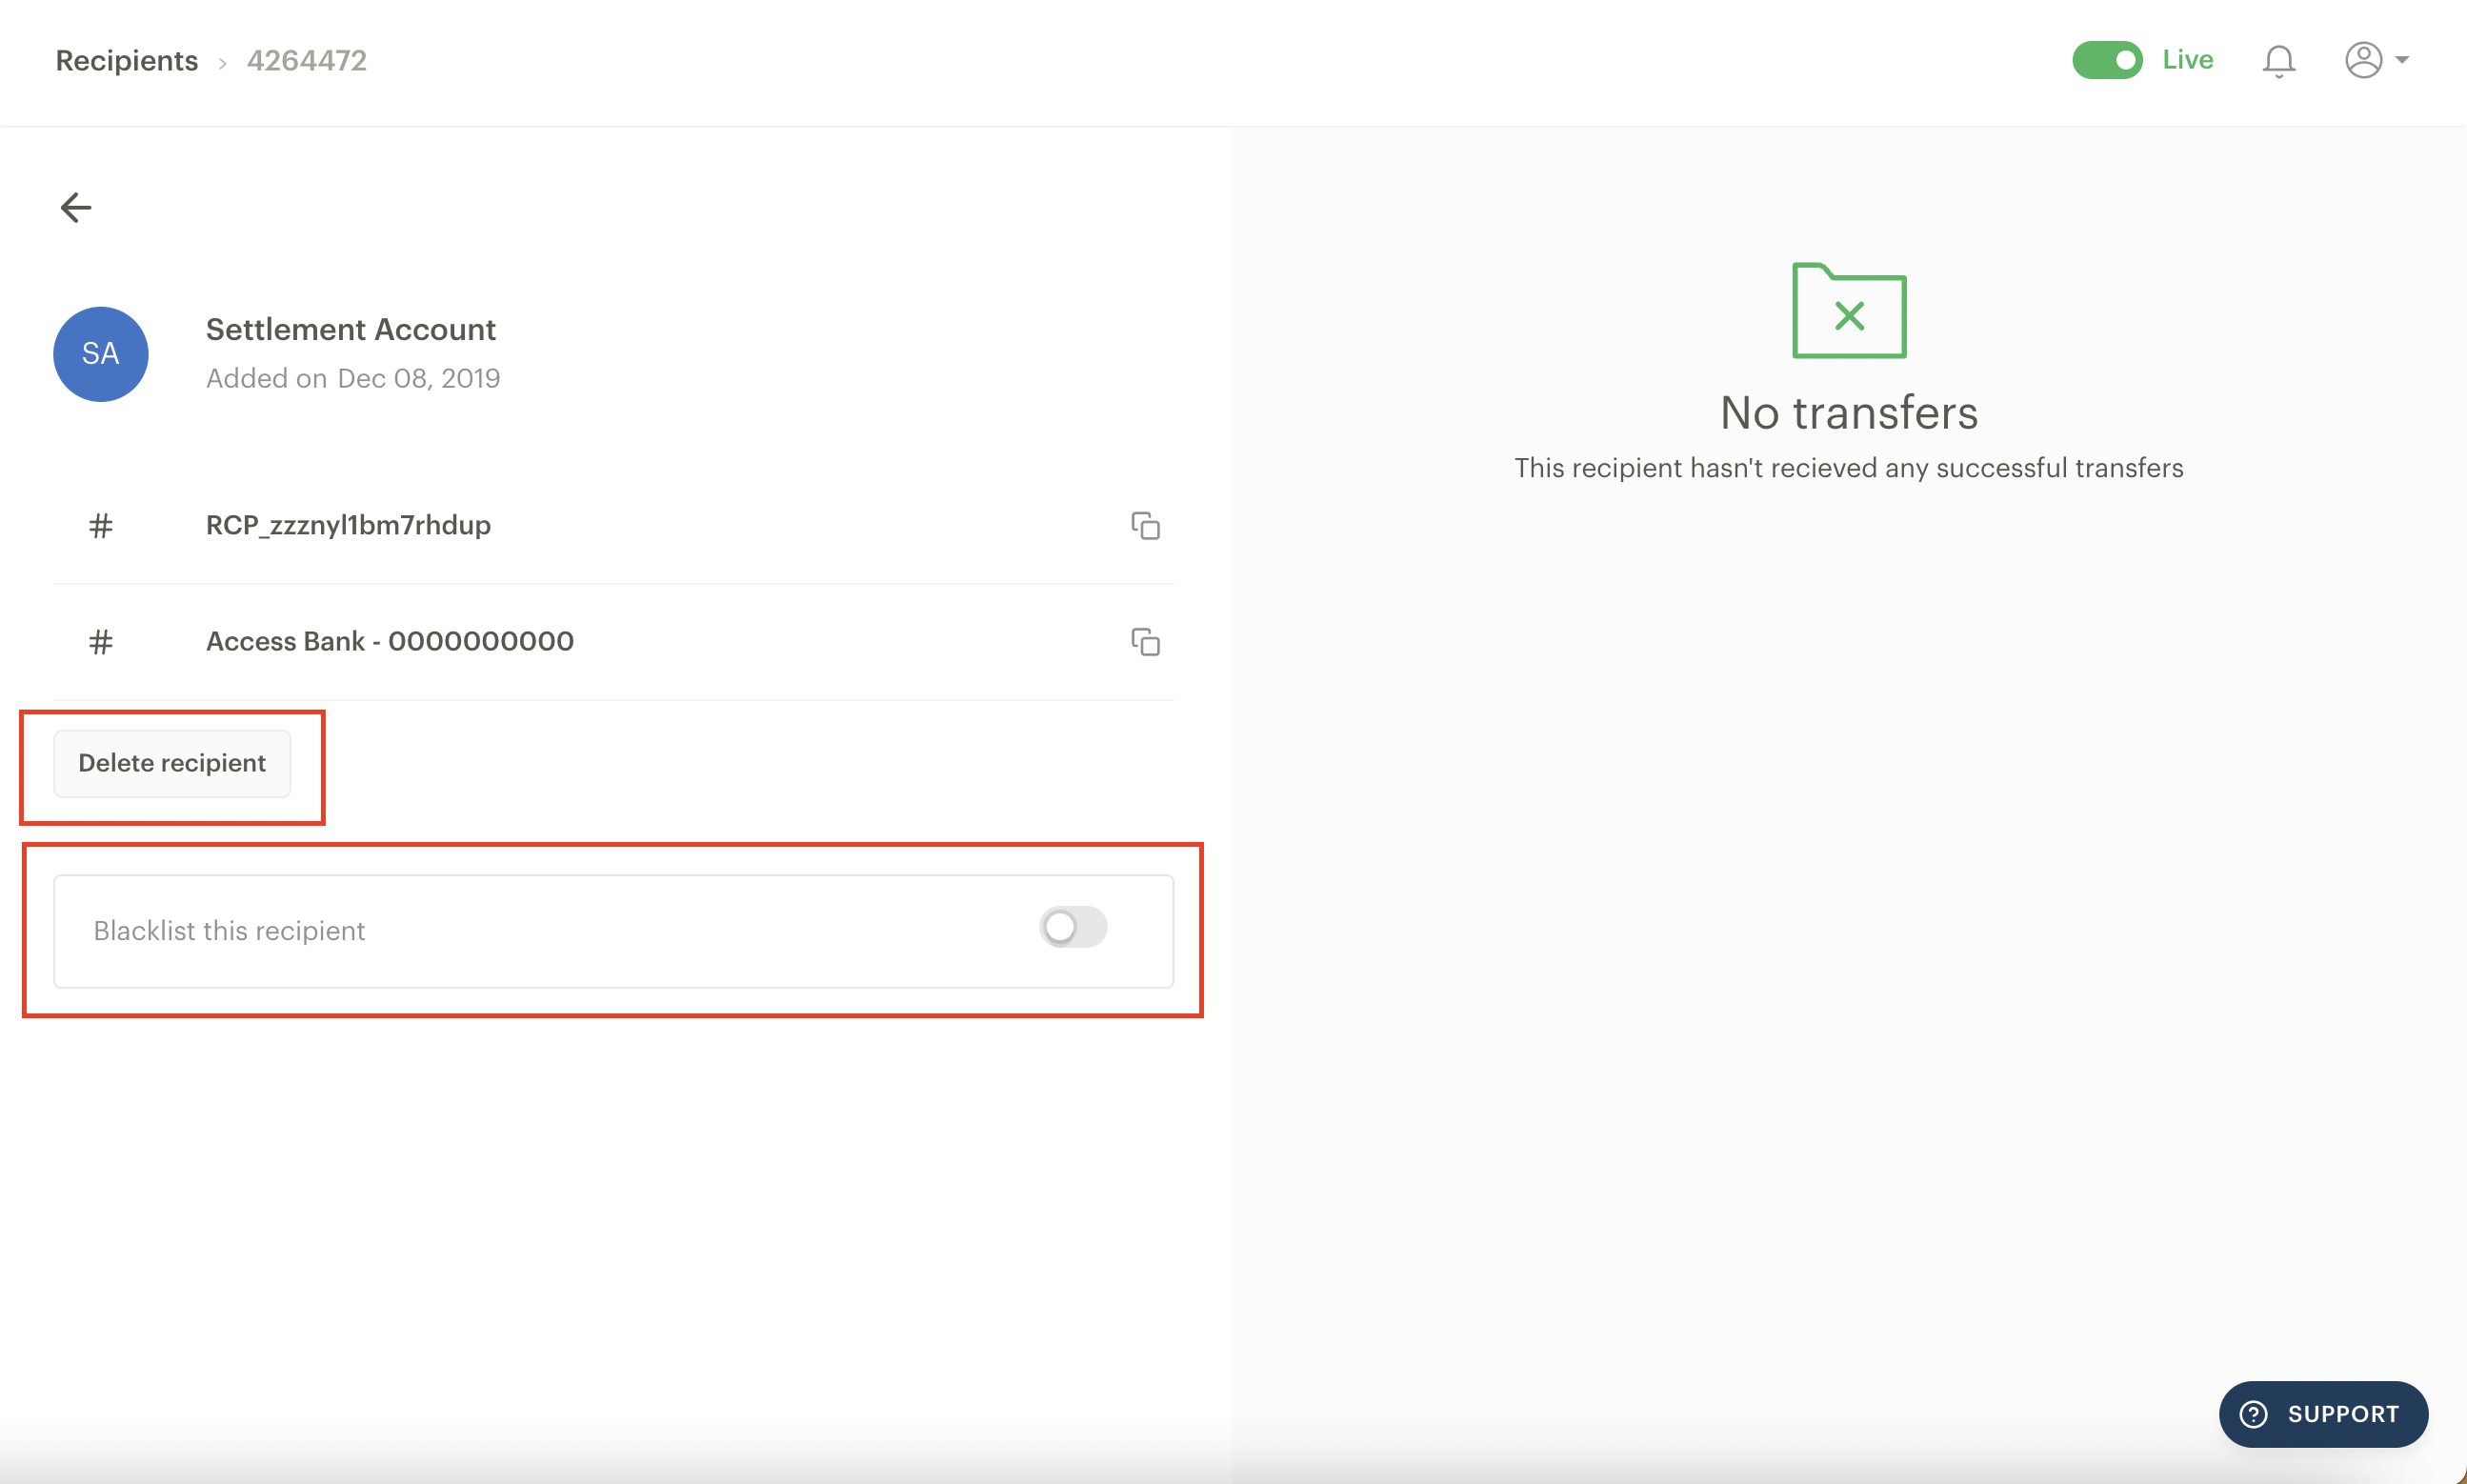
If you'd like to delete or blacklist a transfer recipient, you can do this by opening the recipient's entry on the Recipient's page and clicking on the 'Delete recipient' button or 'Blacklist this recipient' toggle.
What to do if your customers do not receive their transfers
Transfers on Paystack are almost instant. However, on rare occasions, a customer might reach out to say they have not received value for a Transfer whose status is successful on your Dashboard. In this case, Paystack has sent the funds to your customer's bank, and it's likely the customer's bank hasn't applied value to the customer's account, but this can happen for other reasons:
The transfer was processed to an inactive bank account. An inactive bank account is a bank account that has been closed or is dormant and cannot receive any funds.
The transfer was processed to an invalid account, where the recipient account number is the wrong account number or does not exist.
The customer's bank cannot apply value due to a restriction on the account. A restriction could be a lien on the customer's account or a limit on the amount the bank account can receive.
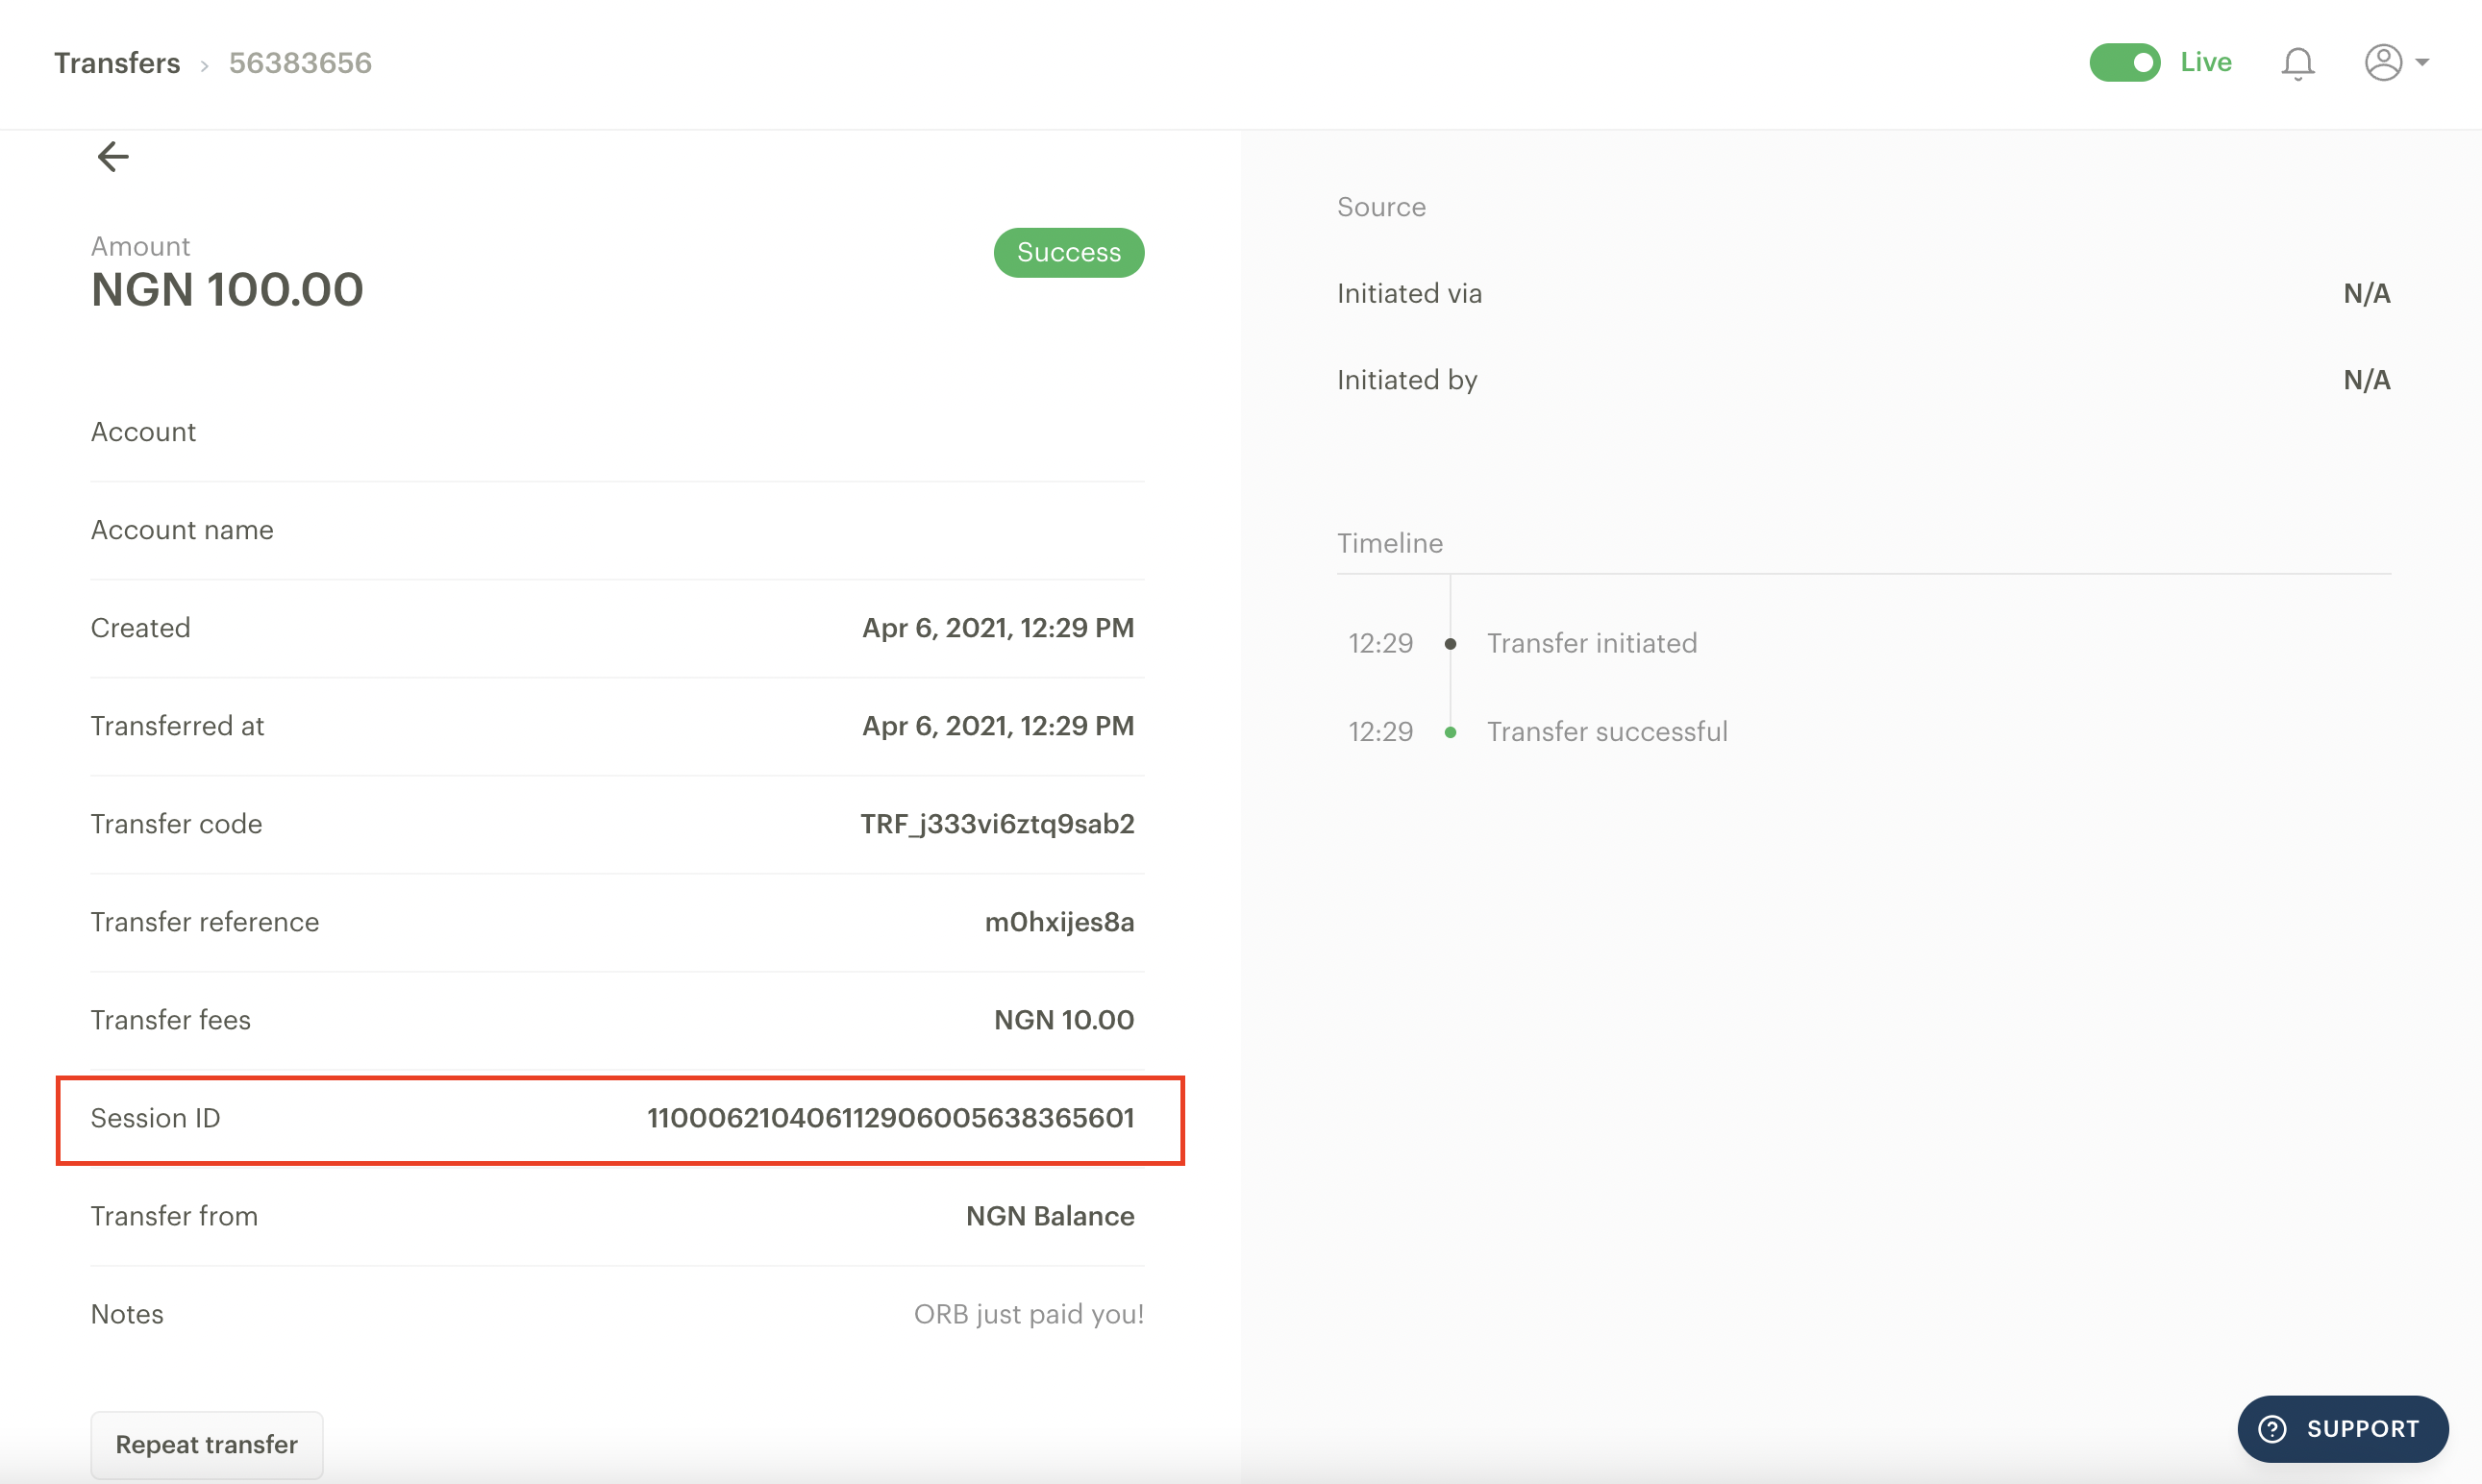
If your customer hasn't received a transfer that is successful on your Dashboard, you can share the session ID (for Nigeria-based businesses) and reference ID (for Ghana, Kenya and South Africa-based businesses) with the customer to take to their bank so they can trace the transfer on their end and apply it to their customer's account.
The session and reference IDs appear on the transfer information page of each transfer. Here's an example of what this looks like for Nigeria-based businesses:
Please feel free to reach out to us via email at support@paystack.com or via our contact form if you have any questions.

