
Single Sign On on the Paystack Dashboard
Single-Sign-On allows your team manage access to various applications using a single set of credentials through an identity management platform.
The Paystack Dashboard supports Security Assertion Markup Language (SAML) 2.0, an open framework that allows you create users and manage authentication and authorization. Most ID providers also support SAML e.g. Okta, Auth0, Entra ID (formerly known as Azure AD).
Paystack supports the following SSO features
Just-In-Time account creation: Automatically create new Paystack accounts for users without existing access upon their first SSO sign-in.
Granular Dashboard roles: Assign granular user roles through your IdP.
Service Provider-initiated SSO: Initiate SSO login directly from Paystack’s login page.
Single-Sign-On is available on-request to Paystack merchants. Contact our support team at support@paystack.com to enable the feature for your business. You will need to provide an existing admin user on your business to serve as the SSO admin.
Once SSO is enabled for your account, your admin can proceed to set it up from your dashboard settings with these steps
Confirm ownership of the email domain(s) your team uses
Set up your ID provider to work with Paystack
Set up your Paystack Dashboard to work with the ID provider
Confirm Domain Ownership
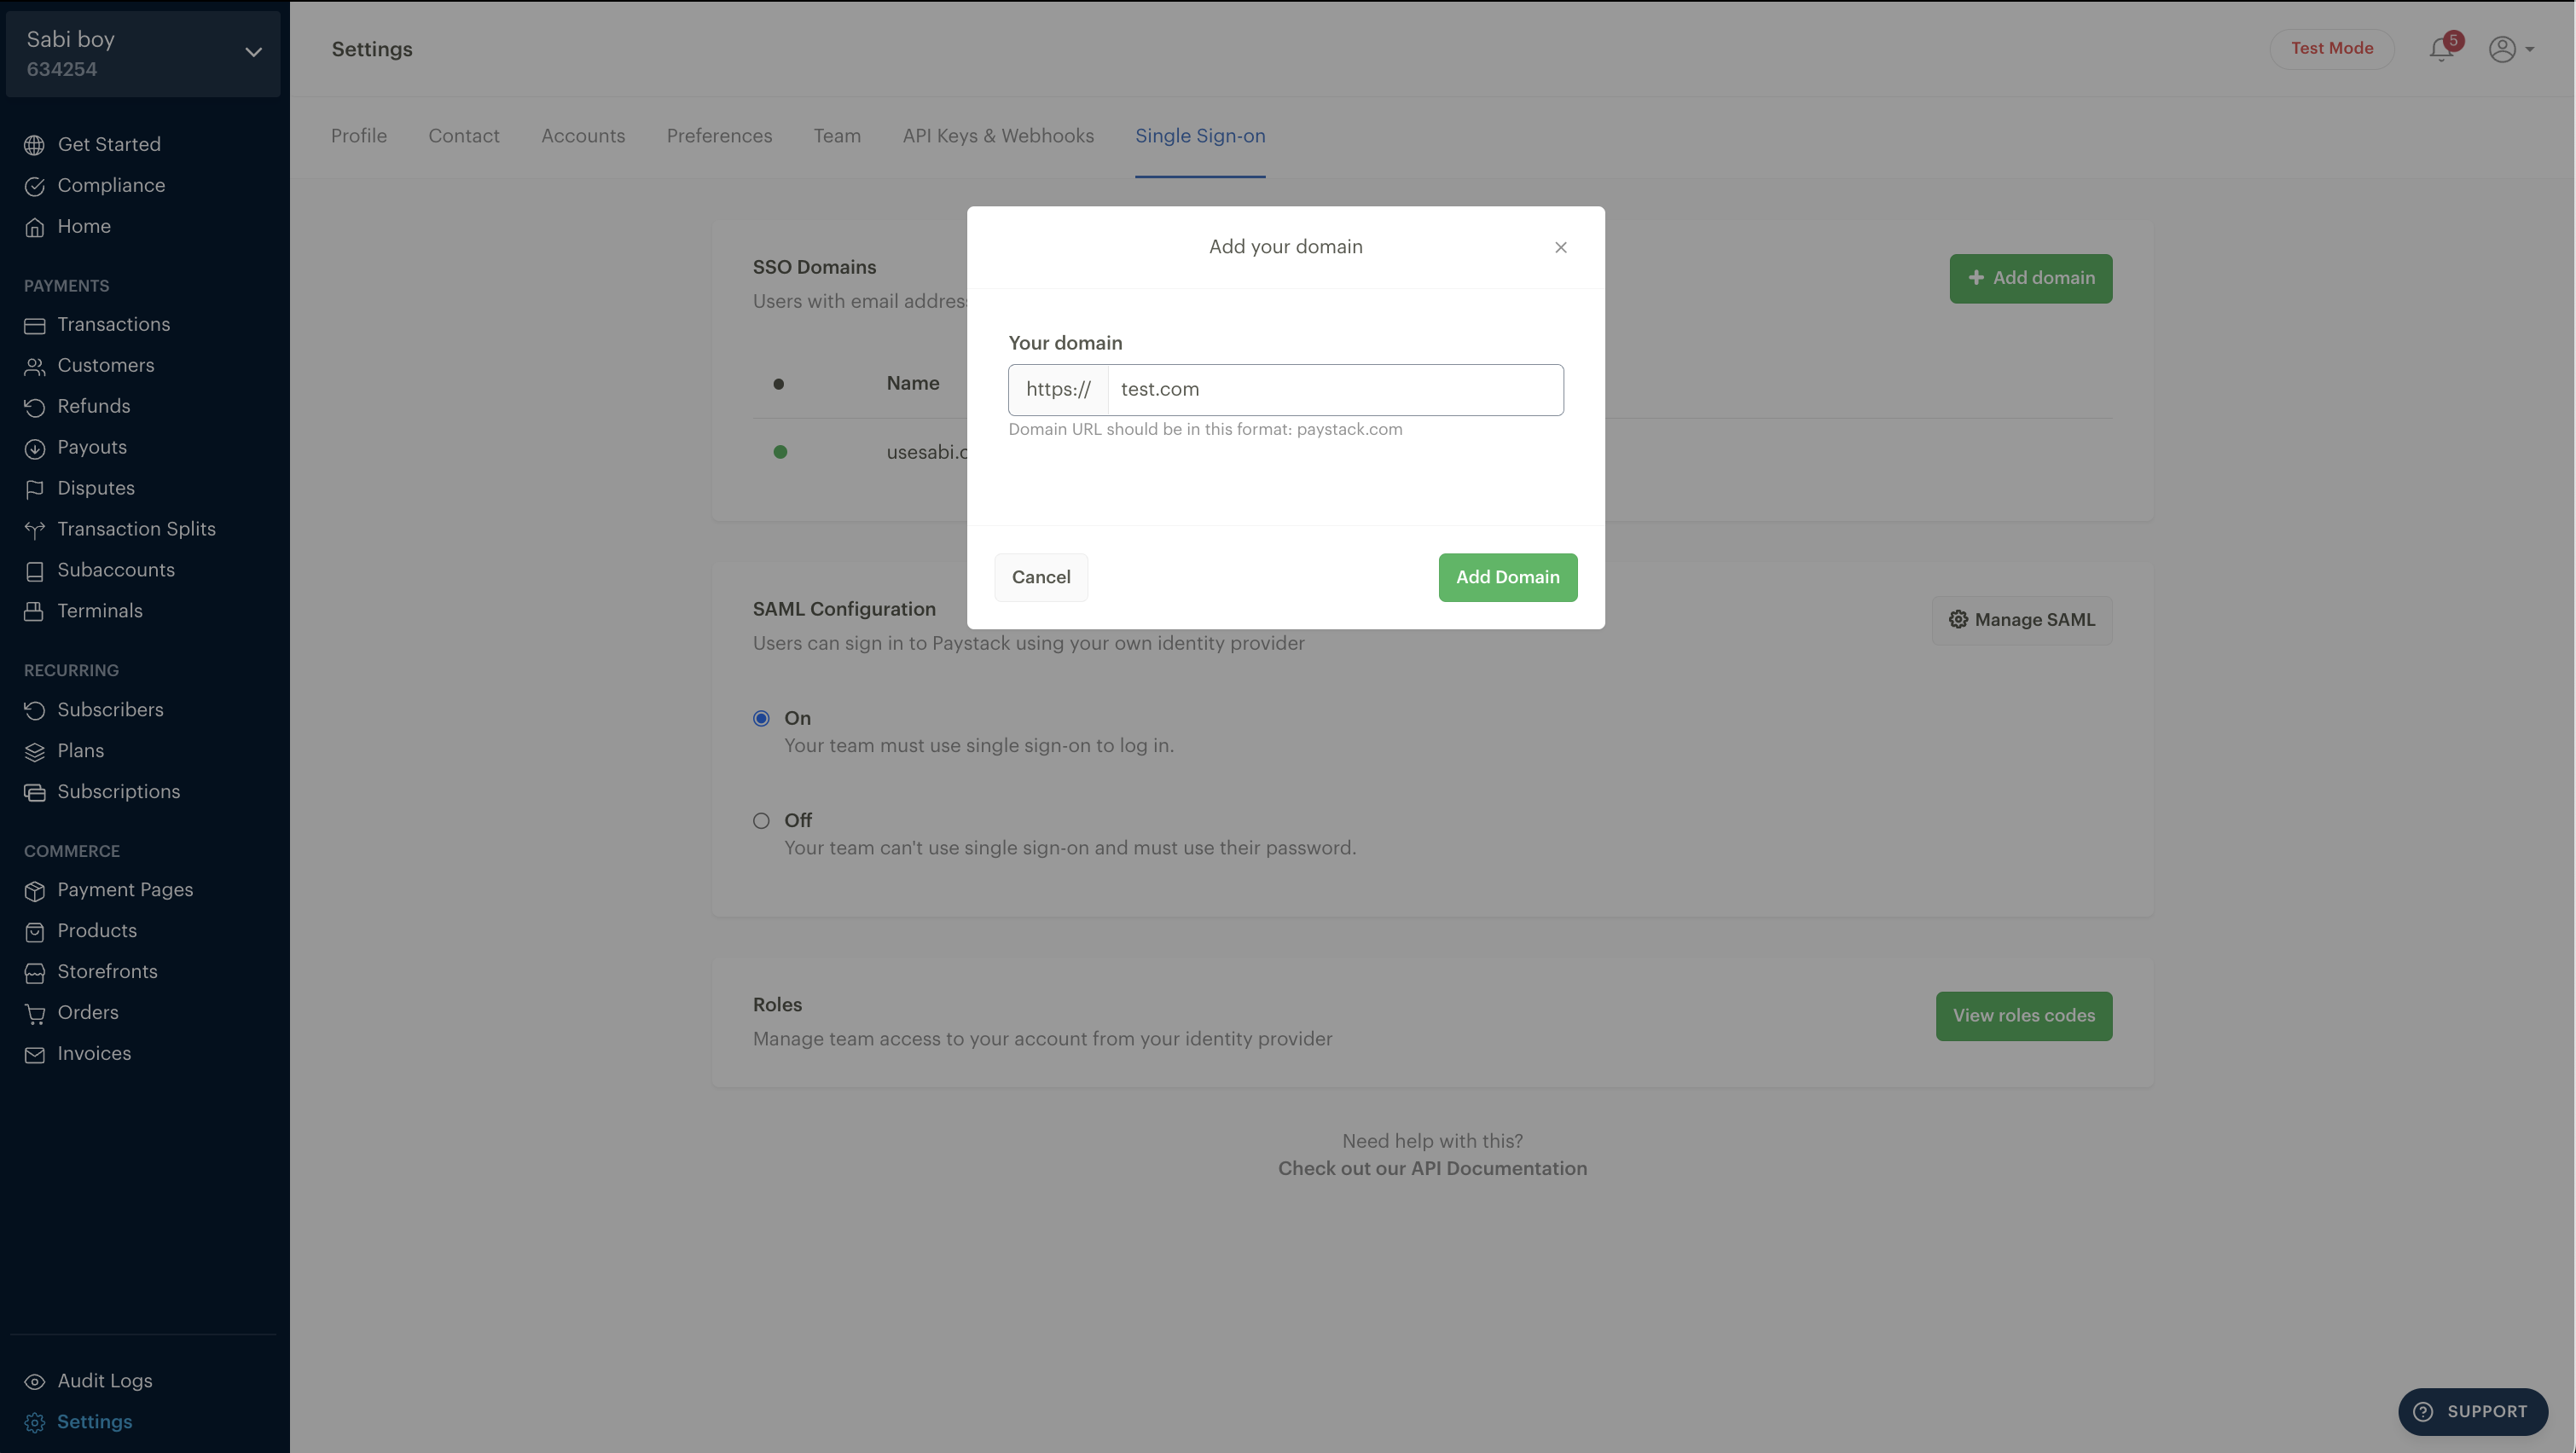
On the Single Sign-On settings page, click on “Add Domain”
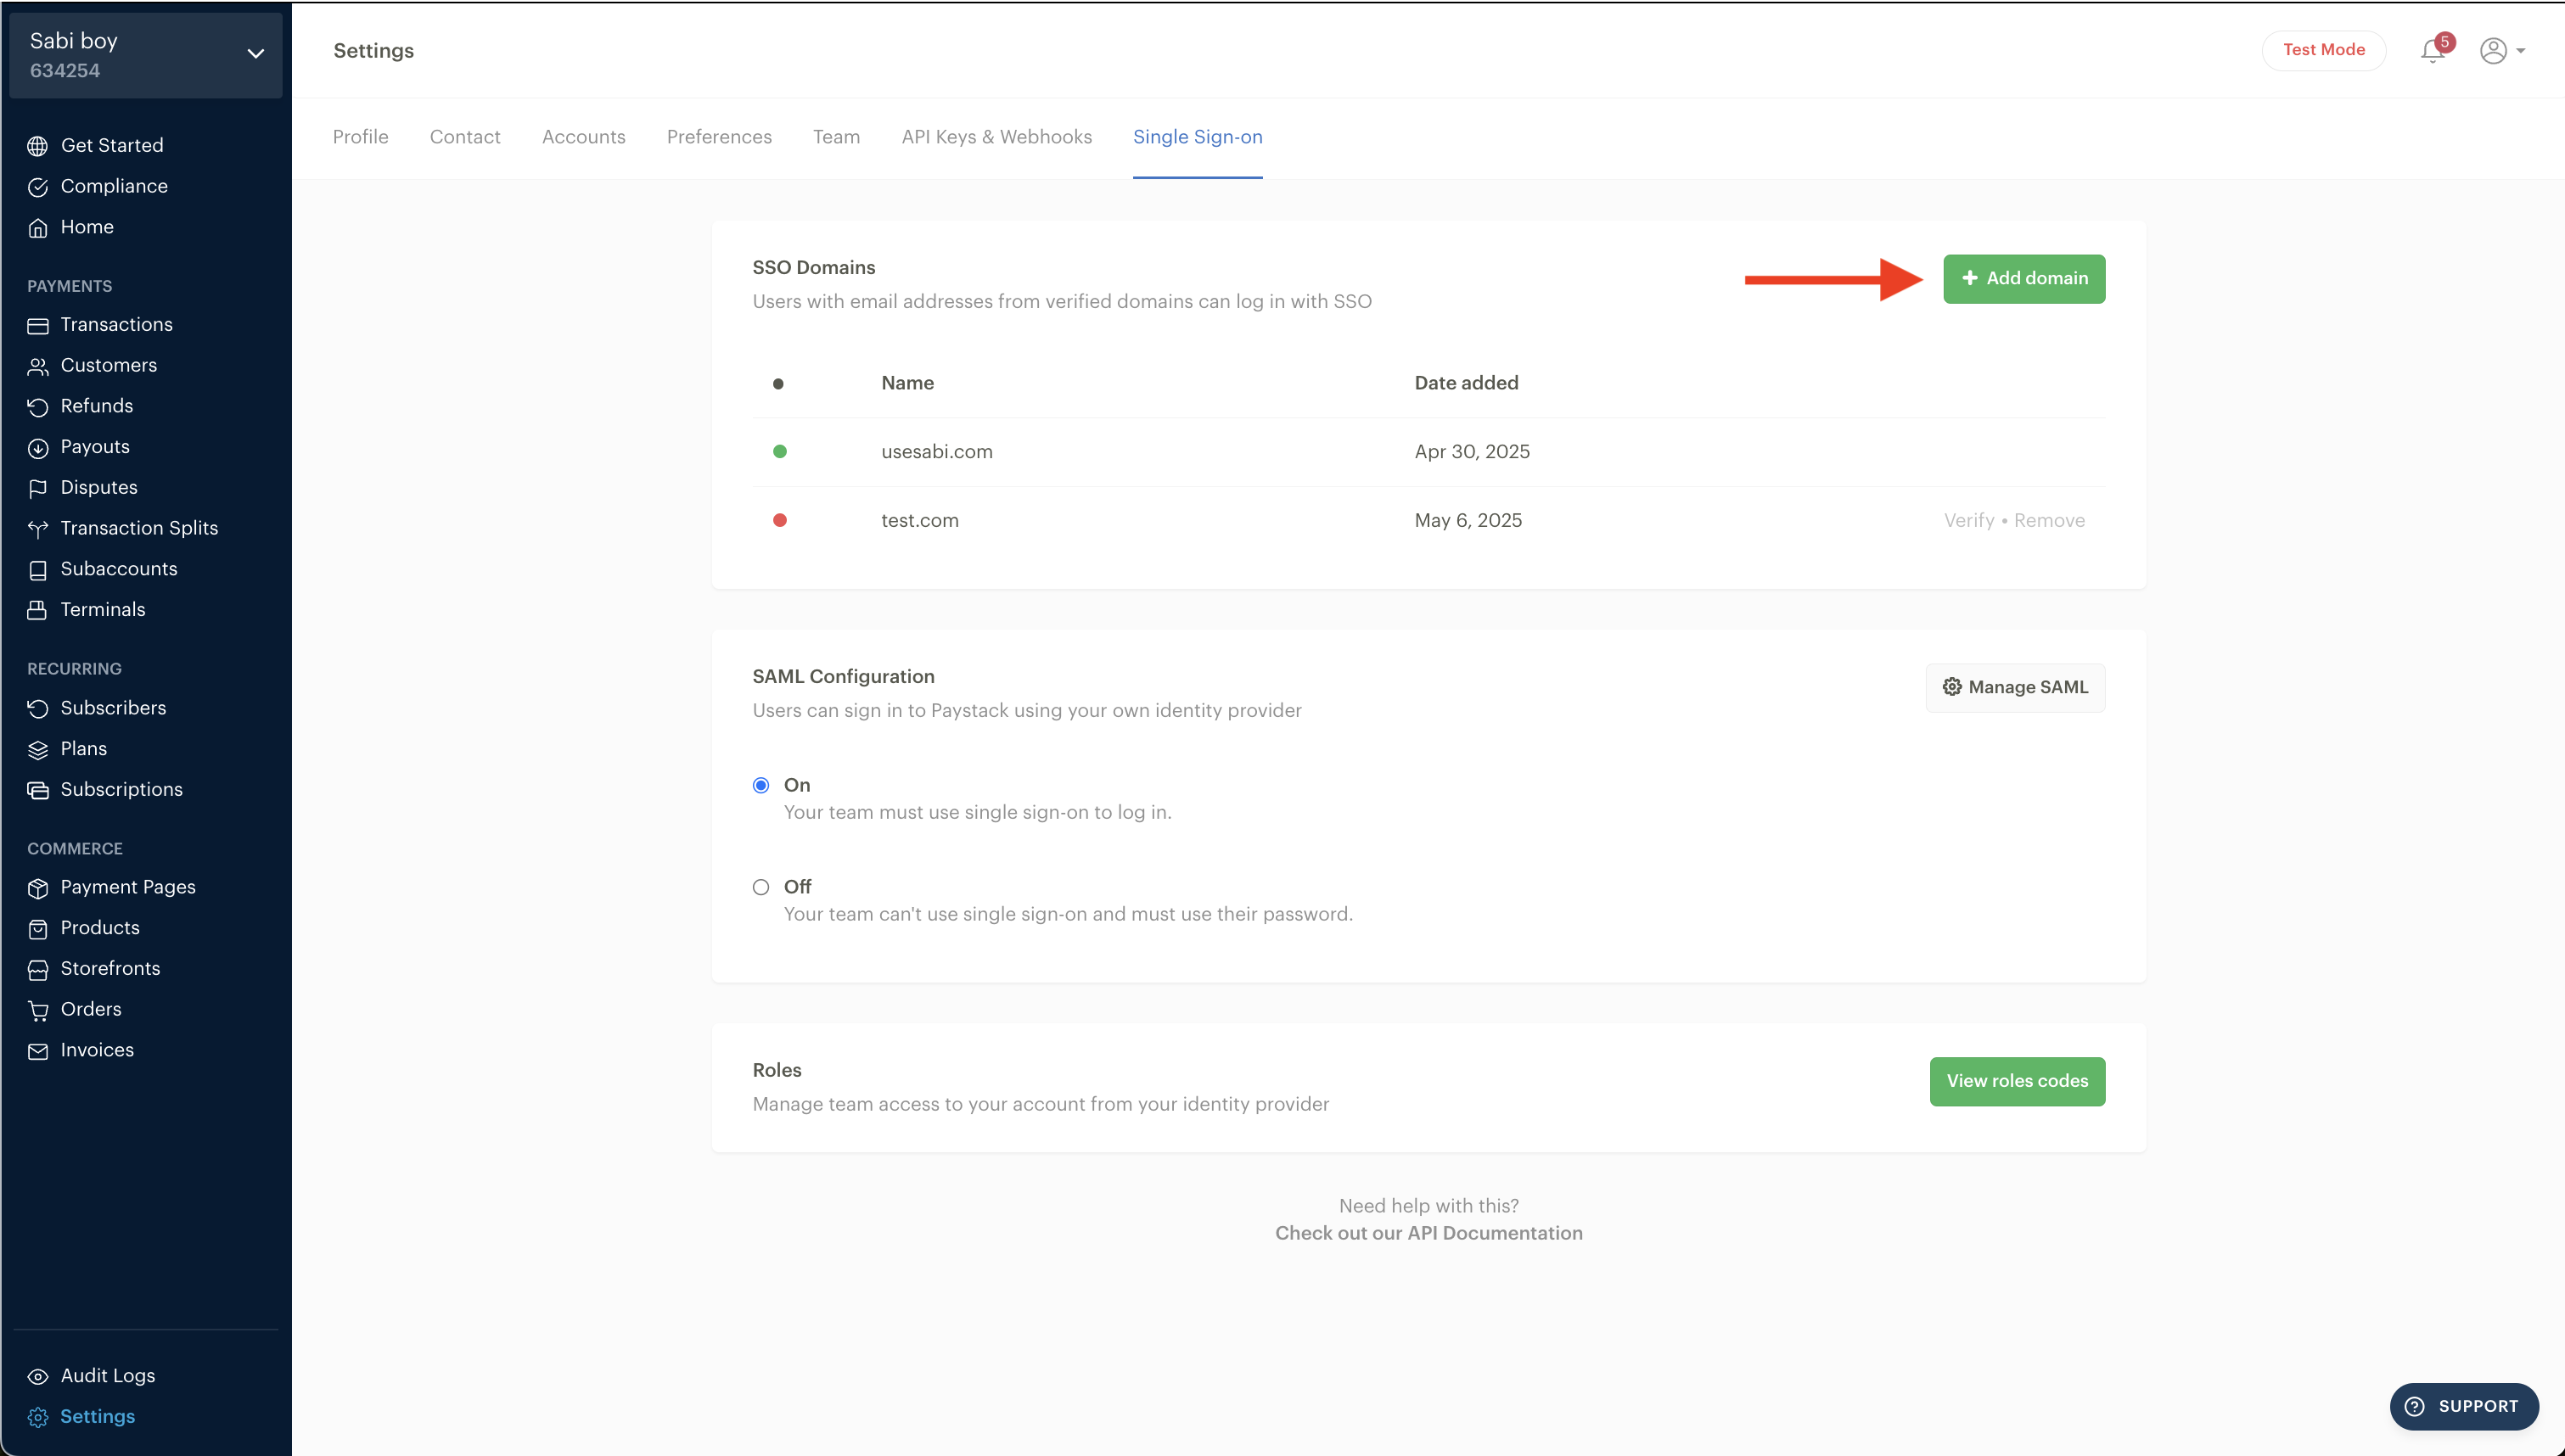
Type in the top level domain you want to verify (e.g. test.com)
You’ll receive a unique TXT record to add to your DNS records to verify domain ownership. Copy this TXT record and set it up on your DNS server.
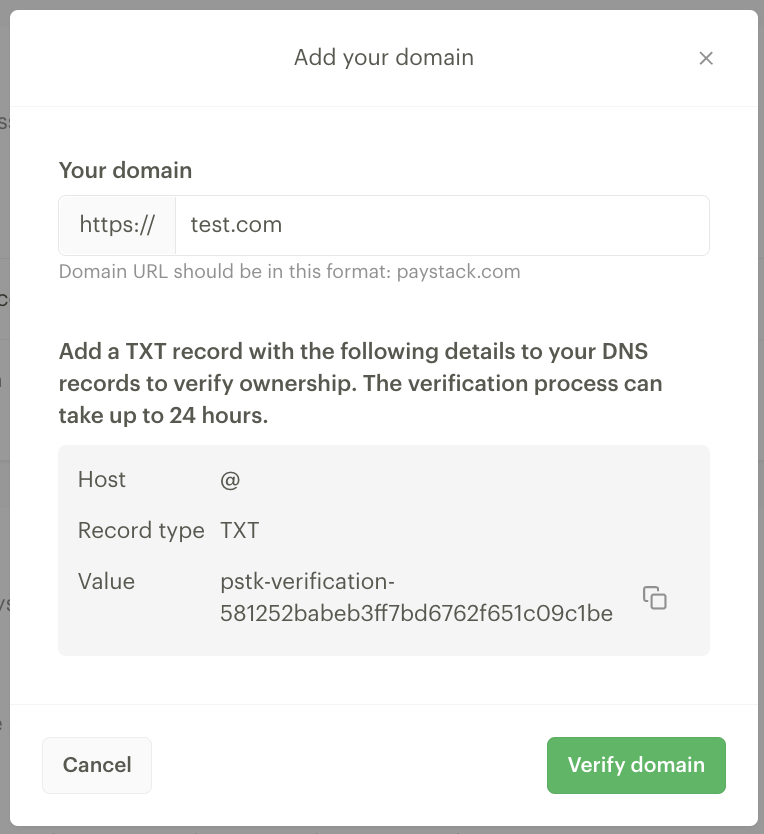
The verification process should complete immediately. If the domain can’t be verified immediately, wait 24 hours before you retry verification. You can also remove a domain if you choose to.
⚠️ Important to note: You must have at least one verified domain for SSO to remain active on your business.
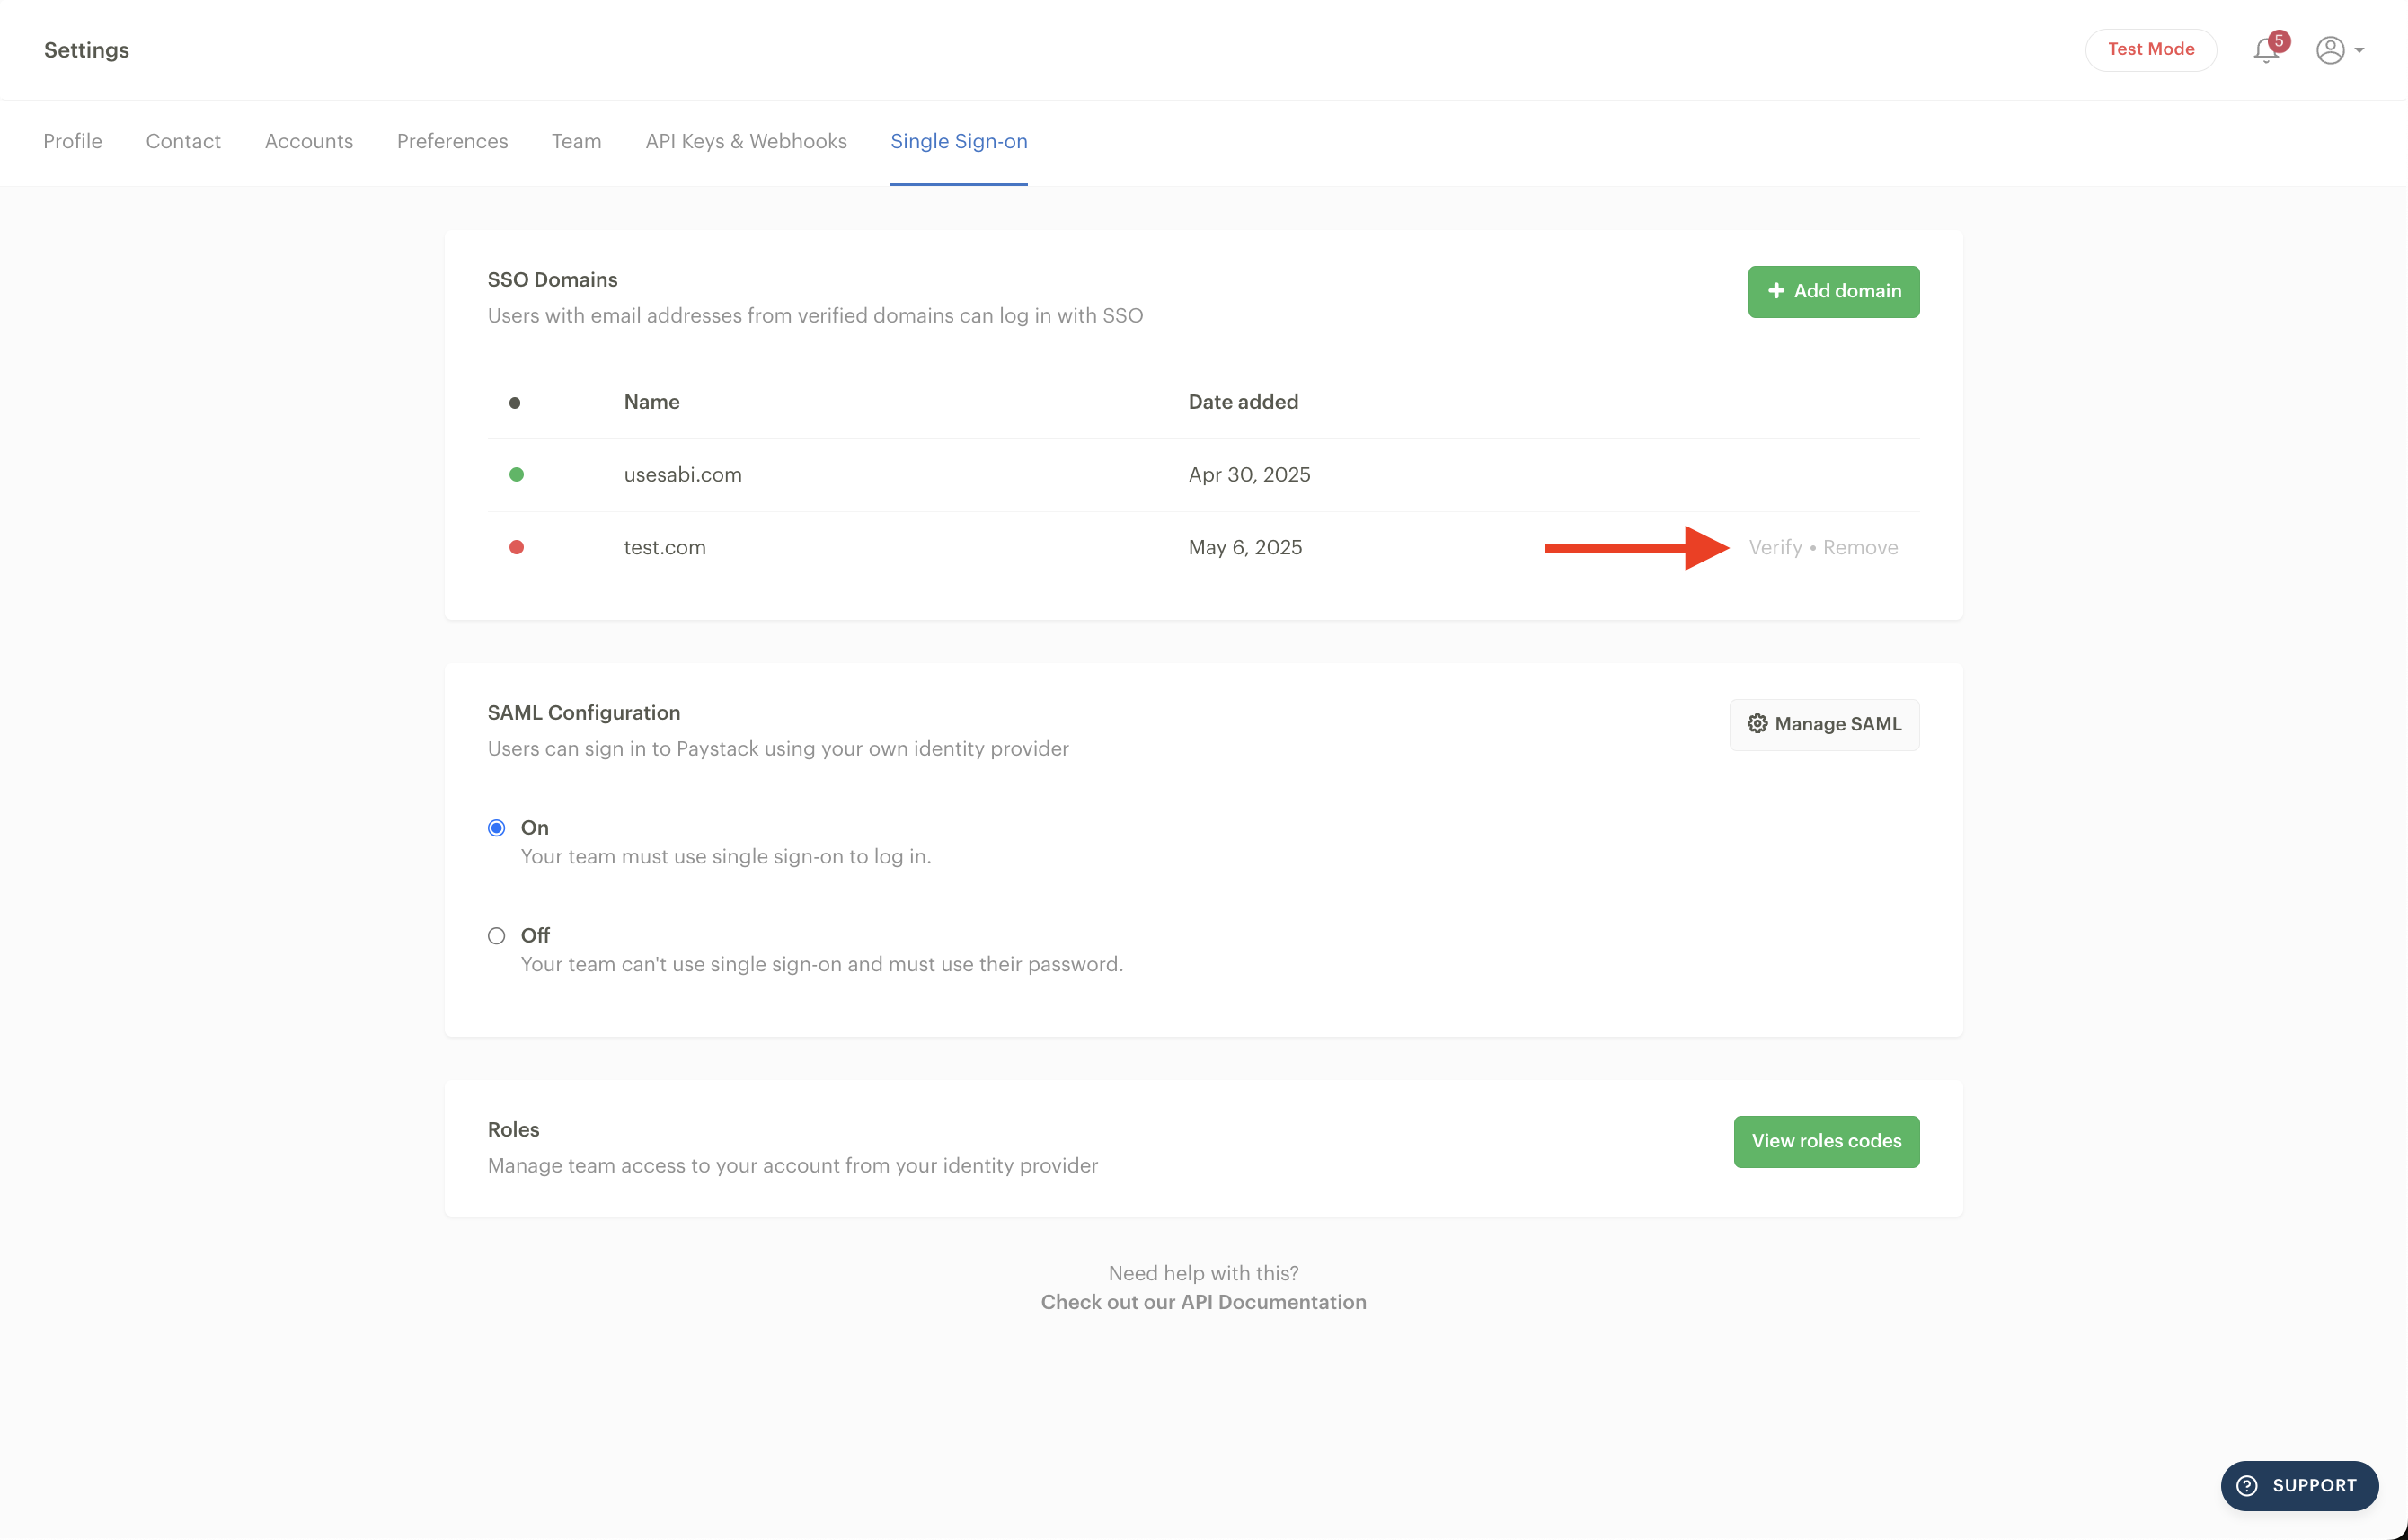
If the domain is invalid, you’ll get an error message immediately.
Set up your ID Provider to work with Paystack
Your admin will need to set up the Paystack dashboard as a service or application on your Identity Provider. This represents the relationship between your provider and Paystack.
Single Sign On URL - This value for Paystack is https://api.paystack.co/login/sso/acs.
Audience URL or Entity ID - An identifier for the Paystack Dashboard within the ID provider. This value for Paystack is https://api.paystack.co/login/sso/metadata.
Name ID - The identifier that team members have to provide when logging in from the ID Provider’s interface. The value for Paystack is EmailAddress.
You can also find the values above when you click on “Manage SAML” from your SSO settings page.
Security settings - The types of algorithms that will be used to encrypt and sign authentication messages. On your ID Provider, the Signature Algorithm should be RSA-SHA256 and Digest Algorithm should be SHA256
⚠️ Important to note:
You should always set up your IdP to sign both the SAML Assertion and Response.
User Management
You can give your users access to the Paystack dashboard from your Identity Provider without inviting them to your business on Paystack first. They will be granted access to your Dashboard once they try to log in.
While SSO is turned on for your Dashboard, these users can only be managed from your Identity Provider. If SSO is turned off on your Dashboard, you can manage users’ access from the Paystack dashboard.
You will be able to assign the Paystack Application to users from your IDP console after you’ve successfully added Paystack as an application. Navigate to the Paystack Dashboard application in your IdP;
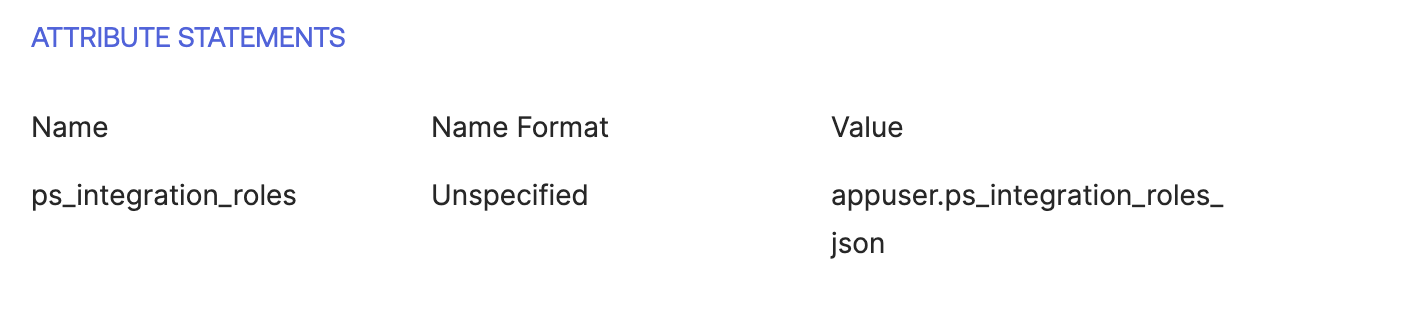
Create a SAML user attribute scoped to Paystack with data type
stringortext area.Name:
ps_integration_rolesDisplay name:
PS Integration Roles JSONYou’ll have to set an attribute statement on your SSO config that points to the user attribute in the application, so that it is available in the SAML assertion sent by the idP to Paystack backend. On some ID Providers you’ll have to create a custom attribute for the users first before mapping that attribute to the name above.

Some IdP’s will require you to create the custom user attribute first
When assigning a user to the Paystack application, populate the PS Integration Roles JSON attribute with a JSON object of the integration you’re trying to add the user to and the role you want to provision them with. Learn more about Paystack dashboard roles. here. You’ll have to repeat this for each user you’re adding to the Paystack application.
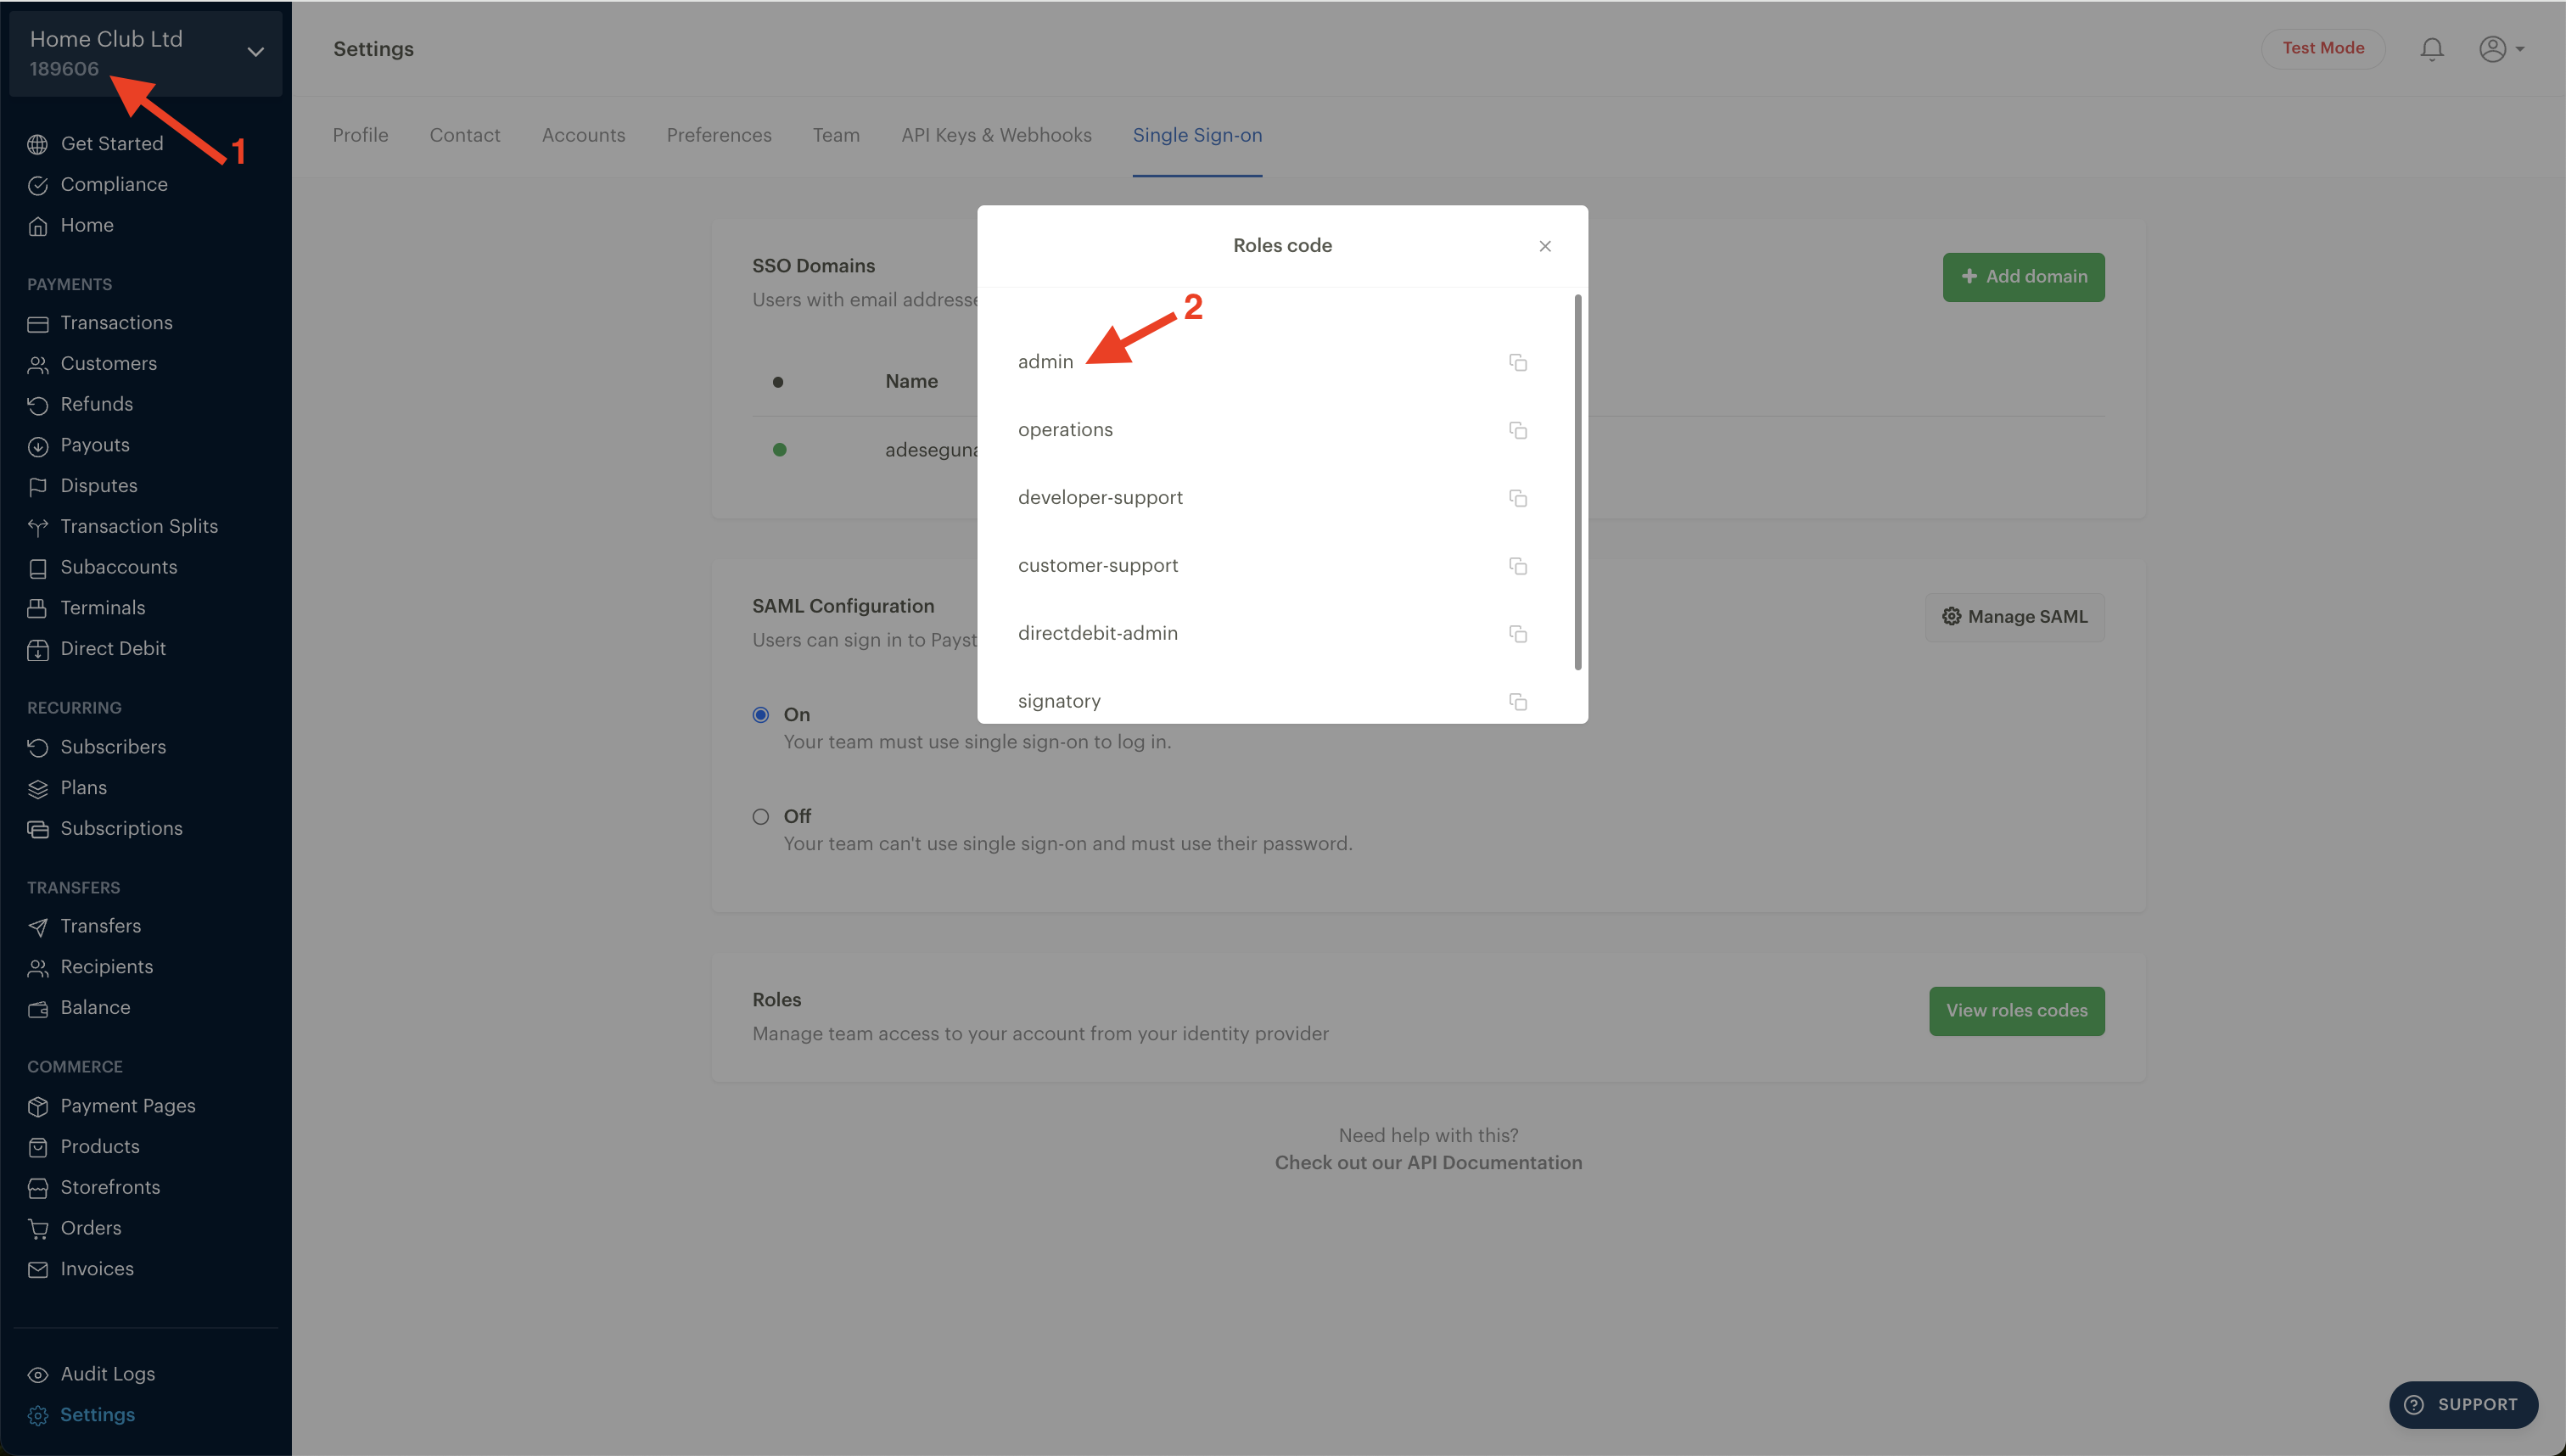
Role Codes: On your Paystack Dashboard, click on “View role codes” to see the codes representing all the available roles on your Paystack business. Copy the role codes into your identity provider when giving access to the dashboard.
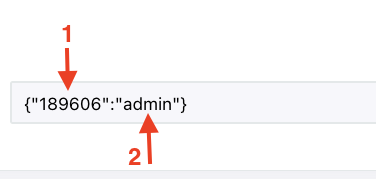
Here’s an example of the JSON required where you’re adding the same user as an admin on two Paystack businesses
{"412325":"admin","101256":"admin"}Set up your Paystack Dashboard to work with the ID provider
Once you’ve created the relationship with the Paystack dashboard from your ID provider, you’ll need to provide the relevant parameters from your provider on the Paystack Dashboard. The fields you’ll need from your ID provider are:
Identity Provider Entity ID - A unique identifier from your identity provider. If your ID provider doesn’t give you one by default you can enter a string in this field. Make sure to use the same value on the Paystack Dashboard and your IdP.
Identity Provider SSO URL - The URL where your dashboard team members are redirected to for them to authenticate. This should always be available from the IdP
ID provider certificate - The certificate your ID provider will use to sign SAML assertions.
To upload these fields on Paystack, click on “Manage SAML” on the Single Sign-On settings page.
SSO Configuration
Once you’ve set up SAML on your business, you can choose how you want users to be able to access your business. There are 2 options
On - Your team must use single sign-on to log in.
Off - Your team can't use single sign-on and must use their email and password, or passkeys.
After you finish configuring SSO, you can inform your users to sign in by selecting “Log in with single sign-on (SSO)” on the Paystack Login page.
⚠️ Important to Note: Your SSO Admin will always be able to log in using either their email address and password, passkeys, or SSO.